Asset Grouping Screen
Last Updated: 17 Dec 2015
The Asset Grouping screen allows you to define the grouping options for the asset in the list.
Bookmarks to the headings on this page:
You can group by one of the following options:
- Parent - for example, if the assets being shown have been created in Folder assets, you can group them by the Folders.
- Asset Field - for example, group the assets by their name or the date they were created.
- Metadata Field - for example, group the assets by the metadata field called Description.
- Keyword - for example, group the assets by their asset type using the keyword value asset_type.
You can also create groups within groups. For example, say you are showing all of the media releases in your Site. Within the Asset Map you have created a Folder for each year and then within that Folder, you have a Folder for each month. The media releases are then created in the Folders for the month. On the Asset Listing page, you can group the assets by year and then group them by month.
Tip: Once you have created and set up the groups on an Asset Listing, you need to change the List Format on the Details screen to Custom Grouping.
The Asset Grouping and Add New Group sections of the Asset Grouping screen are shown in the figure below.

The Asset Grouping and Add New Group sections of the Asset Grouping screen
Adding a New Group
By default, no grouping options have been created, as shown in the figure above. To add a new group, in the Add New Group section, select Add a new group level, select at the top level in the second list and select what to group by in the third list, for example Parent Asset. Once you have done that, click Commit. Additional fields will appear in the Asset Grouping section, as shown in the figure below.
The Asset Grouping section
A Group Format Bodycopy
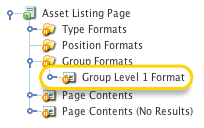
A Bodycopy asset will also appear under the Group Formats Folder in the Asset Map, as shown in the figure to the right. The Bodycopy allows you to format the layout for the group. For more information about the fields available in the Asset Grouping section, refer to the sections below.
Once you have added a group, you will be able to choose to add a new group after group level 1 or at the top level in the Add New Group section. If you select at the top level, this will add another group at the top level. In other words, a group 2 will be created. If you select after group level 1, a group will be created within group 1. This allows you to create a group within a group.
Setting Up a Group by Parent Asset
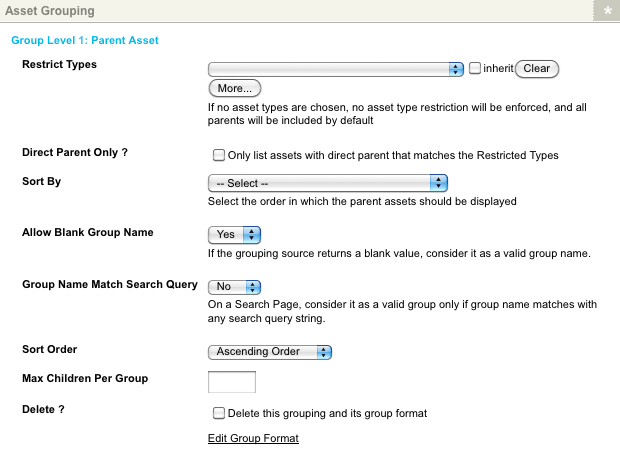
If you selected Parent Asset when you created a group, the fields shown in the figure below will appear in the Asset Grouping section of the Asset Grouping screen.

Grouping by Parent Asset
The fields that are available in this section are as follows:
- Restrict Types: select which asset type to group the assets by. For example, if you want to group the assets by the Folder they have been created in, select Folder. To add additional asset types, click the More... button. An additional field will appear on the screen. To remove an asset type from the list, click the Clear button and click Commit.
- Direct Parent Only?: select this option if you only want to show the assets that are a direct child asset of the parent asset type. For example, if you have selected Folder in the Restrict Types and you tick this field, the list will only show assets that are direct child assets of a Folder. If the asset has been created under another asset, it will not appear in the list.
- Sort By: select which field to sort the parent assets by. If you select Metadata Field you will be able to select a metadata field from the Asset Map to sort the parent assets by.
- Allow Blank Group Name: this option allows you to specify that blank source values should be considered valid for grouping, i.e. a group with no name. By default, this field is enabled, meaning that any blank source values will be used to group assets.
- Group Name Match Search Query: this option allows you to specify that only source values matching with a search query string should be considered valid for grouping. Please note that this field is only applicable when configuring the Asset Grouping screen of Search Page assets. For more information, refer to the Search Page chapter in the Search manual.
- Sort Order: select which order to sort the parent assets in. You can select either Ascending or Descending.
- Max Children Per Group: enter the number of assets to show within a group. For example, if you only want to show 10 assets per group, enter 10 into this field.
- Delete?: to delete the group, click this box and click Commit.
- Edit Group Format: when you click on this hyperlink, you will be taken to the Edit Contents screen of the group Bodycopy asset.
Setting Up a Group by Asset Metadata
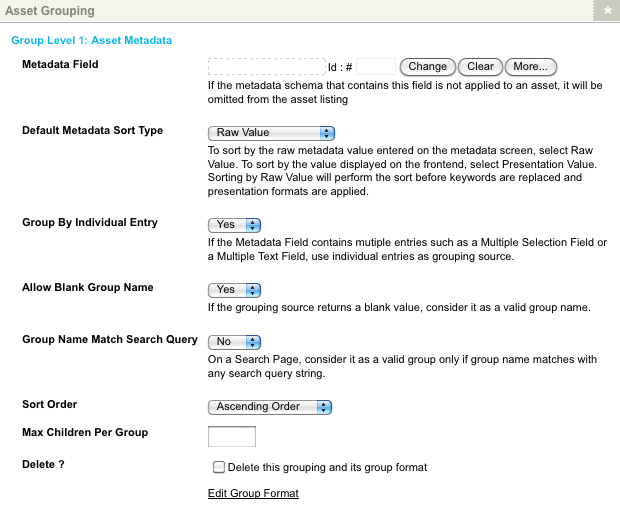
If you selected Asset Metadata when you created a group, the fields shown in the figure below will appear in the Asset Grouping section of the Asset Grouping screen.
Grouping by Asset Metadata
The fields that are available in this section are as follows:
- Metadata Field: select which metadata field(s) to sort the assets by. You can select multiple metadata fields by clicking the More... button; additional fields will be displayed, allowing you to make further selections.
- Default Metadata Sort Type: select which value to sort by. You can select either Raw Value which is the value that is entered on the Metadata screen or the Presentation Value, which is the value that appears in the HTML source code of the page. For example, if you are sorting by a select field, select Raw Value to sort by the Value (by default this appears on the Metadata screen) or Presentation Value to sort by the Key (by default this appears in the HTML source code).
- Group by Individual Entry: this option allows you to specify that individual values within a single metadata field should be used as separate grouping sources. Enabling this field will provide individual grouping sources for multiple values in Select, Multiple Text, Thesaurus and Hierarchy fields.
- Allow Blank Group Name: this option allows you to specify that blank source values should be considered valid for grouping, i.e. a group with no name. By default, this field is enabled, meaning that any blank source values will be used to group assets.
- Group Name Match Search Query: this option allows you to specify that only source values matching with a search query string should be considered valid for grouping. Please note that this field is only applicable when configuring the Asset Grouping screen of Search Page assets. For more information, refer to the Search Page chapter in the Search manual.
- Sort Order: select which order to sort the groups in. You can select either Ascending or Descending.
- Max Children Per Group: enter the number of assets to show within a group. For example, if you only want to show 10 assets per group, enter 10 into this field.
- Delete?: to delete the group, click this box and click Commit.
- Edit Group Format: when you click on this hyperlink, you will be taken to the Edit Contents screen of the group Bodycopy asset.
Setting Up a Group by Standard Asset Field
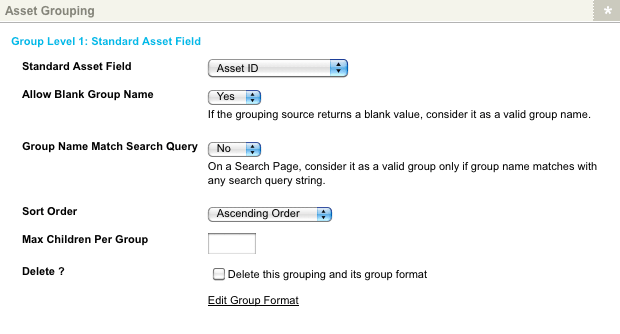
If you selected Standard Asset Field when you created a group, the fields shown in the figure below will appear in the Asset Grouping section of the Asset Grouping screen.
Grouping by Standard Asset Field
The fields that are available in this section are as follows:
- Standard Asset Field: select which asset field to group the assets by. For example, you can group the assets by their asset types.
- Allow Blank Group Name: this option allows you to specify that blank source values should be considered valid for grouping, i.e. a group with no name. By default, this field is enabled, meaning that any blank source values will be used to group assets.
- Group Name Match Search Query: this option allows you to specify that only source values matching with a search query string should be considered valid for grouping. Please note that this field is only applicable when configuring the Asset Grouping screen of Search Page assets. For more information, refer to the Search Page chapter in the Search manual.
- Sort Order: select which order to sort the groups in. You can select either Ascending or Descending.
- Max Children Per Group: enter the number of assets to show within a group. For example, if you only want to show 10 assets per group, enter 10 into this field.
- Delete?: to delete the group, click this box and click Commit.
- Edit Group Format: when you click on this hyperlink, you will be taken to the Edit Contents screen of the group Bodycopy asset.
Setting Up a Group by Keyword
If you selected Keyword when you created a group, the fields shown in the figure below will appear in the Asset Grouping section of the Asset Grouping screen.
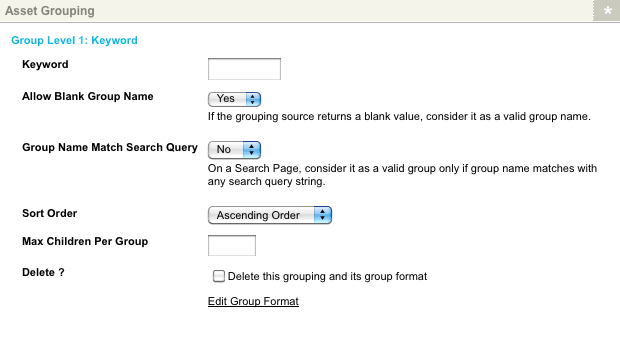
Grouping by Keyword
The fields that are available in this section are as follows:
- Keyword: enter the keyword to group the assets by. Please note that this keyword value should not be surrounded by percentage (%) signs.
This option can be useful when sorting Data Source Record Set assets, which do not expose their field values as attributes; for example, you could enter the ds__recDocumentType keyword value to sort assets by their Document type (Wordpad Documents, Email Messages, PDF Files etc). - Allow Blank Group Name: this option allows you to specify that blank source values should be considered valid for grouping, i.e. a group with no name. By default, this field is enabled, meaning that any blank source values will be used to group assets.
- Group Name Match Search Query: this option allows you to specify that only source values matching with a search query string should be considered valid for grouping. Please note that this field is only applicable when configuring the Asset Grouping screen of Search Page assets. For more information, refer to the Search Page chapter in the Search manual.
- Sort Order: select which order to sort the groups in. You can select either Ascending or Descending.
- Max Children Per Group: enter the number of assets to show within a group. For example, if you only want to show 10 assets per group, enter 10 into this field.
- Delete?: to delete the group, click this box and click Commit.
Group Format Bodycopy

A Group Format Bodycopy
Whenever you create a new group on the Asset Grouping screen, a Group Format Bodycopy is created under the Group Formats Folder in the Asset Map, as shown in the figure to the right. These Bodycopy assets allow you to format what to show for each group in the list.
To change what information is being shown for a group, right click on the Group FormatBodycopy in the Asset Map and select Edit Contents. Click on the ![]() icon – the WYSIWYG Editor will appear where you
can use keyword replacements and formatting to layout the information to show on the page. By default, the keyword replacement Asset Group Listing will appear in the WYSIWYG Editor.
icon – the WYSIWYG Editor will appear where you
can use keyword replacements and formatting to layout the information to show on the page. By default, the keyword replacement Asset Group Listing will appear in the WYSIWYG Editor.
Tip: If you do not include the keyword replacement Asset Group Listing on the Group Format Bodycopy, the list of assets will not appear within that group.
Keyword Replacements on the Group Format Bodycopy
A list of keyword replacements is provided in the WYSIWYG Editor toolbar on the Edit Contents screen of the Group Format Bodycopy. You can use these keyword replacements in conjunction with text, images and links etc to layout the group for the Asset Listing page. The standard keyword replacements that are available include the following:
- Asset Group Listing: this will show the list of assets for the group. This keyword replacement needs to be included so that the list of assets for the group is shown on the page.
- Asset Group Name: if you are grouping by the parent asset, this will show the name of the parent asset. For example, if you have created a Folder called January and it is a group on an Asset Listing page, January will appear on the page.
- Asset Group Name Linked: if you are grouping by the parent asset, this will show the name of the parent asset. This will also be hyperlinked to that asset. For example, if you have created a Folder called January and it is a group on an Asset Listing page, January will appear as a hyperlink on the page.
- Contents of the Parent Asset: if you are grouping by the parent asset, this will show the content of the parent asset and use any Paint Layouts that have been applied to the asset.
- Raw Contents of the Parent Asset: if you are grouping by the parent asset, this will show the content of the parent asset but will not use any Paint Layouts that have been applied to the asset.
- Asset Group Immediate Child Group Count: this will show the number of assets that are direct child assets of a group. For example, if you have created a Folder called January that has two PDF Files this will show 2. If those PDF Files have any child assets they will not be counted, as they are not direct children of the JanuaryFolder.
- Asset Group Total Child Asset Count: this will show the total number of assets that are under a group.
If you are grouping by the parent asset, along with these keyword replacements you can use the standard keyword replacements to show information about the parent asset. The keyword replacement, however, should be prefixed with parent_ instead of asset_. For example, if you want to show the date the parent asset was created, use the keyword replacement .
Example of Grouping Assets on an Asset Listing Page
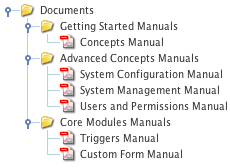
Example PDF File assets
To see how to add and set up a group on an Asset Listing, consider the following example. An Asset Listing called Manuals has been set up under a Site. It is showing all PDF Files under the DocumentsFolder (as shown in the figure to the right). We want to group by the Folder they have been stored in. To set up this group, follow the steps outlined below.
- Right click on the Manuals asset in the Asset Map and select Asset Grouping.
- In the Add New Group section, click Add a new group level, select at the top level from the first list and select Parent Asset from the second list.
- Click Commit. Additional fields will appear in the Asset Grouping section and a Group Format Bodycopy will appear under Group Formats Folder in the Asset Map.
-
In the Asset Grouping section, set the following fields:
- Restrict Type: select Folder. This means that the PDF Files will be grouped by the Folder they have been created in.
- Sort By: select Name. This means that the groups will be sorted by the name of the parent asset.
- Click Commit.
- Right click on the Group Format Bodycopy in the Asset Map and select Edit Contents.
-
Format what to show for the group. An example of what you can do is shown in the figure below.

The WYSIWYG Editor on the Group Format Bodycopy -
Right click on the Asset Listing in the Asset Map and select Details.

The List Format field - Change the List Format field to Custom Grouping.
-
Click Commit. When you preview the Asset Listing page, the asset will be grouped by the Folder they have been created in, as shown in the figure below.
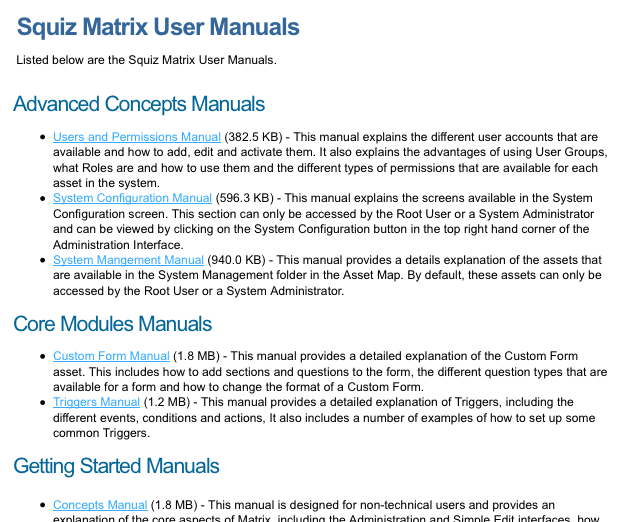
An example Asset Listing using groups
