Details Screen
Last Updated: 19 Apr 2017
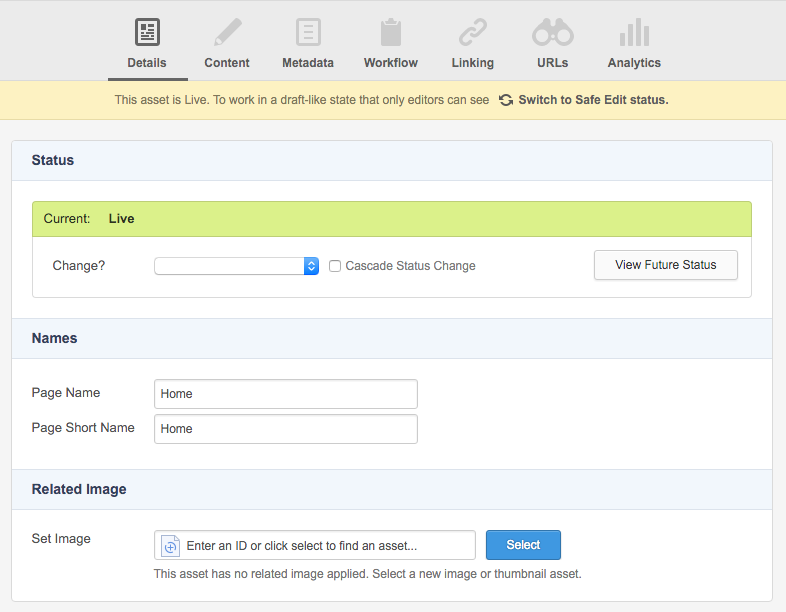
The Details screen allows you to change the status of the asset, change its name, and set a related image.
Depending on the asset type you are editing, this screen might have various additional options available to it. This page describes the generic functionality found on the Details screen of all asset types.
The Details screen for a Standard Page is shown in the example below.

Status

- Current: This is current Status of the asset. The background colour will change depending on what Status the asset is in.
- Change: To change the Status, select a status option from the list. The options available will depend on the current Status of the asset, what permissions you have, and whether or not Workflow is applied.
For example, if the asset is currently Under Construction and you have Admin Permission, the available options would be Approve, Make Live, and Archive. If there is Workflow applied to the asset then the available options might only be Apply for Approval and Archive. - View Future Status: This button will open the Future Status settings, allowing you to schedule a Status change for the asset at a specified future date and time. For more information, refer to the Future Status section below.
- Cascade Status Change: Check this box to cascade the Status change to all child assets.
Depending on the number of child assets, this might take a long time to process.
For more information on the Statuses available within Squiz Matrix, refer to the Squiz Matrix Concepts chapter in the Concepts manual.
Future Status
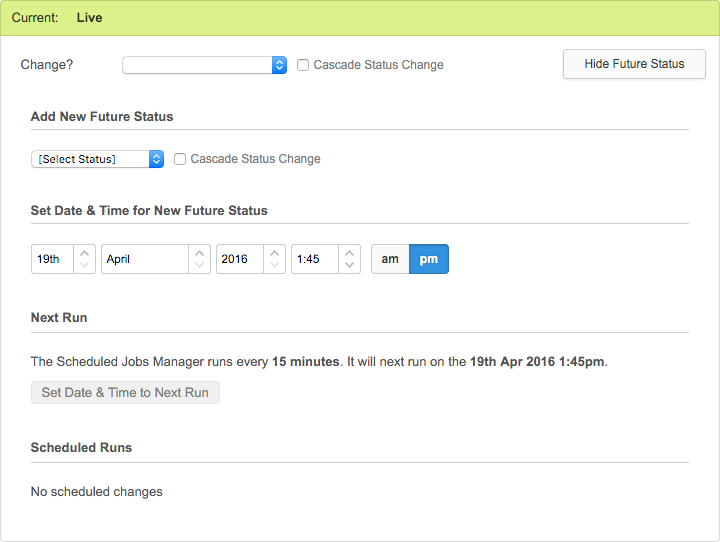
This section allows you to set the Status of the at asset at a scheduled date and time in the future.
You can choose to hide and prevent use of the Future Status settings in the Edit+ configuration file. For more information, refer to the Installation Guide chapter in the Edit+ manual.
To access these fields, click the View Future Status button in the Status bar - additional fields will appear on the screen.
These fields will only be available if the Scheduled Jobs Manager has been configured to run.

- Add New Future Status: Select the desired Status you wish the change the asset to in the future.
- Cascade Status Change: Check this box to cascade the Future Status change to all child assets.
- Set Date & Time For New Future Status: Select the date and time that the Future Status change will occur.
- Next Run: Alternatively, you can click this button to set the Future Status change to occur on the next run of the Scheduled Jobs Manager.
- Scheduled Runs: Scheduled Future Status changes will appear in this section. To delete a Future Status change, check the corresponding delete box and click Save. This scheduled Future Status change will be deleted and will no longer occur.
Names
This section allows you to change the name and short name of the asset.
- Name: Enter a name for the asset. By default, the name that was entered when the asset was first created will appear in this field.
- Short Name: Enter a short name for the asset. The short name is shown in the Asset Finder and can be different to the asset name. Depending on your site's design implementation, this value usually appears in things like menus and breadcrumbs.
Related Image
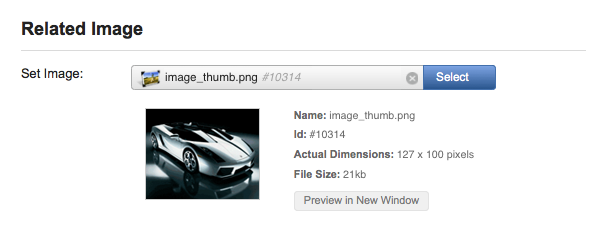
This section allows you to assign a related image to the asset.
You can choose to hide and prevent the use of the Related Image settings in the Edit+ configuration file.
In the Set Image field, select an Image or Thumbnail asset to assign as the related image for the Standard Page. If a related image has been assigned, image information will be displayed below the field once the change has been saved.

