
Personalisation Framework
Last Updated: 30 Jul 2021
Overview
The Personalisation Framework extension lets you add granular personalisation to your page and container assets in Squiz Matrix.
The extension adds a traits layer to the personas and variations features in Matrix which allows you customise how users that visit your site see the content.
Prerequisites
Read the following prerequisites and information before installing and using the Personalisation Framework.
Key package information
Minimum supported Matrix version | 5.5.5.0 |
|---|---|
Extension type | Matrix implementation |
| Extension version | 1.2.2 |
Installation method | Asset import |
Interface availability | Edit+ (recommended) Admin (supported) |
Minimum user account level | Simple edit user (once installed) |
Features
The personalisation framework provides the following extensions to the personas and variations functionality in Matrix:
- Track traits for your users
- Have users automatically assigned to personas based on their traits
- Target containers and variations to particular personas
- Manage personalisation settings from within the Edit+ authoring environment
- Test what content shows/hides for what personas in preview mode
- Programmatically apply users to personas (opt-in)
- Both pages and containers can have multiple personas associated with them
- Containers can have four types of evaluation logic applied:
- all personas must match
- any persona must match
- all personas must not match
- any persona must not match
Limitations
The following limitations apply to the extension:
- Only Standard Page asset types and their containers can be personalised.
- Personas are not editable when Safe Trash is applied to these assets types.
- The framework requires JavaScript to run on your website, otherwise only default content is displayed.
- The settings interface is not supported in Admin mode.
- Personalisation does not work in private browsing mode on Safari iOS.
Installing the extension
Admin access to your site's configuration assets is required to install this extension.
Download and import
- Download the Personalisation-Framework.tgz import file from the Squiz Marketplace.
- Import the file into Matrix using Tools > Import Assets from XML. This will create a set of assets in your system that the extension is made up of.
Make sure the root node it’s installed under has a URL. This should ideally be somewhere under the configuration area of your site's implementation.
Include the Edit+ config to your site
You need to add the Edit+ configuration to your site so it is available in Edit+.
- In the Asset tree where you imported the assets from the import file, navigate to Personalisation > Configuration > Includes > Personalisation editplus include.
- Copy the ID of this asset.
- Using a globals keyword, include that asset’s content in the Edit+ custom configuration, replacing
<asset-id>with your asset ID.
<!--@@ Personalisation Edit+ includes @@-->
%globals_asset_contents_raw:<asset-id>%
If you don’t have a custom Edit+ include set up, follow the instructions in the Customising global edit configurations in the Edit+ Installation Guide.
Include the frontend config to your site
You need to add the frontend configuration to your site so it is available in the footer of all your pages.
- In the Asset tree, navigate to Personalisation > Configuration > Includes > Personalisation frontend include.
- Copy the ID of this asset.
- Using a globals keyword, include that asset’s content in the footer of your site, replacing <asset-id> with the ID.
<!--@@ Personalisation front end includes @@-->
%globals_asset_contents_raw:<asset-id>%
Move "personalisation settings" under your main site
You need to move the personalisation settings under your main site so there is an interface to manage the personalisation.
- In the Asset tree, navigate to Personalisation > Configuration > Includes > Personalisation settings.
- Move this asset under your main site.
Check and update the Personalisation Settings
Verify that the personalisation settings are correctly applied to your main website.
- Open the "Personalisation settings" asset in Edit+ and go to the content screen.
- Click the General settings tab.
- In the Personas folder, add the name of the ID that is wrapping your content:
- Do not include the # (eg:
main). - If you do not have an ID on the wrapping div, you must add one.
- Do not include the # (eg:
Apply "Allowed Root Nodes" to personas
- In the Asset tree, navigate to Personalisation > Personas > First visit.
- Set the Allowed Root Nodes setting to your Site Asset ID.
- Repeat steps 1. and 2. for all Persona assets.
Using the extension
Terminology
The following terms are used extensively in this article. Review the following terminology before continuing with the setup procedures.
| Term | Description |
|---|---|
Personas | Personas are used to define a user type. For example, a “first-time” visitor. With the framework installed, extra data about the persona is saved to the Persona asset in Matrix. See the Persona documentation for general information about the Persona asset type. |
| Traits | A trait is an attribute of a persona. Think of traits as facts that you want to store about users as they visit the site. |
| Variations | Variations are settings that can be applied to standard pages within Matrix. Once a Persona is applied to a Variation, the page’s content will only show for that persona. See Variation Settings in the Standard Page documentation for more information about setting up Variations. |
Persona conditions
To determine how a user fits into a persona, conditional operators are used to evaluate traits associated with the persona.
You use these conditions in the Persona evaluation section.
| Operator | Description |
|---|---|
= | Equals |
=* | Equals if set |
! | Not |
!* | Not if set |
< | Less than |
<* | Less than if set |
> | Greater than |
>* | Greater than if set |
n | Not set |
You can evaluate different traits with the same operator. But you can not evaluate the same trait with different operators.
For example, if you want to use the trait site-visits in a persona, you could not use evaluation conditions in the following way:
site-visits > 5 < 10
Personalisation settings
Most of the personalisation management is handled in Edit+ via the content screen of the Personalisation Settings asset. The settings are broken into the following tabs:
- General settings
- Personas
- Tracking Rules
General settings
The general settings tab allows you to define the following variables.
| Variable | Description |
|---|---|
| Persona metadata |
The asset ID of the metadata field applied to each content container. This field links the metadata to the asset that stores the targeting rules. |
| Content wrapper id | The unique CSS ID of the main page container. This ID is used within the frontend personalisation code to specify where the framework should look for sections of content to be personalised. |
Personas
The Personalisation Framework comes with 3 built-in personas:
- First-time visitor
- Return visitor
- Campaign visitor
These use traits and conditions to validate if a user fits into one or more of these personas.
Adding a persona
The following can only be done through the Admin interface.
How to add a persona to your site:
- In the Asset tree, navigate to the Personalisation > Personas asset.
- Right-click on the Persona asset and select New Child > Personalisation > Persona to add a persona asset within this folder. Do not nest personas within folders, they will be ignored.
- Name the asset according to the name you want the persona to have in editing interfaces.
- In the Allowed Root Nodes field, select a root node that includes your site content.
- Edit the details screen of the persona:
- Enable the Client Side Evaluation Settings setting.
- Set a unique key for the persona. The key must be lower-case, unique, and should not be changed after it is set.
- Click Save to save your changes.
Customising a persona
Load the persona you created in Edit+ to finishing editing the persona:
- In Edit+, open the Personalisation settings asset and go to the content screen.
- Open the Personas tab.
- Set the persona attributes according to the reference table in this section.
- Click Save persona (not the Save button at the top of the page) to save the changes you made to the persona attributes.
You should now see an updated list of personas, with your new colour-coded persona in the list.
You can now use your persona for targeting content in Edit+ mode, and testing content in preview mode.
Persona attribute reference
| Persona Attribute | Description |
|---|---|
| Colour | Select a colour to help identify the persona. Answer these questions when selecting a colour:
|
| Summary |
Describe what the persona targets and how it should be used. The testing tool shows this summary in preview mode when editing page content. |
| Conditions | You can add and remove as many rows of conditions as required using the Add a condition and Remove buttons. Each condition lets you specify the following values:
|
Tracking rules
Tracking rules are used to learn information about users to help decide which personas they should belong to, based on things we can infer from their browsing activity.
Tracking rules help you decide which personas a user should belong to based on their browsing activity.
You can collect information about a user's browsing habits at the following points of a page loading:
- When a page is viewed.
- When the Document Object Model (DOM) is loaded.
- Before personas are evaluated and content is organised.
The following tracking concepts are supported and can be further customised with some of the other available options such as path match (described below).
| Tracking Concept | Example Uses |
|---|---|
| Visits the site (or part of the site) | |
| Site navigation |
What is the most popular site sub-section within a particular section of the site? Which top-level section is most popular for this user? |
| Metadata tags |
Most popular metadata tags on pages visited by the user across the site (or a part of the site). For example, given a particular metadata tag name, which value is most popular on the pages visited by this user? |
| Referrer |
What is the most popular referrer tracking multiple site entries? What is the most recent referrer entry to the site? |
| URL Variables |
What URL variables were present when entering the site. For example, what marketing UTM tracking codes were present in the URL when the user landed on the site? |
| Browsing location |
What country is the user browsing the site from? This tracking concept requires additional setup to work. Contact Squiz Support for assistance with setting this tracking concept for your site. |
If the current page view has updated the tracking logic which would lead to the user being evaluated into a different persona, this evaluation can happen within the same page view.
Adding a new tracking rule
- Click Add on the Tracking tab to load the tracking rule page.
- Apply the parameters to your tracking rule (see the reference table below for the list of available parameters you can set).
- Click Add/update (not the Save button at the top of the page) to save your tracking rule.
| Parameter | Description |
|---|---|
| Key | The key for the tracking rule. This must contain only lower-case letters and hyphens. |
| Note | A description that explains how this tracking rule works for Edit+ users. |
| Tracking source | The source used to inform the tracking rule. Track-sub-section - Track visits to a section and it’s top-level sub-pages. Track-metadata-tags - Track metadata tags present on any pages viewed by the user. Referrer - Track incoming referrer header values. Url-variable - Track incoming URL variables. Geolocate - Identifies the current country of the user - up to once per day. Additional configuration is required for Geolocate. |
| Tracking output | How the data should be tracked. There are a few options available - and not all options work with all tracking sources.
|
| Vfield | This field will only display for ‘track-url-field’, enter the name of the URL field you want to track here (e.g. utm_campaign) |
| Mfield | This field will only display for ‘track-metadata-field’, enter the name of the metadata tag you want to track here (e.g. DC.Subject) |
| Gfield | This field will only display for ‘geolocate’ - This requires additional set up. |
| Pathmatch | Can be used with any tracking type - allows scoping the rule to only take any action if the current page view matches the path. Input is a regular expression - however, a normal path should work (e.g. /about/ will match the about path, and any page views under the about section of the site will invoke the tracking rule) |
| Trait | The unique key of the trait that the tracking data should be stored in. |
Personalisation testing tool
You can view how users will see your content through the regular Edit+ Preview feature.
When personalisation features are active on the asset you are editing, an extra option becomes available to the right of the screen size icon.
Click the target icon option to enable the Personalisation Testing Tool, which is available from the left of the screen.
You can simulate one or more personas on the page you are previewing.
You can also highlight the personalised content that is on the screen. This does not affect how the content is displayed on your front-end: it is a way for you to simulate what your users will see.
Function reference
The framework offers a selection of methods that allow you to control how personalisation works in your frontend.
Tracking
init()
Users are automatically tracked and content personalised by default after personalisation is activated.
You can control the point at which tracking and personalisation are activated on the frontend if you want to only track and personalise user sessions after users opt-in.
To deactivate automatic tracking go to the Personalisation > Configuration > Includes > Personalisation frontend include asset and remove the
personalisationFramework.init();
function.
Now you may activate the tracking yourself when desirable.
Usage
personalisationFramework.init();
You must implement the method after the point at which the user opts-in to personalisation.
Personalisation
personalise.changePersona()
This method lets users optionally nominate a persona they feel best represents them from a list of available personas.
This can either be in conjunction with the persona automatically selected for the user or can override persona information stored in session data.
Usage
personalisationFramework.personalise.changePersona(key, clear_values);
Parameters
| Argument | Type | Description |
|---|---|---|
key | string (required) | The unique persona key for the user session. |
clear_values | boolean (false) | Determines whether or not to clear existing values. Existing values are not cleared by default. |
Models
personalise.containerAttributes
This method lets you retrieve the data structure of the personalised containers (page model).
Usage
personalisationFramework.personalise.containerAttributes
Return values
An array of objects containing container attributes.
Adding Datastore
Read this article to understand how you can extend the Personalisation Framework using Datastore.
Overview
The Personalisation Framework simplifies how you integrate with Datastore by offering base line functionality that is restricted by design.
By restricting functionality to only critical integration points, you can confidently extend the Datastore integration by adding integration points directly into your application, rather than within the Personalisation Framework code itself.
When is data updated?
Datastore does not replace trait local storage, rather it supplements local storage by adding a permanent data storage layer.
Each time a trait is updated in local storage it is also updated at the Datastore layer. When the changePersona() function is called the Datastore also records this and the data is saved as an array.
If you find this level of trait functionality is not suitable for your data storage requirements, you can write application-specific code that implements a different permanent data storage mechanism.
Installing
For development and testing, you must simulate the Datastore locally using Docker and the personalisation framework blueprint.
Follow steps two to four on the Squiz Marketplace personalization blueprint page:
- Step 2: Learn how to use Datastore
- Step 3: Simulate and test the personalization blueprint
- Step 4: Add your blueprint to the Squiz Experience Cloud.
The marketplace listing refers back to documentation in this section. Use the marketplace documentation to guide you through the rest of the steps.
Configure the framework to work with Datastore
Remember to change these settings when you deploy the blueprint to production.
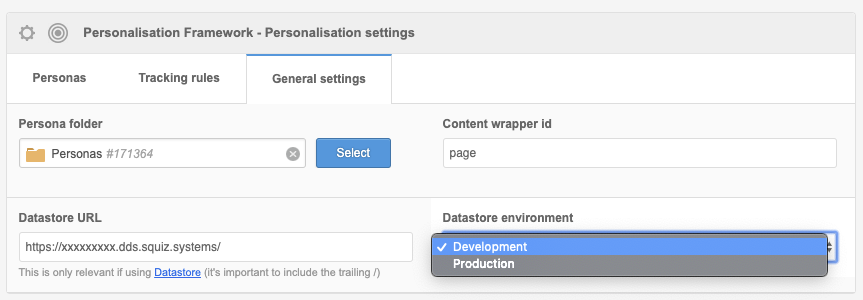
The Datastore simulator command-line interface provides you with a base URL for the API once you have it set up and running locally. Add this URL into the configuration for the personalisation framework.
- Load your Matrix instance.
- Navigate to the Personalisation settings screen.
- In the General settings tab, add the URL provided by the simulator.
- In the Datastore environment field, set the correct personalization environment to load the Development version of the Datastore SDK.
- Click Save.
Adding Traits
Consult the account owner if you need to store sensitive information. See the Datastore privacy and security documentation for guidance on what type of data is suitable to store in Datastore.
The Datastore blueprint includes common API methods for storing user traits as well as storing a user’s Opted Persona. Opted Persona is when a user has specifically opted into a persona using the changePersona() function. See the function reference for more on this.
To add more custom traits to store follow the provided convention in the user schema.
Example user trait property in the user schema
"siteVisits": {
    "title": "Site visits",
    "description": "Increments on each page load of the site.",
    "type": "integer",
    "example": 10,
    "default": 1
}
The trait names in the Personalisation Framework must match those in the schema.
Retrieving a single record
The framework offers a GET method to retrieve a single user using the API.
https://{baseURL}/users/{UUID}You can use this method to resume a user’s session provided you know the UUID. You can implement this method inside your code providing it is loaded after the Personalisation Framework’s Javascript.
Retrieve a single user document using the SDK
dataStore.collection('users')
    .doc('6d833c5c-b11d-48cc-ba84-de4b4bdf673f')
    .get()
    .then((document) => console.log(document));
Deleting users
The framework offers a DELETE method to delete a single user document or all user documents in a collection.
Delete a single user based on their UUID
/**
 * Delete a user document
 * @param {string} id: the document's uuid
 */
function deleteUserRecord(id) {
    // Delete the user document
    dataStore.collection('users').doc(id).delete();
}
Delete all user documents in the user collection
/**
 * Delete all
 * @param {string} id: the document's uuid
 */
function deleteAll() {
    // Delete all user documents in the user collection
    dataStore.collection('users').get().then((collection) => {
        collection.forEach((item) => {
            deleteUserRecord(item.userid);
        });
    });
}
Setting up location tracking
Geolocation services are not enabled by default because not all Matrix instances have the required services configured.
If you need to find out the user’s country they are visiting from, there are two approaches you can use.
Using Edge and GeoIP
The recommended way to get a user’s location is to use a combination of Edge Side Includes (ESI) and the NGINX GeoIP module.
To test if you have ESI and GeoIP configured:
- Load any page of your personalisation framework-enabled website.
You can do this from within Matrix on any site asset. Right-click and select Preview In new window - Open the Developer Tools in your web browser.
- In the console, enter
personalisationFrameworkSettings.tracking.countryand press Enter. - Review the result:
- If you see your country returned (for example,
"australia"), you can proceed with setting up tracking rules in the personalisation settings page in Edit+. - If you see
"<esi:vars>$(GEOIP_COUNTRY_NAME)</esi:vars>"returned contact Squiz Support to get the required modules installed.
- If you see your country returned (for example,
Using Mapbox
Mapbox is a service that offers mapping and location detection services. You can sign-up for an account for free with a request limit per month, which can be useful when evaluating whether Mapbox can meet your needs.
How to use Mapbox in personalisation settings:
- Read the access token scopes documentation on Mapbox to decide what token scopes fit your tracking requirements.
- Sign up for Mapbox at https://account.mapbox.com/auth/signup/ and complete the account verification steps.
- On the https://account.mapbox.com/ screen, click Create a token.
- On the create an access token screen leave all public scopes selected.
- On the https://account.mapbox.com/access-tokens portal, copy the token string you just created.
- In Matrix, navigate to the Paint Layout for the Personalisation Settings content container template (CCT).
- Locate the
personalisationFrameworkSettings.data.mapTokenobject property. - Paste the token as the value of the
mapTokenproperty. - In the
tracking.countryproperty, remove the<esi:vars>$(GEOIP_COUNTRY_NAME)</esi:vars>value.
Do not have both thepersonalisationFrameworkSettings.tracking.countryandpersonalisationFrameworkSettings.data.mapTokendefined. If both properties are specified, geolocation with Mapbox will not work. - Save the content container template to apply the settings.