REST Resource Assets
Last Updated: 02 Feb 2019
The REST Resource and Rest Resource Javascript assets are used to communicate with web services exposing themselves using Representational State Transfer (REST) methods. This enables content to be retrieved from other REST web services, allowing the posting and modification of data using HTTP GET, POST, HEAD, PUT and DELETE requests. Access to servers is processed through authentication settings with the REST Resource OAuth Session and OAuth 2 Legged assets, allowing access to OAuth secure REST web services.
The REST Manager can also be used to cache requests based on the cache settings configured on the Details screen.
The REST functionality only supports requests to HTTP and HTTPS URLs.
REST Resource
The Details screen of the REST Resource asset allows you to configure the settings for the HTTP request to the external web server(s). For more information about the Status, Future Status, Thumbnail and Details sections, refer to the Details Screen chapter in the Asset Screens manual.
HTTP Request
This section allows you to configure the settings of the HTTP request of the REST Resource, including the request method and URL of the target REST web service.
The fields available in this section are as follows:
- Method: select the method of requests made by the REST Resource. The methods available are as follows:
- GET: this allows you to make a GET request. This method is used to retrieve and list the content of a resource.
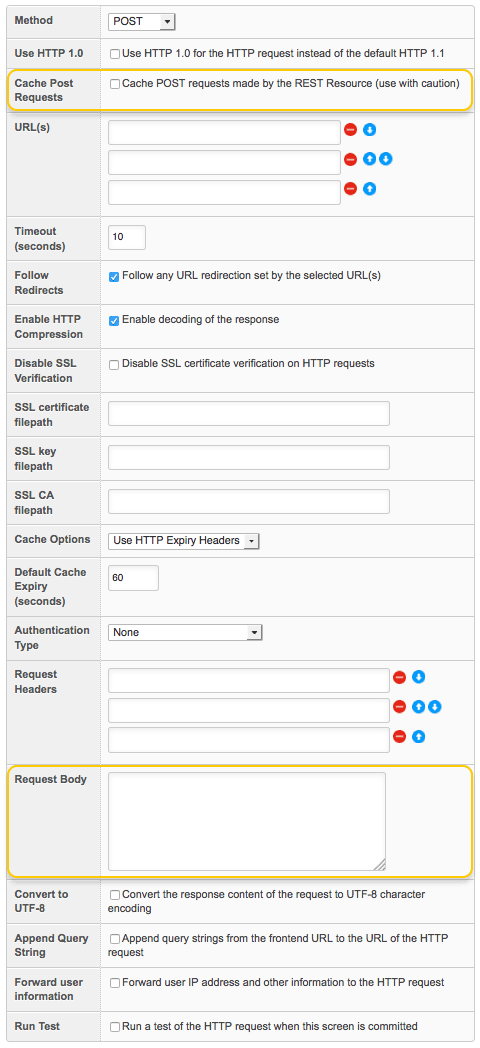
- POST: this allows you to make a POST request. This method is used to create and modify the content of a resource (for example, adding data to a field on a Custom Form). Selecting this request method and clicking Commit will display the Cache Post Requests and Request Body fields, as shown in the figure below.

The HTTP Request section for a POST request - HEAD: this allows you to make a HEAD request. This method is used to retrieve information from an object, such as its update status, without downloading it.
- PUT: this allows you to make a PUT request. This method is used to update and replace the content of a resource. Selecting this request method will display the Request Body field.
- DELETE: this allows you to make a DELETE request. This method is used to delete the content of a resource.
- Use HTTP 1.0: select whether or not to use HTTP 1.0 for the HTTP request, instead of the default HTTP 1.1. This is useful when dealing with advanced configurations with older proxy servers that do not fully support HTTP 1.1.
- Cache Post Requests: select whether or not to cache POST requests made by the REST Resource. POST requests are usually independent operations that will cause a different outcome with each subsequent use. As a result, it is recommended to be careful when using cache so that POST operations are not unexpectedly repeated, causing undesirable results. This field is only available when making a POST request.
- URL(s): enter the URL(s) of the REST web services you want to communicate with. Any number of URLs can be entered in these fields.
- Timeout (seconds): enter the amount of time in seconds that the REST Resource will attempt to communicate with the selected REST web services before returning an error. By default, this field is set to 10 seconds.
- Follow Redirects: select whether or not the request will follow any URL redirection set by the selected URL(s). For example, say the site http://www.example.com redirects to http://www.newexample.com. If this field is selected and the Rest Resource is set to communicate with the example URL, the request will be redirected to the newexample URL. By default, this field is enabled.
- Disable SSL Certificate: select whether or not to disable SSL certificate verification on HTTP requests. This can be useful in cases where the request host is using self-signed certificate verification. By default, this field is disabled, meaning SSL certificate verification will be used.
When connecting to web services that require 2WAY or mutual SSL authentication, additional fields can be utilised to specify the filepaths of the SSL certificate, key and CA (certificate authority). These fields are outlined below. - SSL Certificate Filepath: enter the filepath of the SSL certificate for SSL verification.
- SSL Key Filepath: enter the filepath of the private key for SSL verification.
- SSL CA Filepath: enter the filepath of the certificate authority file for SSL verification.
- Cache Options: select how requests made by the REST Resource will be cached. The options available are as follows:
- Never Cache: the request will not be cached.
- Use Default Expiry: the request will be cached according to the amount of time configured in the Default Cache Expiry (seconds) field (see below).
- Use HTTP Expiry Headers: the request will be cached according to the cache settings of the requested URL.
Please note that Squiz Matrix will use the system's Cache Manager to cache the request made by the REST Resource (using the Rest Manager asset type code). As such, the Cache Manager must be enabled and configured appropriately for these options to work. For more information, refer to the Cache Manager chapter in the System Management manual. - Default Cache Expiry (seconds): enter the amount of time in seconds that the REST Resource will be cached before expiring. This field is only used if the Cache Options field is set to Use Default Expiry. By default, this field is set to 60 seconds.
- Authentication Type: select the authentication type that will be used to access the requested URL. This will allow access to secure REST web services. The options available are as follows:
- None: no authentication will be attempted. If the requested URL requires authentication, the request will fail.
- HTTP Basic: password authentication will be used. To use this authentication type, select HTTP Basic from the drop down menu and click Commit. The Username and Password authentication fields will be displayed, as shown in the figure below.

The HTTP Basic Authentication Type - Matrix Cookie Passthrough: authentication will be determined by the session cookie set by Squiz Matrix, provided it contains valid authentication information. This cookie will be passed through to the response header of the requested URL.
- OAuth: select this method when communicating with an OAuth secure REST web service. When this option is selected, click Commit. An additional field will be displayed, as shown in the figure below.
In this field, select a REST Resource OAuth Session with the configured OAuth authentication information for the target web service.
OAuth Authentication TypeFor more information, refer to the REST Resource OAuth Session and REST Resource OAuth 2 Legged sections in this chapter. By default, this field is set to None.
- Digest Auth: this option will use digest access authentication on the HTTP request. To use this authentication type, select Digest Auth from the drop down menu and click Commit. The Username and Password authentication fields will be displayed, as shown in the figure below.

Digest Auth Authentication Type
- Request Headers: assemble additional headers to send as the header of the request.
- Request Body: assemble additional parameters to send as the body of the request. For example, you could set query parameters on a POST request using the example Request Body shown below.
query=%globals_get_query^uppercase%&query1=%globals_get_query1^lowercase%
This request would set the query and query1 parameters as global keyword replacements, able to be called on the REST web service being communicated with. Keyword modifiers have also been used to display the query parameter in uppercase and the query1 parameter in lowercase. This field is only available when making a POST or PUT request. - Convert to UTF-8: select this field to convert the response content of the request to a UTF-8 (8-bit Unicode Transformation Format) character encoding system. To select the UTF-8 encoding system, select this field and click Commit. The Document Encoding field will be made available, as shown in the figure below.

The Document Encoding field.
- Document Encoding: select either Auto Detect or a specific character encoding system to convert the response content to. The following encoding systems are available:
- ISO-8859-1
- ISO-8859-15
- CP866
- CP1251
- CP1252
- KOI8-R
- BIG5
- GB2312
- BIG5-HKSCS
- Shift_JIS
- EUC-JP
- UTF-8
- Append Query String to the Request URL: select this field to enable query strings passed on the URL of the REST Resource to be appended on the URL of the HTTP request.
- Forward User Information: select this field to forward user information on the HTTP request. This information can useful when performing permission checks on the REST web service.
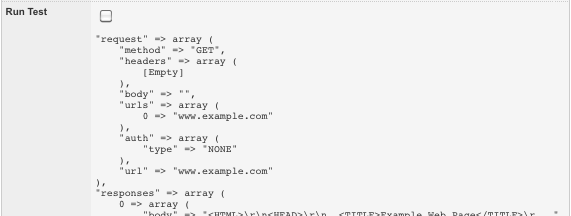
- Run Test: select this field and click Commit to run a test of the request. Sample return code will be displayed in this field, as shown in the figure below.
- Allow Keyword Replacements: select whether or not keyword replacements should be replaced in the REST response. If this option is enabled, Squiz Matrix will identify and replace content in the keyword format (wrapped in percent signs). By default, this field is set to No, meaning that this option is disabled.
- Allow Multiple Runs: select whether or not multiple runs will be allowed if the REST Resource asset is nested more than once in the same page. If this field is set to Yes, requests will be forced to re-run for each instance of a request on a page, as opposed to just once. By default, this field is set to No.
- Forward Response Headers: select whether or not to forward headers from the REST response. This allows you to pass through objects of an unknown type without alteration. By default, this field is set to No.
- Error Response: enter the content that will be displayed if the request returns a client (4xx) or server (5xx) error code. For example, say you have entered the text This web service cannot be contacted into this field. This error message would be displayed in the case that the REST web service URL returns a client or server error.

An excerpt of the sample code from the Run Test
REST Resource JavaScript
The Details screen of the REST Resource JavaScript asset allows you to configure the settings of the HTTP request to the external web server(s) and the JavaScript processing of the response. For more information about the Status, Future Status, Thumbnail and Details sections, refer to the Details Screen chapter in the Asset Screens manual.
HTTP Request
This section allows you configure the settings of the HTTP request of the REST Resource, including the request method and URL of the target REST web service. The fields available in this section are similar to those for a REST Resource asset. For more information on these fields, refer to the REST Resource Details Screen section in this chapter.
JavaScript Processing
This section allows you to either select a JS File or manually enter JavaScript to determine the content that will be processed by the REST Resource JavaScript asset. Request data is available as JSON data using the pre-defined variable _REST. For example, print(_REST.response.body); will print the body of the first REST web server response.
The fields available in this section are as follows:
- Session Var Name: The response of HTTP response array object can be stored as a custom specified variable in the Matrix session sandbox based on the value you put into this field. You can overwrite this array value with a custom one if you print anything using the JavaScript field.
For example, if I enter response in this field and in my JavaScript field I enterprint(_REST.response.body), the value of the_REST.response.bodywill be stored in the session variable which can then be accessed using a custom session keyword of%globals_session_response%.This field is only available on the Call REST Resource Form Submission Action and the Call REST Resource Trigger Action.
- Pre-Process Matrix Global Keywords: enable this option to allow global keyword replacements (%globals_*%) to be evaluated prior to running JavaScript.
- JS Engine: select the engine to use to execute JS commands on the REST Resource JavaScript asset. By default, this is set to use the V8 JavaScript engine, which requires the PECL v8js extension installed on your system. For more information, refer to the PECL v8js Package documentation. Alternatively, you can select to use SpiderMonkey, as configured on the External Tools Configuration screen. For more information, refer to the External Tools Configuration chapter in the System Configuration manual.
- Include Files: select a file asset, such as a JS File, within the system to use for JavaScript processing. To select more than one file, click the More… button. An additional field will appear on the screen. Files selected in this field will be run in sequential order, followed by any code entered in the JavaScript field.
- Process Keywords in JavaScript Files: files that are added through the 'Included Files' field are able to be individually selected for keyword processing in this section.
- JavaScript: enter valid JavaScript to use for JavaScript processing. Example JavaScript is shown below.
var s = _REST.response.body;
When this JavaScript code is used, the character length of the REST response body is printed, followed by the body content itself.
print(s.length);
print(_REST.response.body);
You can also access and use response error messages and codes returned by the response, for example:print(_REST.response.error); print(_REST.response.error_code);
REST Resource OAuth Session
The Details screen of the REST Resource OAuth Session asset allows you to set the parameters for OAuth authentication. For more information about the Status, Future Status, Thumbnail and Details sections, refer to the Details Screen chapter in the Asset Screens manual.
OAuth Parameters
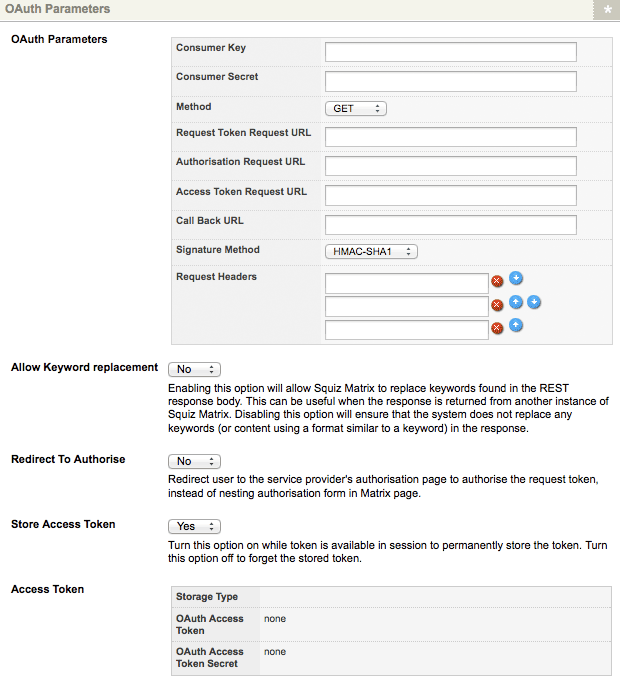
This section allows you to define the OAuth Parameters for authentication when communicating with an OAuth secure REST web service. The OAuth Parameters section of the Details screen is shown in the figure below.

The OAuth Parameters section of the Details screen
Please note that the parameters required must be acquired from the REST web server (Service Provider) that is being communicated with.
The fields available in this section are as follows:
- Consumer Key: enter the Consumer Key provided to you by the Service Provider.
- Consumer Secret: enter the Consumer Secret provided to you by the Service Provider.
- Method: select either GET or POST as the HTTP request method of the OAuth authentication call. By default, this field is set to GET.
- Request Token Request URL: enter the Request Token URL provided to you by the Service Provider.
- Authorisation Request URL: enter the User Authorisation URL provided to you by the Service Provider.
- Access Token Request URL: enter the Access Token URL provided to you by the Service Provider.
- Call Back URL: enter a callback URL that the REST Resource OAuth Session asset will redirect back to after authorisation is completed.
- Signature Method: select either HMAC-SHA1 or PLAINTEXT as the method used to sign the authorisation requests made to the OAuth secure server.
- Request Headers: assemble additional headers to send as the header of the OAuth authentication request.
- Request Body: assemble additional parameters to send as the body of the OAuth authentication request.
- Allow Keyword Replacements: select whether or not keyword replacements should be replaced in the REST response. If this option is enabled, Squiz Matrix will identify and replace content in the keyword format (wrapped in percent signs). By default, this field is set to No, meaning that this option is disabled.
- Redirect to Authorise: enabling this option will redirect a user to the service provider's authorisation page to authorise the request token instead of simple nesting the authorisation form within Squiz Matrix.
- Store Access Token: allows you to permanently store the OAuth access token. By default, this token is store in the session, meaning that when a user logs out, the token will be lost. Enabling this option will permanently store this token, preventing users from having to reauthorise for each new user session.
- Access Token: displays the storage type of the OAuth access token and token secret. This will be either permanent or session, based on the configuration of the Store Access Token option.
OAuth Authentication on a REST Resource
Once the REST Resource OAuth Session asset has been set up correctly, it must be assigned to a configured REST Resource or REST Resource JavaScript asset. To do this, on the Details screen of the REST Resource, select OAuth in the Authentication Type field and click Commit. An additional field will appear, allowing you to select the REST Resource OAuth Session asset, as shown in the figure below.

The OAuth Authentication Type
For more information, visit the OAuth website.
REST Resource OAuth 2 Legged
The Details screen of the REST Resource OAuth 2 Legged asset allows you to set the parameters for 2-legged OAuth authentication. For more information about the Status, Future Status, Thumbnail and Details sections, refer to the Details Screen chapter in the Asset Screens manual.
OAuth Parameters
This section allows you to define the OAuth Parameters for authentication when communicating with an OAuth secure REST web service. The OAuth Parameters section of the Details screen is shown in the figure below.

The OAuth Parameters section on the Details screen
Please note that the parameters required must be acquired from the REST web server (Service Provider) that is being communicated with.
The fields available in this section are as follows:
- Consumer Key: enter the Consumer Key provided to you by the Service Provider.
- Consumer Secret: enter the Consumer Secret provided to you by the Service Provider.
- Signature Method: select either HMAC-SHA1 or PLAINTEXT as the method used to sign the authorisation requests made to the OAuth secure server.
OAuth Authentication on a REST Resource
Once the REST Resource OAuth 2 Legged asset has been set up correctly, it must be assigned to a configured REST Resource or REST Resource JavaScript asset.
To do this, on the Details screen of the REST Resource, select OAuth in the Authentication Type field and click Commit. An additional field will appear, allowing you to select the REST Resource OAuth 2 Legged asset.
For more information, visit the OAuth website.
Example: Twitter REST API
The REST Resource assets can be used for a variety of social media purposes. In this example, we will display the simple retrieval and JavaScript modification of Twitter data, using Twitter's REST API and the Rest Resource JavaScript asset, in conjunction with Oauth authentication.
To set up the Twitter REST API feed, you'll first need to create a new application on your Twitter account. For more information on how to do this, refer to the Twitter Developers site.
Once you have created your application, take note of the details in the OAuth Settings of the Twitter app; these will be used to authenticate the system with Twitter. Also, be sure to add the URL of your system to the Callback URL settings of the Twitter application.
Once you have set up the Twitter application:
- Add a REST Resource OAuth Session asset under your site.
- In the OAuth Parameters section, enter the Consumer Key, Consumer Secret and the Request Token, Authorize and Access Token URLs of your Twitter application. In the Callback URL field, enter the URL of the REST Resource OAuth Session asset. Click Commit.
- View the REST Resource OAuth Session asset on the front-end. You will be redirected to Twitter, where you can input your username and password to authorise the Twitter application. Once this is done, return to the Details screen of the asset; the token details will be displayed in the Access Token field. Enable the Store Access Token field and click Commit.
- Add a REST Resource JavaScript asset under your site.
- In the Authentication Type field, select OAuth and then select the configured REST Resource OAuth Session asset.
- In the URLs field, enter the Twitter REST API resource URL. In this example we are using the statuses/user_timeline resource, as follows:
https://api.twitter.com/1.1/statuses/user_timeline.json?include_entities=true&include_rts=true&screen_name=squizmatrix&count=5
This resource URL specifies that we are returning the last five twitter statuses of the SquizMatrix user, including entities (metadata) and retweets. You can edit this URL to display the tweets of whichever account you wish to display. - Select the Run Test field and click Commit.
- The REST Resource JavaScript asset will now display the information returned from the Twitter REST API. This can be viewed in the Run Test field and/or on the front end.
The JSON data returned includes all the information of the five most recent tweets on the SquizMatrix twitter account. We can use the JavaScript processing provided by the REST Resource JavaScript asset to modify this data to only display the information we require. - In the JavaScript field, enter the following:
var statuses = eval('(' + _REST.response.body + ')');This JavaScript will print the body of each tweet and the user who posted in (in this case Squiz Matrix). We have also included additional JavaScript to replace the abbreviated URLs, hashtags and user mentions with the appropriate links.
print('<ul>');
for (i = 0; i < statuses.length; i++) {
print("<li><strong>" + statuses[i].user.name + "</strong>");
var text = statuses[i].text;
// Replace t.co URLs with their full versions.
var urls = statuses[i].entities.urls;
for (var j = 0; j < urls.length; j++) {
text = text.replace(urls[j].url, '<a href="' + urls[j].expanded_url + '">' + urls[j].url + '</a>');
}
// Replace hashtags with Twitter searches.
var tags = statuses[i].entities.hashtags;
for (var j = 0; j < tags.length; j++) {
text = text.replace('#' + tags[j].text, '<a href="http://twitter.com/search/%23' + tags[j].text + '">#' + tags[j].text + '</a>');
}
// Replace user mentions with Twitter URL links.
var users = statuses[i].entities.user_mentions;
for (var j = 0; j < users.length; j++) {
text = text.replace('@' + users[j].screen_name, '<a href="http://twitter.com/' + users[j].screen_name + '">@' + users[j].screen_name + '</a>');
}
print(" : " + text + "</li>");
}
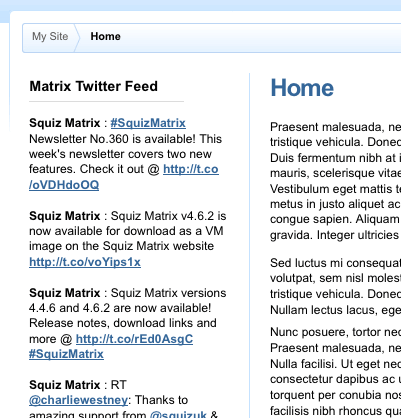
print('</ul>'); - On the frontend, the REST Resource JavaScript asset will now display a list of the latest tweets from the SquizMatrix Twitter account, as shown in the figure below.
This asset can then be nested within the Design of a Site, to display an updated list of the latest tweets from the SquizMatrix Twitter account.
Twitter information retrieved on the REST Resource JavaScript asset
The REST JavaScript asset nested in the Design of a Site
