
Checkout Page
Last Updated: 02 Jun 2020
ecommerce_checkout|asset|6.0.0
The Checkout Page asset allows you to create a Checkout Page that will allow site users to select a delivery method and confirm their purchases before proceeding to payment. Taxes and fees can also be configured with this asset.
Once you have added a Checkout Page, you can configure its settings on its associated asset screens. The majority of these screens are the same or similar to those for a Standard Page and are described in the Asset Screens manual. In this chapter, we will describe the Processing Components, Display Formatting Options, Region Specific Options, Taxation and Flat Fees, and Quantity Tracking screens, which are different for a Checkout Page.
Bookmarks to the headings on this page:
- Additional Dependant Assets
- Processing Components Screen
- Display Formatting Options Screen
- Region Specific Options Screen
- Taxation and Flat Fees Screen
- Quantity Tracking Screen
- Checkout Completion Actions Screen
- Checkout Bodycopy
- Confirmation Bodycopy
- Failure Bodycopy
- Receipt Bodycopy
- Customised Receipt Bodycopy
- Ecommerce Order
Additional Dependant Assets

The additional dependant assets
When you create a Checkout Page, several assets are automatically created beneath it, as shown in the figure to the right. You can use these assets to define the contents and layout of the Checkout Page.
- Bodycopies: Bodycopies are used to define the layout of the pages in the Checkout Page. The following Bodycopies are listed in this folder:
- Checkout: this Bodycopy is used to define the layout of the checkout page of the Checkout Page asset.
- Confirmation: this Bodycopy is used to define the layout of the confirmation page of the Checkout Page asset.
- Failure: this Bodycopy is used to define the layout of the failure page of the Checkout Page asset.
- Receipt: this Bodycopy is used to define the layout of the receipt page of the Checkout Page asset.
- Ecommerce Order: successfully processed, pending and up for review orders are stored in either the Pending Orders, Completed Orders and Orders To Review folders.
Processing Components Screen
The Processing Components screen allows you to set the Delivery Method(s) for the e-commerce transaction.
Delivery Methods
The Delivery Methods section is shown in the figure below.

The Delivery Methods section of the Processing Components screen
This section allows you to select one or more configured Ecommerce Default Delivery Method assets that will allow users to choose how to receive their purchased items and enter details corresponding to their chosen delivery method. To select more than one Ecommerce Default Delivery Method, click on the More… button. An additional field will appear on the screen. For more information, refer to the Ecommerce Default Delivery Method chapter in this manual.
Display Formatting Options Screen
The Display Formatting Options screen allows you to configure format options for the various pages of the Checkout Page asset.
Context Screens
This section lists the available Bodycopies for the Checkout Page.

The Context Screens section of the Display Formatting Options screen
Clicking the name of a Bodycopy will take you to its Edit Contents screen.
Checkout Screen
This section allows you to change the text for the Go to Confirmation Button.

The Checkout Screen section of the Display Formatting Options screen
In the Go to Confirmation Button Text field, enter the text to show on the confirmation button. This button allows users to proceed to the confirmation page. By default, it will read Go to Confirmation. This message is shown when the keyword replacement Go To Confirmation Button is used on the CheckoutBodycopy.
Confirmation Screen
This section allows you to change the text for the buttons on the confirmation page.

The Confirmation Screen section of the Display Formatting Options screen
The following fields are available:
- Checkout Button Text: enter the text to show on the checkout button. This button allows users to confirm their order and proceed to payment. By default, it will read Confirm Order. This button is shown when the keyword replacement Confirm Order Button is used on the Confirmation Bodycopy.
- Go Back Button Text: enter the text to show on the go back button. This button allows users to return to the checkout screen and alter the details of their order. By default, this button will read Return To Checkout. This button is shown when the keyword Return to Checkout Button is used.
- Product Non-Refund Text: enter the text to show for the Custom refund type on a Product. This option is set on the Details screen of a Product and is predominantly used on the uTransact Payment Gateway. For more information, refer to the Product and uTransact Payment Gateway chapters in this manual.
Customise Receipt
This section allows you to select whether or not to customise the receipt page. The Customise Receipt section is shown in the figure below.

The Customise Receipt section of the Display Formatting Options screen
The following fields are available:
- Customise Receipt Controls: select whether or not to customise the contents of the receipt page. If this option is set to Yes, additional fields will appear in the Customise Receipt section and the Customised Receipt Bodycopies will appear in the Asset Map, as shown in the figure to the right. By default, this field is set to No.
- Currency Symbol: enter the currency symbol to be used on costs detailed in the customised receipt. By default, this field is set to the dollar sign ($). This field will only appear if the Customise Receipt Controls is set to Yes.
Float Precision: enter the decimal floating point precision for costs in the customised receipt. This will determine how many integers are listed after the decimal point. For example, if the Float Precision was set to 1, a cost of $1.48 will be listed on the customised receipt as the rounded total $1.5. Similarly, if the Float Precision was set to 5, the same cost will be listed as $1.4800. By default, this field is set to 2. This field will only appear if the Customise Receipt Controls is set to Yes.
The Customise Receipt Bodycopies
For more information, refer to the Customised Receipt Bodycopy section of this chapter.
Region Specific Options Screen
The Region Specific Options screen allows you to configure additional fees and taxes based on the response to the country question of an Ecommerce Default Delivery Method asset.
Country Question
This section allows you to select the question(s) to use as the country identifier for the Region Specific Options.
In the Country Question field, select a question of type Country to use for the Region Specific Options. This field is required for the Region Specific Options to function.
You have the ability add multiple Country Questions by pressing the 'More' button on the right of the initial question. This is for if you have more than one Processing Component you can set up multiple Delivery Methods.
Taxable Countries
This section allows you to choose which countries should be charged tax and which should not.

The Taxable Countries section of the Region Specific Options screen
The fields available are as follows:
- Taxable Countries: select a country to make it a taxable country. This means that if your items include a tax, users purchasing items from this country will be charged the tax fee. Users not from the countries selected will not be charged a tax fee. To select multiple countries, hold down the Ctrl key on the keyboard and left click on the country.
- Calculate Tax on Delivery: specify whether or not tax should be calculated against the delivery fee of an e-commerce order, in addition to the items. If this setting is enabled, the configured tax rate will be calculated against the delivery fee and added to the order.
- Delivery Fee Includes Tax?: specify whether or not the delivery fee already includes the specified tax fee. If this setting is enabled, the tax on the delivery fee will be calculated and displayed on the e-commerce order. For example, if the delivery fee is $11.00 and the tax rate is 10%, the delivery fee will be displayed as $10.00 + $1.00 tax. Please note that this setting will only be applied when the Calculate Tax on Delivery field has been enabled.
Delivery Prices Per Weight Metric
This section allows you to add a delivery price fee to all orders based on their weight. The Delivery Prices Per Weight Metric section is shown in the figure below.

The Delivery Prices Per Weight Metric section of the Region Specific Options screen
The fields available in this section are as follows:
- Item Weight Selector: select whether the weight information will be sourced from an Asset Attribute or a Metadata Text Field. For example, a Metadata Schema could be applied to items with a Weight field. By default, this field is set to Metadata Text Field.
- Item Weight Source: specify the source of the item weights by entering an Asset Attribute or selecting a Metadata Text Field as determined in the Item Weight Selector field.
- Price Per Weight Metric: select one or more countries from the list. Only selected countries will incur the delivery fee.
- Price: enter a price per weight metric in the Price field that will be charged to the selected countries. For example, Australia is selected with a Price of 2.50 per weight metric. If a user from Australia purchases an item that has a Metadata Text Field indicating its weight as 1.5, a delivery fee of $3.75 ($2.50 x 1.5) will be added to the order.
- Maximum Price: enter the maximum price that for delivery that will be added to the order.
- Default Price Per Weight Metric: enter a price per weight metric that will be charged to all countries that are not configured in the Price Per Weight Metric field. If you do not want to charge a delivery fee to other countries, leave this field as 0.00.
Additional International Delivery Fee
This section allows you to add an international delivery fee to all orders. The Additional International Delivery Fee section is shown in the figure below.

The Additional International Delivery Fee section of the Region Specific Options screen
The fields available in this section are as follows:
- International Delivery Fee Exempt Countries: select the countries that will not be charged the international delivery fee. If no countries are selected and a fee is entered in the International Delivery Fee field, all countries will incur the fee. To select multiple countries, hold down the Ctrl key on the keyboard and left click on the country.
- International Delivery Fee: enter the fee that will be charged to users purchasing items from countries not selected in the International Delivery Fee Exempt Countries field. For example, if 2.50 is entered into this field, all countries not exempt will incur an international delivery fee of $2.50.
Additional Conditional Delivery Fee
This section allows you to add an additional delivery fee or remove all fees based on the price of an order. The Additional Conditional Delivery Fee section is shown in the figure below.
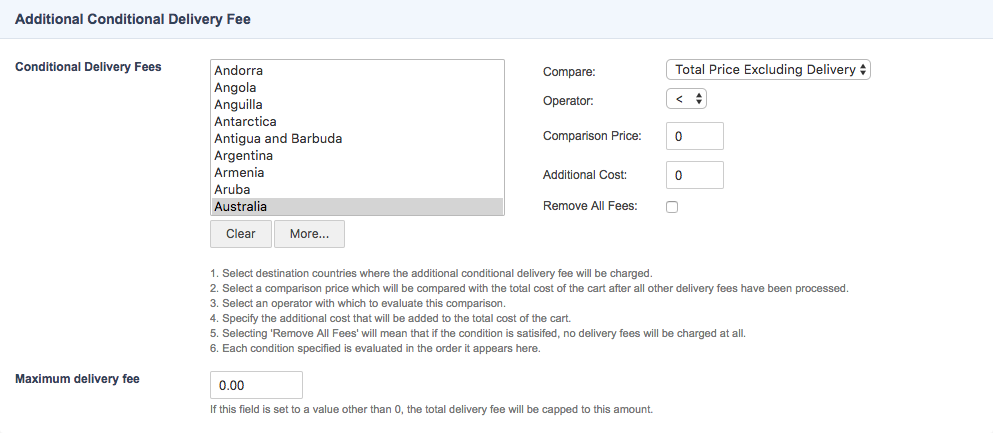
The fields available in this section are as follows:
- Conditional Delivery Fees: select either one or more country from the list. Only selected countries will be affected by the condition. To set the condition and the action taken if the condition is met, the following fields are available:
- Compare: select the value option to use as the Comparison Price. The following options are available:
- Total Price
- Total Delivery
- Total Price Excluding Delivery
- Operator: select a relational operator to use when comparing the order price with the Comparison Price. The following options are available:
- > (Greater than) : the condition will be met if the order price is greater than the Comparison Price.
- < (Less than) : the condition will be met if the order price is less than the Comparison Price.
- == (Equal to) : the condition will be met if the order price is equal to the Comparison Price.
- Comparison Price: enter a price to be used as the comparison price. This price of the order will be compared to this price and, depending on the selected Operator, either an additional fee will be charged or all fees will be removed.
- Additional Cost: enter the price of an additional fee that will be charged to the selected countries if the condition is met. For example, Australia is selected and the condition is set to < (less than)5.00 with an Additional Cost of 1.00. If a user from Australia purchases an order with a total cost of $4.00, they will incur an additional fee of $1.00.
- Remove All Fees:select this field to remove all fees from the selected country if the condition is met. For example, Australia is selected and the condition is set to > (greater than) 5.00 with Removes All Fees selected. If a user from Australia purchases an order with a total cost of $7.00, all incurred fees will be removed.
- Compare: select the value option to use as the Comparison Price. The following options are available:
To add more than one Conditional Delivery Fees, click on the More… button. An additional field will appear on the screen.
Taxation and Flat Fees Screen
The Taxation and Flat Fees screen allows you to configure the tax and fee options for orders on the Checkout Page.
Taxation
This section allows you to apply a fixed tax rate to all taxable purchases made through the Checkout Page.

The Taxation section of the Taxation and Flat Fees screen
The fields available in this section are as follows:
- Taxation Name: enter a name for the tax. This will be shown to customers during the checkout process. By default, this field is set to GST.
- Tax Value (%): enter a percentage value for the tax. The tax will be applied to any taxable purchases. For example, if 10 is entered into this field, the purchase of a taxable item priced at $1.00 will include a $0.10 tax. By default, this field is set to 10.
Flat Fees
This section allows you to apply either one or more flat fees to all purchases made through the Checkout Page.

The Flat Fees section of the Taxation and Flat Fees screen
In the List Of Flat Fees field, select a Product asset to use as a flat fee. The price of the Product will be charged to orders during the checkout process. For example, if a Product titled Handling Fee with a price of 1.50 is selected in this field, all orders will incur a $1.50 fee to their order.
Quantity Tracking Screen
The Quantity Tracking screen allows you to manage the availability of items for sale by setting and tracking item quantities.
Product Quantities
This section allows you to configure the settings of the item quantities.
![]()
The Product Quantities section of the Quantity Tracking screen
The fields available in this section are as follows:
- Enforce Quantities: select whether or not to use Quantity Tracking on the items for sale. By default, this field is set to No.
- Quantity Selector: select whether the item quantities will be sourced from an Asset Attribute or a Metadata Text Field. For example, a Metadata Schema could be applied to items with a 'Quantity' field. By default, this field is set to Metadata Text Field.
- Quantity Source: specify the source of the item quantities by either entering an Asset Attribute or selecting a Metadata Text Field depending on the field source selected in the Quantity Selector field.
- Cart insufficient Quantity Message: enter the text to display when the Cart's contents contains items that have insufficient quantities available. By default, this message will read There is an insufficient amount of items in stock to proceed with your order. Your order quantities have been altered to reflect the amount available. Items which are currently not in stock have been deleted from your cart. These items with insufficient quantities are listed below:. This message is shown when the keyword replacement Insufficient Product Quantity Message is used on the Page Contents Bodycopy of the Cart.
- Checkout insufficient Quantity Message: enter the text to display on the Failure page of the Checkout Page when an order contains items that have insufficient quantities available. By default, this message will read There is an insufficient amount of items in stock to proceed with your order. Your order has not been processed. The items with insufficient quantities are listed below:. This message is shown when the keyword replacement Insufficient Product Quantity Message is used on the Failure Bodycopy of the Checkout Page.
Checkout Completion Actions Screen
The Checkout Completion Actions screen allows you to create custom actions that are run after the checkout process has been successfully completed. The Existing Actions, Add New Action and Selected Action sections of the Checkout Completion Actions screen are shown in the figure below.

The Checkout Completion Actions screen
The completion actions available on the Checkout Page are as follows:
Further information on each of these actions is outlined in the sections below.
Save as XML
The Save as XML completion action exports the details of an ex-commerce order to an XML file. To add this action, check the Create a new action of type in the Add New Action section, select Save as XML in the list provided and click Commit. The action will be added to the Existing Actionssection, as shown in the figure below.

The Save as XML Completion Action
Additional fields will also appear in the Selected Action section, as shown in the figure below.

The Selected Action section for the Save as XML Completion Action
The fields available in this section are as follows:
- Action Name: this is the name of the action that you have added. By default, it is set to Save as XML. This name appears in the Action Name / Type field in the Existing Actions section.
- Location: enter a server file path as the destination for the saved XML files. A location must be specified for the completion action to work.
- Include Transaction Reference: select whether or not to include the transaction and merchant reference numbers on the XML file.
Call REST Resource
The Call REST Resource Action completion action communicates with a web service exposing itself using Representational State Transfer (REST) methods. To add this action, check the Create a new action of type option in the Add New Action section, select Call REST Resource and click Commit. The action will be added to the Existing Actions section, as shown in the figure below.

The Call REST Resource Completion Action
Additional fields will also appear in the Selected Action section. You can modify the name of your completion action in the Action Name field.
REST Request
This REST Request settings allow you to configure the request made to the REST resource. This includes the request method and the URL of the target REST web service. These settings are shown in the figure below.

The REST Request settings
For more information on the fields and the functions of the REST Request, refer to the REST Resource Assets chapter of the Web Services manual.
Order Array Configuration
The Order Array Configuration settings allow you to set custom parameters for Product asset types on the Order Array keyword, which can be used within the REST request and error notification email. These settings are shown in the figure below.

The Order Array Configuration settings
In the Add Product Asset Type to Customise field, select the Product asset type to set the parameters of and click Commit. The Parameter Setup settings will be displayed for the selected asset type.
In the Add New Parameter field enter a new array item to configure and click Commit. Additional fields will appear, allowing you to set the Value of the item you have just created.
You can use the Order Item keyword replacements listed in the Available Keywords section to define the values of your array items. In the example below, the %product_quantity% keyword has been set on an array item named ord-item-qty.

Configuring the Parameter Setup settings
The %order_array% keyword replacement will print an array of information of the e-commerce order, as configured by these set parameters. An example order array is as follows:
order array: name[0]=lettuce&price[0]=1.80&ord_item-qty[0]=1&name[1]=carrot&price[1]=90&ord_item-qty[1]=5
Error Response Notification Email
The Error Response Notification Email fields allow you to configure an email notification for non-2xx error responses from the REST server. These fields are shown in the figure below.

The Error Response Notification Email fields
In the fields available, configure the error response notification. The Order Keywords and In Error Response Notification Email keyword replacements listed in the Available Keywords section can be used to print information from the e-commerce order, as well as the REST request and response.
Available Keywords
The Available Keywords section contains a list of keyword replacements that can be used in the fields and functions of the Call REST Resource completion action. These keywords are grouped under the following three categories:
- Order Item Keywords : prints information on the individual items or products of the e-commerce order. These keywords can be used in the Order Array Configuration settings.
- Order Keywords : prints information on the e-commerce order. These keywords can be used in the REST Request settings, as well as the Error Response Notification Email.
- Error Response Notification Keywords : prints information from the REST response and request. These keywords can be used on the Error Response Notification Email.
Editing a Completion Action
To edit a completion action, click on the ![]() icon in the Existing Actions section. The action will turn blue and the details of the action will appear in the Selected Action section.
icon in the Existing Actions section. The action will turn blue and the details of the action will appear in the Selected Action section.
Activating and Deactivating a Completion Action
By default, when you add a completion action it will automatically be activated as the Active box will be ticked in the Existing Actions section. To deactivate a completion action, click the Active box and click Commit. This will mean that the action will not be performed until it is activated once again.
Deleting a Completion Action
To delete a completion action, click the Delete box for the action in the Existing Actions section and click Commit.
Checkout Bodycopy
The Checkout Bodycopy is used to define the layout of the checkout page of the Checkout Page asset. To create a layout for this page, right click on the Checkout Bodycopy in the Asset Map and select Edit Contents. Click on the ![]() icon – the WYSIWYG Editor will appear where you can use the keyword replacements and formatting to set the layout of the information to show on the checkout page. By default, no information will appear in the WYSIWYG Editor.
icon – the WYSIWYG Editor will appear where you can use the keyword replacements and formatting to set the layout of the information to show on the checkout page. By default, no information will appear in the WYSIWYG Editor.
Keyword Replacements on the Checkout Bodycopy
A list of keyword replacements is provided in the WYSIWYG Editor toolbar on the Edit Contents screen of the Checkout Bodycopy. You can use these keyword replacements in conjunction with text, images and links etc to configure the layout of the checkout page. The standard keyword replacements that are available include the following:
- Cart Summary: this will show the summary of the Cart including the items, quantity of each item and the total cost.
- Delivery Method Selector: this will show a drop down menu with the available delivery methods. Please note that an Ecommerce Default Delivery Method must be linked to the Checkout Page for this menu to display any options.
- Delivery Method Interface: this will show the selected delivery form. Please note that an Ecommerce Default Delivery Method must be linked to the Checkout Page for the delivery form to show.
- Error Messages: this will show any errors the user may have received when they click the submit button.
- Go To Confirmation Button: this will show the Go To Confirmation button allowing the user to proceed to the confirmation page.
- Number Of Items: this will show the number of items in the order.
- Number Of Total Items: this will show the number of total items, including tax and/or delivery fees, in the order.
Confirmation Bodycopy
The Confirmation Bodycopy is used to define the layout of the confirmation page of the Checkout Page asset. To create a layout for this page, right click on the Confirmation Bodycopy in the Asset Map and select Edit Contents. Click on the ![]() icon – the WYSIWYG Editor will appear where you can use the keyword replacements and formatting to set the layout of the information to show on the checkout page. By default, no information will appear in the WYSIWYG Editor.
icon – the WYSIWYG Editor will appear where you can use the keyword replacements and formatting to set the layout of the information to show on the checkout page. By default, no information will appear in the WYSIWYG Editor.
Keyword Replacements on the Confirmation Bodycopy
A list of keyword replacements is provided in the WYSIWYG Editor toolbar on the Edit Contents screen of the Confirmation Bodycopy. You can use these keyword replacements in conjunction with text, images and links etc to configure the layout of the confirmation page. The standard keyword replacements that are available include the following:
- Customised Receipt: this will show the customised receipt. For this keyword replacement to be available, the Customise Receipt Controls option must be enabled on the Display Formatting Options screen of the Checkout Page asset. For more information, refer to the Customised Receipt section of this chapter.
- Cart Summary: this will show the summary of the Cart including the items, quantity of each item and the total cost.
- Confirmation Summary: this will show the layout of the Ecommerce Default Delivery Method confirmation page. The layout of this page is managed through the delivery method's Confirmation Bodycopy. For more information, refer to the Confirmation Bodycopy section of the Ecommerce Default Delivery Method chapter.
- Confirm Order Button: this will show the Confirm button allowing the user to confirm their details and proceed to payment.
- Return to Checkout Button: this will show the Return to Checkout button allowing the user to return to the checkout page.
- Number Of Items: this will show the number of items in the order.
- Number Of Total Items: this will show the number of total items, including any tax and delivery fees in the order.
Failure Bodycopy
The Failure Bodycopy is used to define the layout of the failure page of the Checkout Page asset. To create a layout for this page, right click on the Failure Bodycopy in the Asset Map and select Edit Contents. Click on the ![]() icon – the WYSIWYG Editor will appear where you can use the keyword replacements and formatting to set the layout of the information to show on the failure page. By default, no information will appear in the WYSIWYG Editor.
icon – the WYSIWYG Editor will appear where you can use the keyword replacements and formatting to set the layout of the information to show on the failure page. By default, no information will appear in the WYSIWYG Editor.
Keyword Replacements on the Failure Bodycopy
A list of keyword replacements is provided in the WYSIWYG Editor toolbar on the EditContents screen of the Failure Bodycopy. You can use these keyword replacements in conjunction with text, images and links etc to configure the layout of the failure page. The standard keyword replacements that are available include the following:
- Failure Summary: this will show the layout of the Ecommerce Default Delivery Method failure page. The layout of this page is managed through the delivery method's Failure Bodycopy. For more information, refer to the Failure Bodycopy section of the Ecommerce Default Delivery Method chapter in this manual.
- Insufficient Product Quantity Message: this will show text entered in the Checkout Insufficient Product Quantity Message field on the Checkout Page Quantity Tracking screen when there is insufficient stock to proceed with the order. Please note that the Quantity Tracking settings must be enabled for Quantity Tracking to work. For more information, refer to the Quantity Tracking section of this chapter.
- Return to Checkout Button: this will show the Return to Checkout button allowing the user to return to the checkout page.
Receipt Bodycopy
The Receipt Bodycopy is used to define the layout of the receipt page of the Checkout Page asset. To create a layout for this page, right click on the Receipt Bodycopy in the Asset Map and select Edit Contents. Click on the ![]() icon – the WYSIWYG Editor will appear where you can use the keyword replacements and formatting to set the layout of the information to show on the receipt page. By default, no information will appear in the WYSIWYG Editor.
icon – the WYSIWYG Editor will appear where you can use the keyword replacements and formatting to set the layout of the information to show on the receipt page. By default, no information will appear in the WYSIWYG Editor.
Keyword Replacements on the Receipt Bodycopy
A list of keyword replacements is provided in the WYSIWYG Editor toolbar on the Edit Contents screen of the Receipt Bodycopy. You can use these keyword replacements in conjunction with text, images and links etc to configure the layout of the receipt page. The standard keyword replacements that are available include the following:
- Customised Receipt: this will show the customised receipt. For this keyword replacement to be available, the Customise Receipt Controls option must be enabled on the Display Formatting Options screen of the Checkout Page asset. For more information, refer to the Customised Receipt section of this chapter.
- Receipt Summary: this will show the layout of the Ecommerce Default Delivery Method success page. The layout of this page is managed through the delivery method's Success Bodycopy. For more information, refer to the Success Bodycopy section of the Ecommerce Default Delivery Method chapter.
- Cart Summary: this will show the summary of the Cart including the items, quantity of each item and the total cost.
Customised Receipt Bodycopy
The CustomisedReceipt Bodycopy folder is used to define the customised layout of the receipt page of the Checkout Page asset. The Receipt Format and Receipt Contents Bodycopies are found in this folder. For the Customised Receipt Bodycopy folder to be available, the Customise Receipt Controls option must be enabled on the Display Formatting Options screen of the Checkout Page asset. For more information, refer to the Customised Receipt section of this chapter.
Receipt Format
The Receipt Format Bodycopy is used to define the layout of the receipt listing. This listing is shown when the keyword replacement Receipt Listing is used on the Receipt Contents Bodycopy. To create a layout for the receipt listing, right click on the Receipt Format Bodycopy in the Asset Map and select Edit Contents. Click on the ![]() icon – the WYSIWYG Editor will appear where you can use the keyword replacements and formatting to set the layout of the information to show on the receipt listing. By default, no information will appear in the WYSIWYG Editor.
icon – the WYSIWYG Editor will appear where you can use the keyword replacements and formatting to set the layout of the information to show on the receipt listing. By default, no information will appear in the WYSIWYG Editor.
Keyword Replacements on the Receipt Format Bodycopy
A list of keyword replacements is provided in the WYSIWYG Editor toolbar on the Edit Contents screen of the Receipt Format Bodycopy. You can use these keyword replacements in conjunction with text, images and links etc to configure the layout of the receipt listing. The standard keyword replacements that are available include the following:
- Item Quantity Added To Cart: this will show the quantity of an item in the order. For example, if the order contains two rings and one necklace, this keyword replacement will list 2 and 1.
- Individual Item Price Including Tax: this will show the price of a single item in the order. If the item is taxable, the price listed will include tax.
- Individual Item Tax Amount: this will show the amount of tax that has been added to the price of a single item in the order. If an item is not taxable, this keyword replacement will list 0.00.
- Individual Item Price Excluding Tax: this will show the price of a single item in the order, without any tax applied.
- Item Price Total Excluding Tax: this will show the total price of the full quantity of an item in the order, including multiples, without any tax applied.
- Item Price Total: this will show the total price of the full quantity of an item in the order, including multiples. For example, if a ring is priced at two dollars and there are two rings in the order, this keyword replacement will list 4.00.
- Item Tax Total: this will show the total amount of tax that has been added to the price of the full quantity of an item in the order, including multiples. For example, if a ring has a tax amount of one dollar and there are two rings in the order, this keyword replacement will list 2.00.
Receipt Contents
The Receipt Contents Bodycopy is used to define the layout of the customised receipt. This customised receipt is shown when the keyword replacement Customised Receipt is used on either the Receipt or Confirmation Bodycopies of the Checkout Page or the Receipt Email Options of an Ecommerce Default Delivery Method.
To create a customised layout for this page, right click on the Receipt Contents Bodycopy in the Asset Map and select Edit Contents. Click on the ![]() icon – the WYSIWYG Editor will appear where you can use the keyword replacements and formatting to set the layout of the information to show on the customised receipt. By default, no information will appear in the WYSIWYG Editor.
icon – the WYSIWYG Editor will appear where you can use the keyword replacements and formatting to set the layout of the information to show on the customised receipt. By default, no information will appear in the WYSIWYG Editor.
Keyword Replacements on the Receipt Contents Bodycopy
A list of keyword replacements is provided in the WYSIWYG Editor toolbar on the Edit Contents screen of the Receipt Contents Bodycopy. You can use these keyword replacements in conjunction with text, images and links etc to configure the layout of the customised receipt. The standard keyword replacements that are available include the following:
- Receipt Listing: this will show the receipt listing as configured in the Receipt Format Bodycopy.
- Total Tax: this will show the amount of tax that has been added to the price of the order. If the order contains no taxable items, this keyword replacement will list 0.00.
- All Flat Fees Listed: this will show a list of the flat fees charged to this order.
- Total Flat Charges: this will show the amount of flat fees that have been added to the price of the order. If the order contains no flat fee charges, this keyword replacement will list 0.00.
- Sub Total (Grand Total Excluding Tax and Delivery): this will show the cost of the order not including tax or delivery fees.
- Delivery Total: this will show the amount of delivery fees that have been added to the to the price of the order. If the order contains no delivery charges, this keyword replacement will list 0.00.
- Grand Total: this will show the total cost of the order.
Ecommerce Order
E-commerce system orders are stored under the Checkout Page asset as Ecommerce Order assets. These orders are stored under the following folders:
- Pending Orders: ecommerce orders are created in this folder when a user enters the payment gateway. Once payment is complete, these orders are moved to the Completed Orders folder.
- Completed Orders: ecommerce orders that are successfully processed by the payment gateway are stored in this folder.
- Orders To Review: ecommerce orders that are processed but are unable to be completed due to insufficient product quantity, are stored in this folder.
The Details screen of an Ecommerce Order provides information on the order including a summary of the order and the payment gateway transaction ID. For more information about the Status, Future Status and Thumbnail sections, refer to the Details Screen chapter in the Asset Screens manual.
Order Details
This section displays the method of delivery selected and the status of the order.

The Order Details section of the Details screen
The fields listed in this section are as follows:
- Delivery Method: the delivery method chosen by the user will be displayed in this field.
- Processing Status: the status of the order will be displayed in this field. For example, Completed or Processing.
Summary
This section displays a summary of the order. The Summary section of the Details screen is shown in the figure below.

The Summary section of the Details screen
In the Order Receipt field, a summary of the e-commerce order will be displayed, including ordered items and form responses.
Audit Trail
This section lists the user's interaction with the order. The Audit Trail section of the Details screen is shown in the figure below.

The Audit Trail section of the Details screen
In the Actions field, the actions of the order will be listed, including the time, date and the activity performed.
Ecommerce Reference Number
This section displays the transaction ID of the order if the SecurePay eSec Payment Gateway was used to pay. The Ecommerce Reference Number section of the Details screen is shown in the figure below.

The Ecommerce Reference Number section of the Details screen
In the SecurePay Transaction ID field, the transaction ID of the order will be recorded.