Linking
Last Updated: 29 Jan 2021
The Linking screen lists all of the current links associated with the asset. It allows you to change the link type of the asset from TYPE_1 or TYPE_2 to either TYPE_1, TYPE_2, or NOTICE, as well as set up a linking job to happen at a future date and time.
Bookmarks
Current Linking
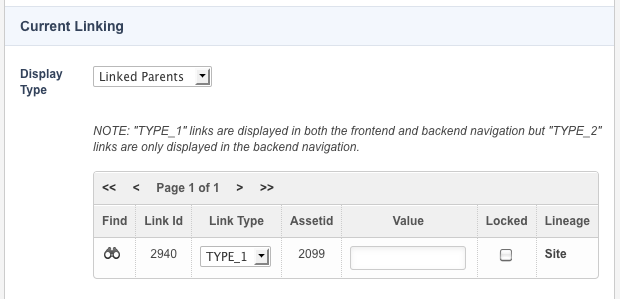
This section lists all of the current links associated with the asset and allows you to change the link type of the asset.

The Current Linking section of the Linking screen
By default, the parent links are displayed (i.e., where this asset is located). To display the child assets, switch to Linked Children In the Display Type select field.
Changing the Link Type of the Current Asset and its Children

A TYPE_2 asset
An asset's link to its parent is set in the Link Type field when it is first created. You can change this link type to change how the asset is displayed on the front end. For example, if an asset is created as a TYPE_1 asset, it will be displayed in a site's navigation menu. Changing it to a TYPE_2 asset will mean that it will be hidden from the menu. Alternatively, you can change the link type of the current asset's link to its child from, for example, a TYPE_1 to a TYPE_2. This works oppositely, making the child asset hidden from the site's navigation menu. For assets that are TYPE_2 links, a ![]() icon is shown on the asset icon in the Asset Map. For example, in the figure shown to the right, the Privacy Page asset has been changed to a TYPE_2 link and hidden from the Site's navigation menu.
icon is shown on the asset icon in the Asset Map. For example, in the figure shown to the right, the Privacy Page asset has been changed to a TYPE_2 link and hidden from the Site's navigation menu.
To change the link type, select TYPE_2 from the Link Type field in the Current Linking section and click Commit. The TYPE_2 assets will not appear in the Site's menu navigation, and the icon in the Asset Map will be updated.
Change asset link type in Matrix 5 from Squiz on Vimeo.
Associated Links
The Current Linking section lists either the Linked Parents or Linked Children associated with the asset. Hyperlinks will be displayed when viewing the Linked Parents list. For example, if you are viewing the Linked Parents of an MS Word Document, it will list all of the assets in the system that has a hyperlink to the MS Word Document.
For each asset listed in the Associated Links list, the following information is shown:
- Link ID: this is the ID of the link used internally within Squiz Matrix.
- Link Type: this is the type of link, and can be either:
- TYPE_1: if the asset has a link of this type, this asset appears in the Site's navigation menu.
- TYPE_2: if the asset has a link of this type, this asset does not appear in the Site's navigation menu.
- TYPE_3: Squiz Matrix creates links of this type to indicate a special relationship between the assets. For example, a Custom Form submission is created as a TYPE_3 linked asset (for more information on the Custom Form, refer to the Custom Form manual). TYPE_3 assets are not shown in the Asset Map.
- NOTICE: Squiz Matrix creates links of this type to indicate that something will be affected if you delete this asset. For example, a NOTICE link is created if:
- An asset has been linked within the bodycopy content of another asset. For example, if you create a hyperlink to a PDF Document within the bodycopy of a Standard Page, this link will appear as a NOTICE link on the Linking screen of the bodycopy container.
- An asset is the Index Page or home page of a Site.
- Asset ID: the ID of the asset that it is linked to.
- Value: a value can be entered for links that are TYPE_1, TYPE_2, or NOTICE. This can be used to filter assets in an Asset Listing when you only want to list assets with a certain type of link value, for example. It can also be used for more advanced use cases such as targeting specific links from a Trigger Action or running a JS API call when you want to make sure you only affect certain links.
- Locked: select whether or not to lock the asset link. This will prevent the link from being manipulated, such as being moved elsewhere in the system or trashed. By default, only selected System Asset links, such as those under the System Management folder, will be locked.
- Lineage: this field shows where the asset is located in the hierarchy of the Asset Map.
Create Link
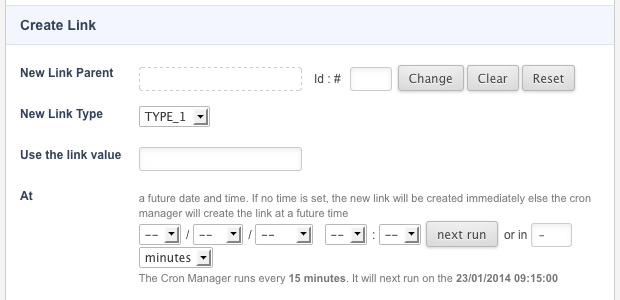
This section allows you to create a new link for the asset at a future date and time.

The Create Link section of the Linking screen
This will create the same asset in a new position in the system. For more information about linking assets, refer to the Concepts manual. To set up a new link job, enter the following information:
- New Link Parent/New Link Child: select the parent or child asset for the new linked asset. For example, if you want to link the asset under the About Us page, the parent asset will be the About Us page, and if you want to link the About Us page under the asset, the child asset will be About Us. The New Link Parent and New Link Child fields are dependant on the Display Type current being viewing. If Linked Parents is being displayed, the New Link Parent field will be available. If Linked Children is being displayed, the New Link Child field will be available.
- New Link Type: select the type of link for the linked asset. For example, if you want to hide the linked asset from the menu navigation, select TYPE_2 from the list. You can select TYPE_1,TYPE_2 or NOTICE.
- At: select the date and time for when the linking job should occur from the list provided.
- Next Run: alternatively, click on the Next Run button to set the date and time to the next run of the Scheduled Jobs Manager.
- Or In: you can set the linking job change to take place in a certain number of minutes, hours, days, weeks, months, or years. Enter the number into the text box and select the appropriate time frame from the list provided.
Tip: If you leave the At field empty, the link will be created when you click Commit.
Once you have filled out the required fields, click Commit. The linking job will appear under the screen's Future Linking section, as shown in the figure below.

The Future Linking section
To delete a Future Linking job, click the delete box and click Commit. This linking job will no longer happen.
Trash Link
This section allows you to create a job to move an asset link to the Trash at a specified date and time.
To set up a new Trash Link job, enter the following information:
- Trash Link: select the asset link to move to the Trash. If there is already a direct child link under the Trash asset for this asset, the link will be trashed instead. You can select to trash all links by selecting All from the list or only a certain link.
Tip: If you select All and leave the At field empty, all linked assets will be deleted from the system, and the asset moved to the Trash.
- At: select the date and time to move the selected link to the Trash using the Scheduled Jobs Manager. If no time is set, the link will be moved to the Trash immediately.
- Next Run: alternatively, click on the Next Run button to set the date and time to the next run of the Scheduled Jobs Manager.
- Or In: you can set the trash to take place in a certain number of minutes, hours, days, weeks, months, or years. Enter the number into the text box and select the appropriate time frame from the list provided.
Tip: If you leave the At field empty, the link will be trashed when you Save the screen.
Once you have filled out the required fields, click Commit. The trash linking job will appear under the Future Linking section of the screen, as shown in the figure below.

The Future Linking section
To delete a Future Linking job, click the delete box and Save the screen. This job will no longer happen.
Dependent Children
This section lists the dependent child assets of an asset, whether they are locked, and their Status. Some examples of a dependent asset include the Page Contents, DIV, and DIV Content.
The following information is shown for each dependent child asset:
- Asset Name: The name and asset ID for each asset in the list. To find out more information about the asset, hover the mouse over the
 icon. To find the asset in the Asset Map, click on the
  icon.
icon. - Lock Status: Whether or not the asset is locked. If someone has a lock on the asset, [LOCKED] will appear next to the asset name. For example, in the figure above, Content DIV 77 (Id: #77) is locked, but the other assets are not locked.
- Status: The Status of each dependent asset in the list. As dependent assets can be linked under many different assets, it can have a different Status to the current asset you are viewing. For example, in the figure above, the current Status of the asset is Live, but Content DIV 77 (Id: #77) has a Status of Safe Editing. If the dependent asset status is higher than the current asset status, then * will appear against the Status. If the Status is lower, then ** will appear against the Status. However, please note that dependants can generally not have a lower status than their parent (unless moved, cloned, or linked under).
./?a= Links
When a link to another asset is created using the WYSIWYG Editor within a Content Container, Matrix links them by using a format of <a href="./?a=1234"> in the HTML content, where 1234 is the Asset ID of the asset you linked to.
This value is then converted to a full URL on the front end when the page is generated. This is so that the relationship between the two assets is always made via an ID rather than a URL, as the URL can change at any time.
You can also use this format when creating links between assets in Raw HTML Content Containers and the Parse File.
This process creates a NOTICE link between the two assets to relate them to each other, adding the link value to the asset's Linking screen.
