Roles
Last Updated: 25 Jan 2018
Roles are a specialised form of User Groups. Like you can for User Groups, you can grant permissions to Roles or include them in steps within a Workflow Schema. However, unlike User Groups, the users who are assigned to Roles are not fixed; rather you can define which Users or User Groups are assigned to a Role for individual assets.
Bookmarks to the headings on this page:
Roles are created under the Users Folder by a System Administrator. Each asset has a Roles screen to allow an administrator to assign Users or User Groups to a Role. When you are selecting Users or Users Groups to assign permissions to, or when adding them in a Workflow Schema, a Role can be used instead. In this case, when a Role is used, only the Users or Users Groups assigned to that Role for that asset will be given that permission or be able to make the approval in Workflow.
Roles are generally not recommended for a system that only has one Site. When you use Roles, all permission checks within the system can be slower as they are highly dynamic. If you are considering using Roles, make sure you have the hardware in place to cope with the additional database load. As an alternative, you could try using a dynamic Workflow.
Example of Using Roles
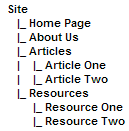
An example Site structure
Consider a Site with the structure shown in the figure to the right. This Site has three sets of people who maintain it. Team A maintains the Home Page and About Us pages. Team B maintains the Articles section. Team C maintains the Resources section. Each team has an administrator who leads the team. This person is responsible for approving all changes made by their team through Workflow. Each team also has a legal expert who must approve all content changes before they can be made available to the public.
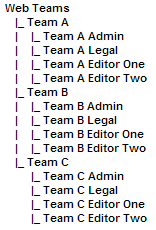
User Group structure
The users are grouped into User Groups as shown in the figure to the left. Each of these teams requires Write Permission on the pages that they maintain except for the administrator of the team, who requires Admin Permission.
The desired Workflow for all of the pages in the Site is:
- Step 1: The legal expert of the team approves content changes made by other members of the team.
- Step 2: The administrator of the team approves content changes made by other members of the team.
This Workflow is simple but it will require three Workflow Schemas to be created, as each step requires a different user to be assigned for each of the three sections. Building and maintaining three Workflow Schemas that have the same structure can be painful.
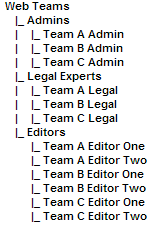
User Group structure for Roles
To get around this we could create a new set of User Groups, as shown in the figure to the right. Then we can change the Workflow Schema to look like this:
- Step 1: A member of the Legal Experts User Group approves content changes made by other members of the team.
- Step 2: A member of the Admins User Group approves content changes made by other members of the team
This works and does allow us to add new team members in the future. However, it introduces a problem where users in the Workflow are sent internal messages (and emails) informing them that a piece of content requires reviewing but that piece of content may not be within their section of the Site. They can ignore this message, but it could get annoying.
By using Roles we can get around this problem. We can create two Roles – an Administrator Role and a Legal Expert Role. For each asset in the Site we assign the Roles and which user is performing which Role on the Roles screen. The role assignments that we need to apply are outlined below:
- On the Home Page, the Administrator Role is assigned to the Team A Admin user and the Legal Expert Role to the Team A Legal user.
- On the About Us page, the Administrator Role is assigned to the Team A Admin user and the Legal Expert Role to the Team A Legal user.
- For the Articles section, the Administrator Role is assigned to the Team B Admin user and the Legal Expert Role to the Team B Legal user.
- For the Resources section, the Administrator Role is assigned to the Team C Admin user and the Legal Expert Role to the Team C Legal user.
We can now change the Workflow Schema to look like this:
- Step 1: The Legal Expert Role approves content changes made by other members of the team.
- Step 2: The Administrator Role approves content changes made by other members of the team
When a piece of content requires reviewing, only the users that are assigned the Roles for that asset will receive an internal message (and emails) and hence be able approve that content. For example, if an editor changed the Home Page, only the Team A Legal user and the Team A Admin user will receive the message and be able to approve the changes.
Adding a Role
Once your Role is created, you can configure the settings of it on its associated asset screens. These screens are often the same or similar to those for a Standard Page and are described in the Asset Screens manual. In this chapter, we will describe the Details screen, which is different for a Role.
Details Screen of a Role
The Details screen allows you to change the name and status of a Role. For more information about the Status, Future Status and Thumbnail section of the Details screen, refer to the Details Screen chapter in the Asset Screens manual.
Details
By default, the name that was entered into the Role Name field when the Role was created will appear in this section. The Details section of the Details screen is shown in the figure below.

The Details section of the Details screen
You can change the name of the Role by clicking into the Role Name field and entering the new name for the Role.
Role Assignments Screen
The Role Assignments screen on a user account allows you view all of the Roles that a user has been assigned. It also allows you to reassign these Roles. The Roles that this user is assigned to perform section of the Role Assignments screen for a Backend User is shown in the figure below.
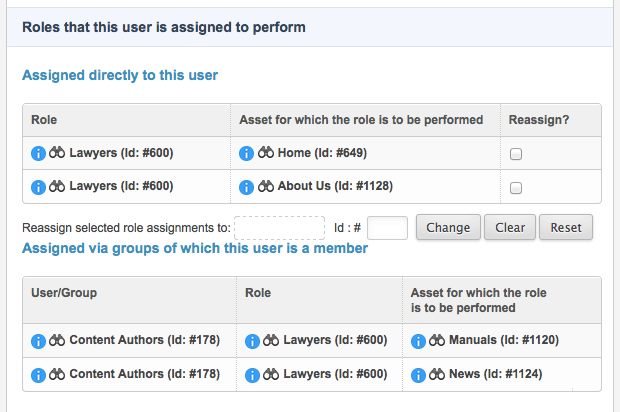
The Roles that this user is assigned to perform section
The screen is broken up into sections. The first section lists the Roles that have been directly assigned to this user. For example, in the figure above, this user has been assigned to the Lawyers Role on the Home and About Us pages. The second section lists the Roles that have been assigned to this user via a User Group. For example, in the figure above, the Content Authors User Group has been assigned the Lawyers Role on the Manuals and News pages. As this user is stored under the Content Authors User Group, they have been assigned these Roles.
On this screen, you can reassign the Roles that have been directly assigned to this user. To do this, click the Reassign box for the Role you want to reassign. In the Reassign selected role assignments to field, select the user or User Group you want to reassign this Role to.
Assigning Roles to an Asset
To assign a Role to an asset, right click on the asset and select Roles. Select the Role in the Select a role field and in the Select the users who will perform the role on this asset field, select either the user or User Group who will perform this Role. If you select a User Group, all of the users stored under that group will be assigned this Role. You can add additional users or User Groups by click on the More... button.
You can also select to globally assign the Role by ticking the Allow globally assigned users to perform this role. You can select this option without having to select a user or User Group in the field above.
For more information on global assignments, refer to the Globally Assigning Roles section in this chapter. For more information about the Roles screen, refer to the Asset Screens manual.
Viewing a User's Roles
You can view the Roles that have been assigned to a user on the Role Assignments screen. Right click on the user account asset in the Asset Map and select Role Assignments. The screen is broken up into sections. The first section lists the Roles that have been directly assigned to this user. The second section lists the Roles that have been assigned to this user via a User Group.
For more information about this screen, refer to the Roles Assignments Screen section in this chapter.
Reassigning a User's Roles
You can reassign the Roles that a user has been assigned on the Role Assignments screen. Right click on the user account asset in the Asset Map and select Role Assignments. Click the Reassign box for the Role you want to reassign. In the Reassign selected role assignments to field, select the user or User Group you want to reassign this Role to.
Using Roles
Once you have created your Roles and assigned them to the assets in your Site, you can grant permissions to the Roles or use them as conditions within a Workflow Schema. When you grant permissions to a Role, only the users or User Groups that have been assigned the Role will be given that permission. If you use a Role in Workflow, again, only the users or User Groups that have been assigned that Role for that asset will be able to review the content.
Globally Assigning Roles
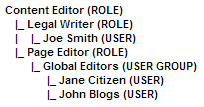
Role hierarchy
Role assets allow other Role assets, User Group assets and user accounts to be linked under them. If a user or User Group is linked under a Role, they have been assigned the Role globally. For example, consider Role hierarchy shown in the figure to the right. This hierarchy is created using Roles, User Groups and Backend Users under the Users Folder in the Asset Map. The Content Editor and Page Editors Roles are assigned to the Home page. Instead of selecting a user or User Group, however, the Allow globally assigned users to perform this role is selected.
The Content Editor Role is then assigned Write Permission to the Home page. This means that any user or User Group that has been assigned to the Content Editor, Legal Writer or Page Editor Roles on the Home page, will be granted Write Permission to the Home page. In addition, the Global assignment of the Content Editor and Page Editors Roles means that the user Joe Smith and the Global Editors User Group (which includes the users Jane Citizen and John Blogs) will also be granted Write Permission to the Home page.
To globally assign a Role for an asset, select Allow globally assigned users to perform this role on the Roles screen. You can also change this option through the Global field in the Current section of the Roles screen.
On a large Site, it is recommended that you do not use Global Role Assignments, as it is one of the most performance intensive things for Squiz Matrix to calculate. Instead, you could try and apply Roles by using the Roles screen of an asset.
