
Submission Actions Screen
Last Updated: 21 Jun 2017
The Submission Actions screen allows you to create custom actions that are run whenever the user submits the form. These actions can do things such as send an email or perform a database query.
Call REST Resource
The Call REST Resource Action submission action communicates with a web service exposing itself using Representational State Transfer (REST) methods. To add this action, check the Create a new action of type option in the Add New Action section, select Call REST Resource and click Commit. The action will be added to the Existing Actions section.
Additional fields will also appear in the Selected Action section.
For more information on these fields and the functions of the Call Rest Resource action, refer to the REST Resource Assets chapter of the Web Services manual.
Validation Rule
The Validation Rule section of the Call REST Resource action allows you to enable validation on the REST call response, checking the HTTP response code or body against a set validation rule.

The Validation Rule settings for the Call REST Resource Submission Action
The fields available are as follows:
- Enable Validation: selecting this field will enable validation checking on the response of the REST call as per the conditions specified in the Validation Rule field.
- Validation Rule: this field allows you to configure the rule to check the REST response against. The fields available allow you to specify that All or One of either the HTTP Code or Response Body must:
- match or not match a specified Regex value,
- be greater than a specified numerical value, or
- be less that a specified numerical value.
- Custom Error Text: this field allows you to specify the error message that will be displayed when the REST response does not meet the set conditions for validation; submission of the form will be ceased and the error message specified in this field will be displayed to the user (the error will also be logged to the Squiz Matrix database).
Create Sharepoint List Item
The Create Sharepoint List Item submission action submits form submissions as SharePoint list items. To add this action, check the Create a new action of type option in the Add New Action section, select Create Sharepoint List Item and click Commit. The action will be added to the Existing Actions section.
Additional fields will also appear in the Selected Action section.
For more information on the Create Sharepoint List Item action, refer to the Using a Custom Form to Create SharePoint List Items example in the SharePoint manual.
Make SOAP Call
The Make SOAP Call submission action sends a message to a remote SOAP Server. To add this action, check the Create a new action of type option in the Add New Action section, select Make SOAP Call and click Commit.
The Make SOAP Call action supports both SOAP 1.1 and SOAP 1.2 standards. Please note, however, that WS-Security features and MIME multi-part attachments are not currently supported by this submission action.
The fields available in this section are as follows:
- Action Name: this is the name of the action that you have added. By default, it is set to Make SOAP Call Before Submit. This name appears in the Action Name / Type field in the Existing Actions section.
- WSDL: enter the URL to the WSDL of the SOAP server.
- Authentication Type: select the authentication to use to access the SOAP server. The following authentication types are available:
- HTTP Basic: basic HTTP authentication using a specified username and password.
- JSESSION ID Cookie: uses a JSESSIONID cookie to communicate with Oracle CRM On Demand web services.
- WSS Username Token: user identity authentication using a WS-security username token.
- WSS Password Digest: similar to the WSS Username Token authentication type, with the addition of a nonce token that includes a creation timestamp and sends the password as a digest hash.
- Marketo Signature: allows integration with a Marketo service, allowing for the creation, retrieval and removal of entities and data stored within their system. For more information, refer to the Marketo Developers site.
- NTLM: uses NTLM authentication using a specified username and password.
- Authentication Details: enter the authentication details of the SOAP server connection. The fields available in this section will differ, depending on the authentication selected in the Authentication Type field.
If you are using either the HTTP Basic, WSS Username Token or WSS Password Digest authorisation types, the following fields will be available in this section:
- Username: enter the username used to connect to the SOAP server.
- Password: enter the password used to connect to the SOAP server.
If you are using the JSESSION ID Cookie authorisation type, both the Username and Password fields will be available in this section, as well as the following:
- Auth URL: enter the login URL for the web service.
If you are using the Marketo Signature authorisation type, the following fields will be available in this section:
- Access Key: enter the access key (user ID) for the connection, as provided to you by Marketo.
- Secret Key: enter the secret key (encryption key) for the connection, as provided to you by Marketo.
The following authentication options are available for SOAP servers used over HTTPS:
- Local Certificate: select the local certificate for authentication on the SOAP server.
- Passphrase: enter the passphrase for authentication on the SOAP server.
Once you have done this, click Commit. Additional fields will be displayed where you can view the request and response messages of the SOAP server and any generated keyword replacements.
Additional SOAP Headers
This section allows you to configure additional request headers to be sent by the SOAP Call. For each SOAP header that is added you can configure the following fields:
- Node Name: the name of the node tag to construct the header with.
- Node Value: the value of the header node tag.
- Encoding: select the encoding type to use for this header. This will automatically convert the Node Value to the correct format for the encoding type when the SOAP Call is made.
- Namespace: the namespace to use for this header. This namespace will be added to SOAP Envelope tag surrounding the whole SOAP XML request.
- Type Name: the name to use for the Type Namespace value in the node tag to construct the header with.
- Type Namespace: the type namespace to use for this header. This namespace will be added to SOAP Envelope tag surrounding the whole SOAP XML request.
- Must Understand: if enabled, this header element is considered mandatory and the SOAP recipient must support it. The SOAP server endpoint should then not process the SOAP call if it doesn't recognise the header.
- Delete: click to delete this header from the SOAP Call configuration.
Example:
The following is an example of an additional SOAP header and how each value is translated into the SOAP request with a WSDL URL value of http://www.webservicex.com/globalweather.asmx?wsdl:
| Node Name | Node Value | Encoding | Namespace | Type Name | Type Namespace | Must Understand |
|---|---|---|---|---|---|---|
| aaa | bbb | XSD_STRING | ccc | ddd | eee | Yes |
This will be translated into the following SOAP XML Request:
<?xml version="1.0" encoding="UTF-8"?><SOAP-ENV:Envelope xmlns:SOAP-ENV="http://schemas.xmlsoap.org/soap/envelope/" xmlns:ns1="http://www.webserviceX.NET" xmlns:ns2="eee" xmlns:xsi="http://www.w3.org/2001/XMLSchema-instance" xmlns:ns3="ccc"> <SOAP-ENV:Header> <ns3:aaa xsi:type="ns2:ddd" soap:mustUnderstand="1">bbb</ns3:aaa> </SOAP-ENV:Header> <SOAP-ENV:Body> ... </SOAP-ENV:Body></SOAP-ENV:Envelope>
SOAP Options Section
This section allows you to configure additional options on the Make SOAP Call submission action. The fields available in this section are as follows:
- Cache WSDL: select the caching system for the retrieved WSDL file information of the SOAP server (as specified in the WSDL field). Caching the WSDL file is useful if this information is usually unaltered, allowing Squiz Matrix to instead retrieve the WSDL file information directly, potentially improving performance. The caching options available are:
- Never Cache (the default option)
- Cache to disk
- Cache to memory
- Cache to both disk and memory
- Mute SOAP Exceptions: if an exception is thrown by the SOAP client, a response will not be returned by the Submission Action. This options allows you to select whether or not to disregard these SOAP exceptions. If this field is enabled, SOAP responses will be returned even if an exception is thrown.
Test Response
This section allows you to test the response of the SOAP request specified in the SOAP Request Message section.
To do this, select the Run Test field and click Commit. A sample SOAP request and response will be printed in this section, as shown in the figure below.

Testing the response of the SOAP request
The tool is useful for testing purposes when configuring the SOAP call in the SOAP Request Message section.
SOAP Request Message
This section allows you to view the actions available and edit the request message of the SOAP call. An example of the SOAP Request Message section is shown in the figure below.
 The SOAP Request Message section of the Make SOAP Call submission action
The fields available are as follows:
- Action: Select the action to use on the request message. These actions are determined by the file that has been selected in the WSDL field. In the figure above, the ListProperties action is being used.
- Parameters: the default request message of the selected Action will be listed in this section, allowing you to configure the parameter values of the Action (marked as ??). Question keyword replacements can be used in the request message, for example, %response_100_q1% , %question_name_100_q1% or %file_upload_100_q2%.
You can also use the %file_upload_100_q1% keyword to access the file uploaded into a file upload form field. Using the ^base64encode keyword modifier you can then also print the contents of the uploaded file in Base64 format, for example, %file_upload_100_q1^base64encode%.XML namespaces are also supported, for example:<?xml version="1.0"?><flt:FWTObjectID xmlns:flt="http://www.example.com/wsdl/FLTypes"> <flt:ObjectType>foo</flt:ObjectType></flt:FWTObjectID>
SOAP Response Message
This section displays the default response message from the SOAP call, displaying the parameter values that will be returned (marked as ??). An example of the SOAP Response Message section is shown in the figure below.

The SOAP Response Message section of the Make SOAP Call submisison action
Check Response
This section allows you to specify a field on the SOAP response for validation purposes. Matrix will display custom error messages if incorrect data is returned on the SOAP response.
The New field to check? field will list the available SOAP response fields, populated by the request message configured in the SOAP Request Message section.
To enable data validation on a response field, select the field in this list and click Commit. Additional fields will appear in this section, as shown in the figure below.

Additional fields in the Check Response section
The following fields are available in order to configure the Check Response validation requirements:
- Rule: specify the rule that will evaluate whether or not data returned on the SOAP response is valid. The rule types available are:
- Must contain
- Must contain (Case sensitive)
- Must NOT contain
- Must NOT contain (Case sensitive)
- Must be equal to
- Must NOT be equal not
- Must be less than
- Must be less than or equal to
- Must be more than
- Must be more than or equal to
- Value: enter a value that will be used to evaluate whether or not data returned on the SOAP response is valid (as determined by the rule type selected in the Rule field).
- Error Message: enter an error to display for users if data validation fails. You can use the keywords listed in the Keywords Available section on this error message.
For example, if you set the validation Rule and Value as Must NOT contain Fail, the response will only be deemed valid if the response does not contain the value Fail. If it does contain this value, the returned data will be evaluated as invalid and the error configured in the Error Message field will be displayed.
Error messages defined in the Check Response section are displayed on the Custom Form via the %form_errors% keyword replacement. When the validation check fails, users will not be permitted to submit their form. Only when all errors have been addressed and validation succeeds can a form submission be made.
To delete a SOAP response field from the Check Response section, select its corresponding Delete checkbox and click Commit.
Keywords Available
The parameter values returned from the SOAP call will be stored as global session variables and can be printed using the keyword replacements that will be listed in this section. These keyword replacements will differ depending on the parameters of the SOAP action. An example of the Keywords Available section is shown in the figure below.

The Keywords Available section of the Make SOAP Call submission action
Response to Download as File
This section allows you to specify keywords (as listed in the Keywords Available section) that correspond to files on the SOAP response, temporarily storing these files on the Squiz Matrix server.
To use this field, enter the field keywords that will return files on the SOAP response. When a file is returned on the SOAP response, Squiz Matrix will temporarily store this file on the server and replace the specified keyword with a relative URL to this file.
As you commit each keyword in this field, additional fields will appear, allowing you to configure multiple field keywords.
Log
This section allows you to enable custom logging for the SOAP requests. The following configuration options are available:
- Enable Log: enable this to turn on the custom logging feature for this SOAP call.
- Location: enter the location on the file server for the logs to be created under. The path is relative to your Matrix installation location unless prefixed with a '/'. This path must be allowed in the Authorised File Write Paths setting under the External Tools Configuration screen.
- Log Name: enter the name of the log file name.
- Log Format: enter the format of each log entry.
Marketo Submit Form
This feature requires a Marketo Bridge to be integrated and configured in your system.
The Marketo Submit Form submission action lets you perform a native form submission from Matrix, into a form configured in Marketo.
This is useful if you want to have triggers that fire marketing campaigns in Marketo whenever a form submission is made. You also don't even have to set up any fields in the Marketo form to sync the attributes from the Matrix form fields to a Marketo record, you can simply just manage all the form fields on the Custom Form asset in Matrix.
Connection Details
- Marketo Bridge Asset: Select the Marketo Bridge to use as the integration point for the form submission action. For this submission action to work, the Pod URL and Munchkin Account ID values must be set on the Marketo Bridge.
- Include Munchkin Cookie: If enabled, the form will try and send the value of the the
_mkt_trkcookie (if available on the frontend) along with the form submission POST request to Marketo. This is useful if you want to link the form submission in Marketo with the Munchkin user in Marketo. For more information about the Munchkin functionality, please refer to the developer documentation on the Marketo website. - Marketo Form ID: The ID of the form in Marketo. For example, if the embed code of the Marketo form has a value of
mktoForm_48, the ID of the form is 48. - Submission Referrer: The URL of the page that the user submitted the form on. By default, this is populated with
%globals_asset_url%%globals_server_QUERY_STRING^prepend_if:?%. This is so that both the URL and any query strings (if present) on the URL will be included in the submission to Marketo.
Attribute Sync Settings
This section let's you configure which attributes to send over to the Marketo form. You can either send values submitted to the various form fields of the Custom Form, or you can use other Global Keywords to source values from.
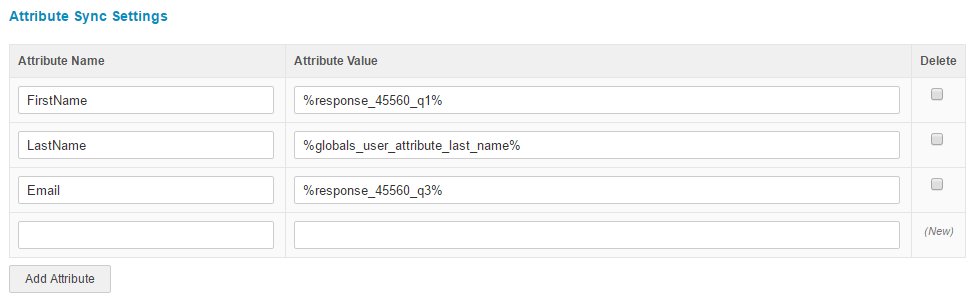
Note that these fields don't require you to have the attributes set up as form fields in your Marketo form in order to sync them over.
Run Database Query
The Run Database Query submission action performs a database query upon submission. To add this action, check the box Create a new action of type in the Add New Action section, select Run Database Query in the list provided and click Commit. The action will be added to the Existing Actions section.
Additional fields will also appear in the Selected Action section.
The fields available in this section are as follows:
- Action Name: this is the name of the action that you have added. By default, it is set to Send Email. This name appears in the Action Name / Type field in the Existing Actions section.
- Database Details: this section allows you to enter the connection details for the database. Select either Specify database details, Use a complete DSN or Use the contents of a DB Connector asset. If you select to use a DB Connector asset, the Login Details that are entered into the section below will be ignored. For more information on the DB Connector asset, refer to the Data manual.
- Login Details: enter the User Name and Password for the database.
- SQL Query: enter the SQL query to be executed when a user submits the Custom Form. You can use keyword replacements to expose content from the submission within the SQL query, such as the responses made by the user on the form, for example:
INSERT INTO DemoTable VALUES (%response_100_q1%, %response_100_q2%)
The keyword replacements available for use within the SQL query are the same as those available on the Thank You Bodycopy. For more information, refer to the Formatting the Custom Form chapter in this manual.
Once you have entered this information, click Commit. The submission action will be marked as valid in the Existing Actions section.
Save as XML
The Save as XML submission action exports form submissions as an XML structure. To add this action, check the box Create a new action of type in the Add New Action section, select Save as XML in the list provided and click Commit. The action will be added to the Existing Actions section.
Additional fields will also appear in the Selected Action section. The fields available in this section are as follows:
- Action Name: this is the name of the action that you have added. By default, it is set to Save as XML. This name appears in the Action Name / Type field in the Existing Actions section.
- Location: enter a server file path as a destination for the saved XML files. A location must be specified for the submission action to work.
- XML Detail: select whether the detail of the XML file will be simple or complex. Complex XML files include user's IP addresses and asset ID details. By default, this is set to Simple.
- XML Value to Store: select whether the exported files will contain form answers in either key or value components. By default, this is set to Values.
- Sort Answers: select this option to list submission details on the saved XML file in the order specified on the form. If this option is not selected, submission details will be listed based on the asset IDs of the form questions.
Send Email
The Send Email submission action sends an email upon submission. To add this action, check the box Create a new action of type in the Add New Action section, select Send Email in the list provided and click Commit. The action will be added to the Existing Actions section.
Additional fields will also appear in the Selected Action section.
The fields available in this section are as follows:
- Action Name: this is the name of the action that you have added. By default, it is set to Send Email. This name appears in the Action Name / Type field in the Existing Actions section.
- To: enter the email address of a person who should receive the email. You can enter their email address in the text fields or select their user account in the asset finder field.
- From: enter the email address that will appear in the from field in the email.
- Reply-To: enter the email address for a user to reply to. If no reply-to address is configured, the header will not be sent on the email.
If you have a question where the user has supplied their email address, use the corresponding response keyword replacement in this field to use this as the Reply-To address. This allows the recipient of the email to directly respond to the user who submitted the form.
- Subject: enter the text to be used as the subject of the recipient email. You can use keyword replacements for the responses to the questions the user entered on the form.
- Attachments: check the Include file attachments box to attach the files that have been uploaded via a File Upload question type to this email. The Attach to Emails option on the Details screen of the File Uploaded question needs to be set to Yes. For more information on the Details screen, refer to the File Uploaded Question Type chapter in this manual.
- Body: enter the body of the email. You can enter either the text or HTML version of the email in this field. To edit the HTML version, click on the
 icon – a WYSIWYG Editor will appear. You can use the keyword replacements for the responses to the questions the user entered on the form within the body of the email. Along with these keyword replacements, you can also use the following:
- %form_info%: this will show information about the Custom Form including the asset id, name and URL of the form, and the name and asset id of the Site.
- %form_summary%: this will show the responses that the user entered on the form.
Once you have entered this information, click Commit. The submission action will be marked as valid in the Existing Actions section.
Set Session Variable
The Set Session Var submission action sets session variables from form submissions. To add this action, check the box Create a new action of type in the Add New Action section, select Set Session Var in the list provided and click Commit. The action will be added to the Existing Actions section.
Additional fields will also appear in the Selected Action section.
The fields available in this section are as follows:
- Action Name: this is the name of the action that you have added. By default, it is set to Set Session Var. This name appears in the Action Name / Type field in the Existing Actions section.
- Variable Name: enter the name of the variable in this field. This name can be used within the %global_session_<variable>% keyword replacement to display the value of the session variable.
- Set Value: enter the value of the session variable in this field. Keyword replacements can be used in this field.
Once you have done this, click Commit. The submission action will be marked as valid in the Existing Actions section and the session variable will display the set value for the last submitted form. For example, if a session variable is created with a Variable Name of IP and a Set Value of %form_submission_ip_address%, using the keyword replacement %globals_session_IP% will display the IP address of the user who completed the most recent form submission.
Submit HPRM Record & Submit TRIM Record
The Submit TRIM Record submission action submits form submissions as TRIM records. To add this action, check the Create a new action of type option in the Add New Action section, select Create TRIM Record and click Commit. The action will be added to the Existing Actions section.
Additional fields will also appear in the Selected Action section.
For more information on the Submit TRIM Record action, refer to the Using a Custom Form to Create TRIM Records example in the TRIM manual.
Upload YouTube Video
The Upload YouTube Video submission action uploads a submitted video file to YouTube. To add this action, check the box Create a new action of type in the Add New Action section, select Upload YouTube Video in the list provided and click Commit. The action will be added to the Existing Actions section.
Additional fields will also appear in the Selected Action section.
The Action Name field displays the name of the action you have added. By default, this will be set to Upload Video File. This name appears in the Action Name / Type field in the Existing Actions section.
Client Credentials
This section allows you to authenticate your Squiz Matrix system to access the YouTube API.
In order to authorise your system, you will need to register your system's root URL with Google. For more information, visit the Registration for Web-Based Applications documentation. Please note that you will also need a YouTube-linked Google account for the authorisation process.
The fields available in this section are as follows:
- Consumer Key: enter the consumer key for your system. This will have been provided to you by Google during the registration process.
- Consumer Secret String: enter the consumer secret string for your system. This will have been provided to you by Google during the registration process.
- Developer Key: enter the developer key for your system. This can be obtained on the Dashboard of your Google account.
- Authentication: this field guides you through the authentication process, allowing you to request and authorise the request token for the YouTube API. The steps to do this are as follows:
- 1. Enter the Client Credentials of the Squiz Matrix system. If these credentials have not been specified, this field will display the message Client Credentials Missing.
- 2. Once you have specified and Committed the credentials of your system, a Get Request Token button will be displayed in this field, as shown in the figure below. Clicking this button will obtain the request token of the YouTube API.
- 3. Once you have obtained the request token, an Authorise Token link will be displayed in this field, as shown in the figure below. Clicking this link will direct you to YouTube, where you can approve Squiz Matrix access to the account.
- 4. You will be redirected back to Squiz Matrix; a Get Access Token button will be displayed in this field, as shown in the figure below.
- 5. Click the Get Access Token button. Access will be approved and the message Access Token Granted will appear in this field, as shown in the figure below.
- Reset Authentication: if you have made an error during authentication or wish to change any details, selecting this field and clicking Commit will reset the authentication process.
The field available in this section is:
- Oauth2 Token asset:: Matrix requires an Oauth2 Token asset to be created to authenticate requests to the YouTube data API. Youtube removed support for Oauth1 authentication on April 20, 2015.
YouTube Video Setup
The section defines the settings of the uploaded YouTube videos. The fields available in this section are as follows:
- Privacy: specify the privacy setting of the YouTube video. The options available are Public, Private and Unlisted. This will determine who can view your video on YouTube.
- Title: the title of the YouTube video. You can set a default value for this field in the Video Settings column. You can also specify a form question in the Form Question ID column to use a response on the form submission as the title value of the YouTube video.
- Description: the description of the YouTube video. You can set a default value for this field in the Video Settings column. You can also specify a form question in the Form Question ID column to use a response on the form submission as the description value of the YouTube video.
- Category: the category of the YouTube video. You can set a default value for this field in the Video Settings column. You can also specify a form question in the Form Question ID column to use a response on the form submission as the category value of the YouTube video. For more information on the available categories, view the YouTube Category List documentation.
- Video Source: the source of the video to upload to YouTube. This will be a File Upload form question on the Custom Form.
- Delete Video from server?: select whether or not to delete the temporary video files on the Squiz Matrix server, once uploaded to YouTube. Please note that this setting will only apply when a Create Location is not specified for the File Upload form question. By default, this field is set to Yes.
- Video Upload Timeout (sec): enter the amount of time (in seconds) that Squiz Matrix will attempt to upload the video file to YouTube before returning an error. By default, this field is set to 300 seconds.
Keyword replacements are available for use on the Thank You Bodycopy to print information of YouTube videos uploaded using the Upload YouTube Video submission action. For more information, refer to the Keyword Replacements chapter in this manual.