Product
Last Updated: 02 Jun 2020
product|asset|6.0.0
Product assets allow you to create items that site users can purchase using an e-commerce system. Products can be allocated information such as a price value, a name, a description and specifications for the item.
Adding a Product
When you add a Product, the Create new Product screen will appear. This Details and Product Description sections of this screen are shown in the figure below.
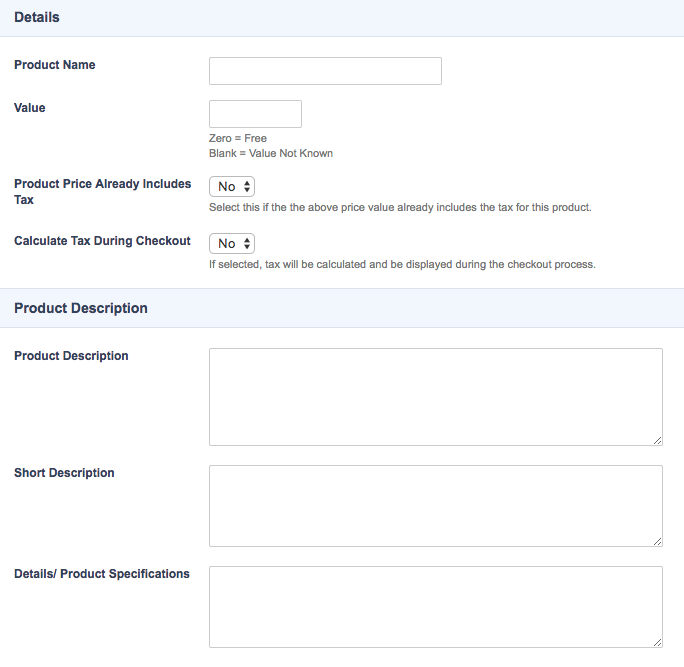
The Details and Product Description sections of the Create new Product screen
Enter the following details for the Product asset:
Details
- Product Name: enter a name for the Product. This will be used as the item name and will appear in the Asset Map. This name will also appear when the keyword replacements %asset_name% and %asset_short_name% are used. This field is required when creating a Product.
- Value: enter a value for the Product. For example, if 4.99 is entered into this field, the value of the product will be $4.99. If 0 is entered into this field, the item will be free while if no value is entered, the item will not have a price attached to it. This value will appear when the keyword replacement %asset_attribute_price% is used.
For an item to be processed in an e-commerce system, it must have an attached price. Items with an unknown price (neither a set price nor free) will result in an error.
When using Product assets on an Ecommerce Form, the %asset_attribute_price% keyword should be used as the Price Source string. For more information, refer to the Asset Purchase section of the Ecommerce Form Page chapter in this manual.
- Product Price Already Includes Tax: select whether or not the price entered in the Value field includes the tax for the Product. If this option is set to No, any applicable tax will be charged during the checkout process if the Calculate Tax During Checkout field is set to Yes. By default, this option is set to No.
- Calculate Tax During Checkout: select whether or not to calculate, display and charge tax to the Product during the checkout process. By default, this option is set to Yes.
Product Description
- Product Description: enter a description of the product. This description will appear when the keyword replacement %asset_attribute_description% is used.
- Short Description: enter a short description of the product. This short description will appear when the keyword replacement %asset_attribute_short_description% is used.
- Details/Product Specifications: enter the details and/or specifications of the product. These details will appear when the keyword replacement %asset_attribute_details% is used.
Once you have added a Product, you can configure its settings on its associated asset screens. The majority of these screens are the same or similar to those for a Standard Page and are described in the Asset Screens manual. In this chapter, we will describe the Details screen, which is different for a Product.
Details Screen
The Details screen for a Product allows you to alter the information entered when the Product was first created. For more information about the Status, Future Status and Thumbnail sections, refer to the Details Screen chapter in the Asset Screens manual. The majority of the fields in the Details and Product Description sections are the same as those described in the Adding a Product section of this chapter and can be used to alter the information of the Product.
Additional fields are available in the Details section to configure the Product for use on a uTransact Payment Gateway, as shown in the figure below.
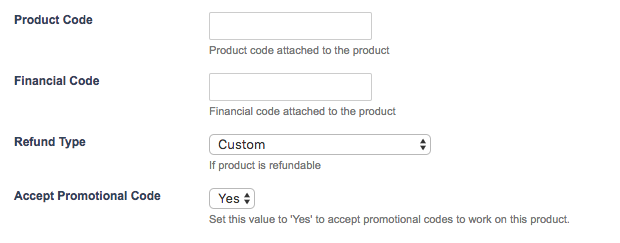
The configuration fields for the uTransact Payment Gateway
The following fields are available:
- Product Code: enter a product code to attach to the Product. This will be used during the payment process on the uTransact Payment Gateway.
- Financial Code: enter a financial code to attach to the Product. This will be used during the payment process on the uTransact Payment Gateway.
- Refund Type: select the refund parameters to use on the uTransact Payment Gateway. The options available include Non-Refundable, Refund Period Expires in a Week and Custom. The Custom refund type can be configured on the Display Formatting Options screen of the Checkout Page asset. For more information, refer to the Checkout Page chapter in this manual. By default, this field will be set to Non-Refundable.
- Accept Promotional Code: select whether or not to accept promotional codes for the Product. These codes allow customers to receive discounts on items. For more information, refer to the Promotional Code chapter in this manual. By default, this field will be set to No, meaning that promotional codes will not be accepted for the Product.
For more information on the uTransact Payment Gateway, refer to the uTransact Payment Gateway chapter in this manual.
Linking Products to an Ecommerce Form Page
When creating an e-commerce system using an Ecommerce Form Page, Product assets must be linked from the Asset Listing Page to the form using the variables specified in the Asset Purchase section of the Ecommerce Form Contents Details screen. In the following example, the Asset ID Request Variable is set to add_to_cart and the Asset Quantity Request Variable is set to add_quantity, as shown in the figure below.
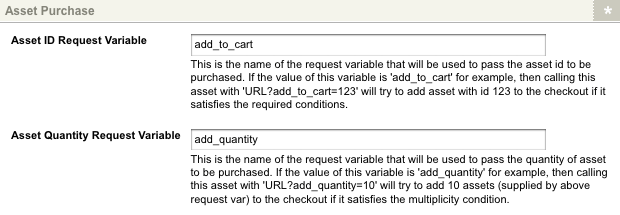
Variables set in the Asset Purchase section of the Details screen
On the Default Bodycopy of the Asset Listing Page, listed Products should be linked to the Ecommerce Form Page using the HTML structure shown in the figure below.

The HTML structure for linking Product assets to an Ecommerce Form Page
Take note of the following sections, underlined in yellow:
- ./?a=<asset_id>: this will send the user to the page of the e-commerce form, where <asset_id> is the asset ID of the Ecommerce Form Page.
- <asset_id_request_variable>=%asset_assetid%: this will add the Product to the e-commerce form, where <asset_id_request_variable> is the Asset ID Request Variable of the e-commerce form.
- <asset_quantity_request_variable>=<quantity>: this will determine the number of items to add to the e-commerce form, where <asset_quantity_request_variable> is the Asset Quantity Request Variable of the e-commerce form and <quantity> is the number of items to add.
When this structure is applied to the above example, the link will appear as shown in the figure below.

The variables applied to the HTML structure
The add_to_cart and add_quantity variables have been added to the link. The <asset_id> and <quantity> fields need to be replaced with the ecommerce setup information. For example, if the asset ID of the Ecommerce Form Page was 100 and we want to sell our items in batches of ten, the link shown in the figure below will be used.

The completed HTML structure
In the above example, the <asset_id> is 100, linking the item to the form, and the <quantity> is 10, adding ten of each item to the form.
Tip: The Asset Quantity Request Variable is not mandatory to include when linking an item to the Ecommerce Form Page. If no quantity is determined, items will be sold individually.
Linking Products to a Cart
When creating an e-commerce system using a Cart and Checkout Page, Product assets can be linked to the Cart from an Asset Listing Page,using the Add an item to the cart Dynamic Parameter.
In the following example, we have created a Dynamic Parameter with the parameter as Add an Item to the Cart and the source as the GET Variable Name add, as shown in the figure below.

The Add an Item to the Cart Dynamic Parameter
On the Default Bodycopy of the Asset Listing Page, listed Products should be linked to the Cart using the HTML structure shown in the figure below.

The HTML structure for adding Product assets to a Cart
Take note of the following sections, underlined in yellow:
- ./?a=<cart_id>: this will send the user to the Cart, where <cart_id> is the asset ID of the Cart
- <add_an_item_to_the_cart_parameter>[%asset_assetid%]=<quantity>: this will add the Product to the Cart, where <add_an_item_to_the_cart_parameter>is the Dynamic Parameter variable of the Cart and <quantity> is the number of items to add.
When this structure is applied to the above example, the link will appear as shown in the figure below.

The Dynamic Parameter added to the HTML structure
The add Dynamic Parameter has been added to the link. The <asset_id> and <quantity> fields need to be replaced with the ecommerce setup information. For example, if the asset ID of the Cart was 100 and we want to sell our items in batches of ten, the link shown in the figure below will be used.

The completed HTML structure
In the above example, the <asset_id> is 100, linking the item to the Cart, and the <quantity> is 10, adding ten of each item to the Cart.
Product assets can also be linked from the item listing to the Cart using the Asset Selections screen.
On the Asset Selections screen of the Asset Listing Page, an Asset Selection must be created to allow users to select the quantity of each Product they would like to purchase. To do this, right click on the Asset Listing Page in the Asset Map and select Asset Selections.
Create a new Asset Selection using the Add New Selection? field. New fields will appear in the Asset Selections section. Configure the Asset Selection using the Input Style and Restrict values to a range fields.
In the following example, we have set the Input Style to a Text Field and the value range from 1 to 10, as shown in the figure below. This means that users will be able to purchase up to ten of each Product by inputting a quantity into the text field.
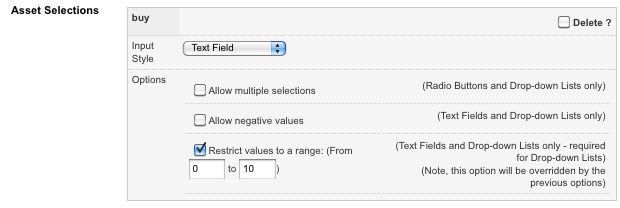
The Asset Selection for the Product
An Asset Target must also be created to allow users to add their Products to the Cart. To do this, create a new Asset Target using the Add New Target? field. New fields will appear in the Asset Targets section. Enter a Button Label and select the Cart in the Target; or Asset field.
In the following example, we have created a button labeled add to cart with the Cart asset as the Asset Target, as shown in the figure below. This means that when users click the add to cart button, the selected Products will be added to the Cart.

The Asset Target for the Product
When the Asset Selection and Asset Target are configured, Keyword Replacements will be available to use on the Bodycopies of the Asset Listing Page, as shown in the following figures, to display the selection field and target button.
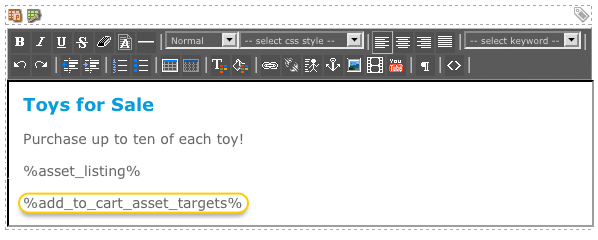
The keyword replacement for the target button on the Page Contents Bodycopy

The keyword replacement for the selection field on the Default Format Bodycopy
Tip: The Keyword Replacements for the selection field and target button will be determined by the names of the Asset Selection and Asset Target configured on the Asset Selections screen. These Keyword Replacements are available from the drop-down menu on the WYSIWYG Editor.
Once you have done this, the selection field and target button will be displayed on the Asset Listing Page. For the Asset Selection to function correctly, a Dynamic Parameter needs to be created in the Cart. To do this, right click on the Cart in the Asset Map and select Details. Create a Dynamic Parameter with the parameter as Add an Item to the Cart and the source as GET Variable Name and click Commit. In the GET Variable Name field, enter the name of the Asset Selection (in this case buy), as shown in the figure below.

The Add an Item to the Cart Dynamic Parameter
Once you have done this, the Products will be able to be added to the Cart when a user enters the number of items they want to purchase and clicks the target button, as shown in the figure below.
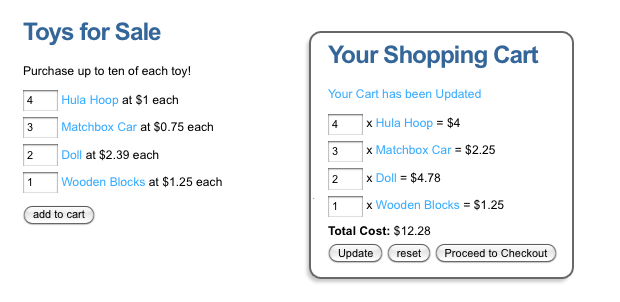
Products linked to a Cart (inset)
