Using a PayPal Payment Gateway
Intermediate
17 Dec 2015
The following example will create an online e-commerce store for our bakery Site, using a PayPal Payment Gateway. The store will have an Asset Listing Page to list the items available for purchase and separate pages for each item. On each item page will be a PayPal Buy Now button to allow users to purchase the item. When a successful transaction is received, an email will be sent to the bakery.
Adding and Setting Up the Paypal Configuration

The Paypal Configuration
- Add a Paypal Configuration asset under your Site, as shown in the figure to the right.
- In the Custom Parameter Secret String field, modify the default secret string to create a unique string for encrypting the Custom Variables.
The Paypal Configuration has now been configured to establish the encrypted PayPal e-commerce system.
Adding and Setting Up the Paypal Business Account

The Paypal Business Account
- Add a Paypal Business Account asset under the Paypal Configuration asset, as shown in the figure to the right.
- On the Details screen, in the Paypal Account Type field, select Sandbox from the drop-down menu. This will allow us to use a Paypal Sandbox account to configure the Paypal payment gateway in a testing environment.
- In the Merchant Account ID field, enter the merchant ID or email address of the corresponding Sandbox account.
- In the Public Certificate Path field, enter the path to the Public Certificate. You must generate this certificate yourself using OpenSSL.
- In the Public Certificate ID field, enter the Public Certificate ID. This ID is supplied by PayPal and must correspond to the public certificate selected in the Public Certificate Path field.
- In the Private Key Path field, enter the path to the Private Key. You must generate this key yourself using OpenSSL.
- In the Paypal Certificate Path field, enter the path to the Paypal Certificate. This certificate can be downloaded from the PayPal website.
The Paypal Business Account is now configured to accept payments from the PayPal payment gateway. For more information on the files required for the Paypal Business Account, refer to the PayPal Payment Gateway chapter in this manual.
The Paypal Configuration and Paypal Business Account assets can be used on more than one PayPal system. This is useful when creating multiple systems with the same PayPal merchant account.
Adding and Setting Up the Paypal IPN Receiver

The Paypal IPN Receiver asset
- Add a Paypal IPN Receiver asset under the Paypal Configuration asset, as show in the figure to the right.
- On the Details screen, in the Target asset ID parameter name field, enter asset id.
This will use the Custom Variable asset id to pass the asset ID of the purchased item. This Custom Variable is configured later in this example.
Adding the Item Asset Listing
To list the items on the Site, allowing users to browse and select the item they wish to purchase, an Asset Listing Page needs to be added, listing the items for sale.
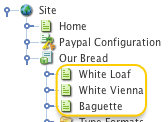
Example Item Pages
To do this:
- Create an Asset Listing Page under your Site, titled Our Bread.
- Create three Standard Pages under the Our Bread listing, called White Loaf, White Vienna and Baguette.
Three item pages will appear in the Asset Map, as shown in the figure to the right. - Content is added to these pages, as shown in the figures below.

The White Loaf Item Page
The White Vienna Item Page
The Baguette Item Page - Right click on the Our Bread listing in the Asset Map and select the Details screen.
- In the Asset Types to List field, select Standard Page.
- In the Root Node field, select the Our Bread Asset Listing Page.
The item pages will not be listed on the Our Bread listing, as shown in the figure below.
Item pages listed on the Our Bread Asset Listing
Adding and Setting Up the Paypal Payment Buttons
Paypal Buy Now buttons must be configured for each item, to allow users to select and pay for their purchases.
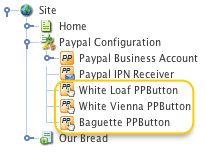
Paypal Payment Button
- Create a Paypal Payment button under the Paypal Configuration asset, titled White Load PPButton, this button will appear in the Asset Map, as shown in the figure to the left.
- Repeat the previous step to create the Paypal Payment Buttons White Vienna PPButton and BaguettePPButton.
Three button assets will appear under the Paypal Configuration asset in the Asset Map, as shown in the figure to the right.
Now that the button assets have been added to the Site, item information must be configured for each.
White Loaf PayPal Button
To set up the White Loaf PPButton button:
- Right click on the White Loaf PPButton asset in the Asset Map and select the Details screen.
- In the Button Type field, select Buy Now.
- In the Item Name field, enter Bread: White Loaf.
- In the Price field, enter 1.75.
- In the Currency field, select AUD.
- In the Paypal Business Account field, select the Paypal Business Account asset under the Paypal Configuration.
- In the Paypal Configuration field, select the Paypal Configuration asset under you Site.
- In the Custom Variable field, enter userid=%globals_user_assetid%,assetid=<asset_id>,where <asset_id> is the asset ID of the White Loaf item page. For example, if the asset ID of the White Loaf page is 150, userid=%globals_user_assetid%,assetid=150would be entered into this field.
- In the Notify URL field, enter the URL of the Paypal IPN Receiver under the Paypal Configuration asset.
- In the Return URL field, enter the URL of the Index page of your Site. Once a user has successfully completed a PayPal transaction, they will be returned to this page.
- In the Cancel URL field, enter the URL of the Our Bread listing. If a user cancels their transaction, they will be returned to this page.
White Vienna PayPal Button
To set up the White Vienna PPButton button:
- Right click on the White Vienna PPButton asset in the Asset Map and select the Details screen.
- In the Button Type field, select Buy Now.
- In the Item Name field, enter Bread: White Vienna.
- In the Price field, enter 2.30.
- In the Currency field, select AUD.
- In the Paypal Business Account field, select the Paypal Business Account asset under the Paypal Configuration.
- In the Paypal Configuration field, select the Paypal Configuration asset under you Site.
- In the Custom Variable field, enter userid=%globals_user_assetid%,assetid=<asset_id>,where <asset_id> is the asset ID of the White Vienna item page.
- In the Notify URL field, enter the URL of the Paypal IPN Receiver under the Paypal Configuration asset.
- In the Return URL field, enter the URL of the Index page of your Site.
- In the Cancel URL field, enter the URL of the Our Bread listing.
Baguette PayPal Button
To set up the Baguette PPButton button:
- Right click on the Baguette PPButton asset in the Asset Map and select the Details screen.
- In the Button Type field, select Buy Now.
- In the Item Name field, enter Bread: Baguette.
- In the Price field, enter 1.40.
- In the Currency field, select AUD.
- In the Paypal Business Account field, select the Paypal Business Account asset under the Paypal Configuration.
- In the Paypal Configuration field, select the Paypal Configuration asset under you Site.
- In the Custom Variable field, enter userid=%globals_user_assetid%,assetid=<asset_id>,where <asset_id> is the asset ID of the Baguette item page.
- In the Notify URL field, enter the URL of the Paypal IPN Receiver under the Paypal Configuration asset.
- In the Return URL field, enter the URL of the Index page of your Site.
- In the Cancel URL field, enter the URL of the Our Bread listing.
Formatting the Item Pages
Now that the Paypal buttons have been fully configured, they need to be nested in each item page of the Site.
To do this:
- Right click on the White Loaf item page in the Asset Map and select the Edit Contents screen.
- On the Page Contents Bodycopy, create a new division of type Nest Content, as shown in the figure below.

The Nest Content division - In the Nest Content Division, select the White Loaf PPButton asset in the Asset Map.
The Paypal Buy Now button for the Bread: White Loaf item is now nested on the White Loaf page, as shown in the figure below.
The White Loaf item page with a Buy Now payment button - Repeat the above steps to add the White Vienna PPButton to the White Vienna item page and the Baguette PPButton to the Baguette item page, as shown in the figures below.

The White Vienna item page with a Buy Now payment button
The Baguette item page with a Buy Now payment button
Creating and Setting Up the Paypal IPN Received Trigger Event
Now that the PayPal payment gateway is complete, we need to create a Trigger that will send an email to the Bakery, informing them of what bread they need to bake.
To do this:
- Create a new Trigger under the Trigger Manager in your system.
- On the Create new Trigger Details screen, in the Name field, enter Paypal IPN event.
- In the Events field, select Paypal IPN Completed. This will tell the Trigger to respond when the Paypal IPN Completed event is received.
- Click Commit. The Paypal IPNevent Trigger will appear in the Asset Map, as shown in the figure to the right.
- Right click on the newly created Trigger in the Asset Map and select the Details screen.
- In the Conditions field, select Has a Child/Parent from the drop-down menu. Click Commit. New fields will appear on the screen.
- Check the with ID field and select the Our Bread Asset Listing Page from the Asset Map.
- In the Actions field, select Send Email from the drop-down menu. Click Commit. New fields will appear on the screen.
- In the Recipient Source field, create a Recipient Asset ID parameter with a POST Variable source. Click Commit. New fields will appear in this section.
- In the POST Variable field, enter userid. This will send an email to the logged-in user who completed the PayPal transaction, as configured in the Custom Variable settings of the Paypal Payment Button.
Once you have done this, the email content must be configured. - The information shown in the figure below is entered into the General Email Settings fields.
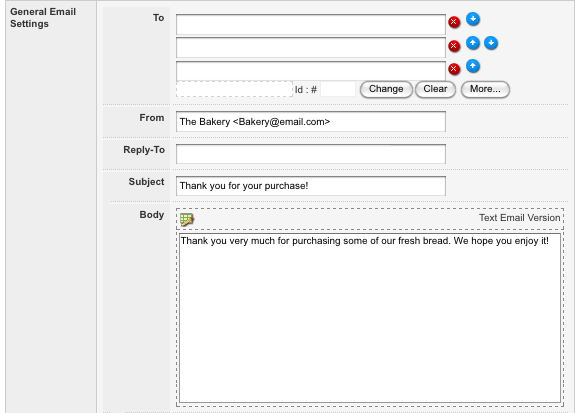
The General Email Settings - Click Commit. The trigger is now complete and can be Enabled in the Status field.
When a user purchases an item using the Paypal payment gateway, an Instant Payment Notification will be sent to the purchased item asset via the Paypal IPN Receiver, which will trigger an email that will be sent to the user, thanking them for their purchase.

The Paypal IPN Event Trigger
Final Steps
The PayPal e-commerce store is now set up. Before making it Live to the public you should check the following things:
- The PayPal payment gateway functions correctly and allows you to purchase an item using the Buy Now button on the item pages. Please note that to make the PayPal payment gateway fully functional, you would need to change the PayPal Business Account to a Live Account.
- The layout of each page is correct.
- An order successfully processed using the PayPal payment gateway generates a Paypal Order to the Paypal Business Account and an email is sent to the user who purchased the item.
Tip: In order to successfully receive the Instant Payment Notification from PayPal, the IPN Receiver asset must be Live and have Public Read Permission granted.
Once you have checked these things and you are happy with the way the PayPal e-commerce store works, change the Status of all the assets in the Site to Live and grant Public Read Permission.
Other PayPal Payment Gateway Setups
The above example utilises the PayPal Payment Button’s Buy Now button type. Below are some examples of PayPal payment gateway setups on e-commerce stores using the Donate, Add to Cart and View Cart button types.
The Donation Button Type
On a Site, you may wish to allow your users to donate money to a specific organisation or charity. This is achieved using the PayPal Donate button. An example Site using the Donate button is shown in the figure below.
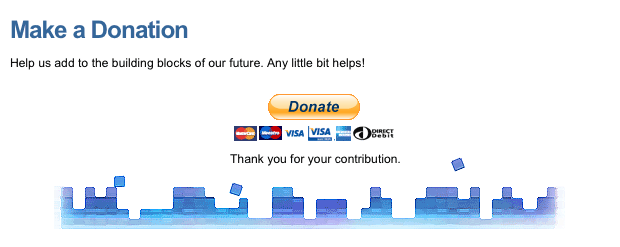
An example Site with a Donation button
In this example, the user is asked to help contribute to the Site owner’s business by making a donation. A Donate button is embedded on the Make a Donation page; clicking on this button will transfer the user to the PayPal website, where they can leave their donation. On this Site, the Donate button has not been configured with a donation Amount. This means that users will be prompted to enter the amount of money they wish to donate, during the checkout process on the PayPal website. If this button were configured with an Amount, the user would donate the amount allocated on the Details screen of the PayPal Payment Button.
The Add to Cart and View Cart Button Types
When using the PayPal Payment Buttons on an e-commerce store, you may wish to allow users to add items to a virtual shopping cart. This allows users to maintain a selection of items they wish to purchase before proceeding to the checkout process and buying the items in their cart. This is achieved using the PayPal Add to Cart button. An example Site using the Add to Cart, View Cart and Buy Now buttons is shown in the figure below.
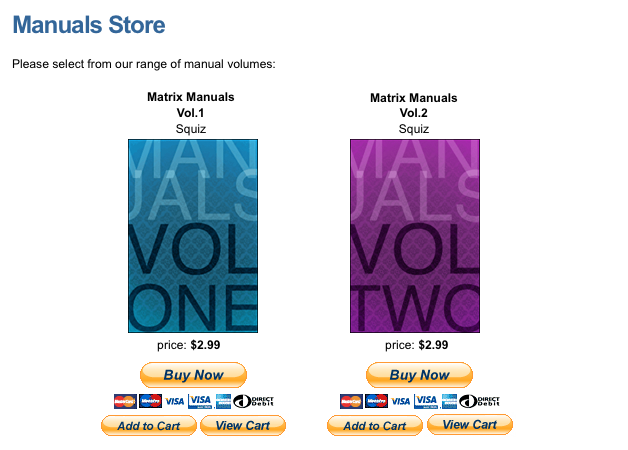
An example Site with Buy Now, Add to Cart and View Cart buttons
In this example, the user is browsing the Manuals Store, which contains two items available for purchase. The user has the option of both the Buy Now and Add to Cart payment options for each of these items. This means that if a user wanted to purchase both items, they would be able to add the items to their PayPal Shopping Cart individually before proceeding to the checkout process. This is done by first clicking the Add to Cart button for one item – the user will be taken to their PayPal Shopping Cart, containing this item. The user can then click Continue Shopping and will be returned to the e-commerce store, as configured on the Details screen of the Paypal Payment Button. There they can then click the Add to Cart button for the other item, which will also be added to their Shopping Cart. The user can then proceed to the checkout process with both items in their Shopping Cart.
Alternatively, the user may only wish to purchase one of these items. Clicking on the Buy Now button will transfer the user straight to the checkout process on the PayPal website for that specific item.
A View Cart button is also available on the Manual Store page, allowing the user to view their Shopping Cart at any time. They can then choose to modify the quantities of their items, remove items from their cart or continue shopping on the e-commerce store.
