Bulkmail Subscribe Page
Last Updated: 24 Jan 2019
bulkmail|asset|5.5.2.0
You can create a Bulkmail Subscribe Page to allow your users to subscribe and unsubscribe to bulkmail emails. It allows them to enter their name, email address and select which User Groups they want to link their Bulkmail User account into. Your Bulkmail Jobs will be configured to use these User Groups as recipients for Bulkmail Jobs.
Bookmarks to the headings on this page:
Tip: The name of the User Group for a Bulkmail Job should correspond to the information that is being sent in the email. For example, if you have a Bulkmail Job that sends information about new products that you are selling, you should create a User Group called 'New Products'. When a user is subscribing to the emails they can associate the User Group 'New Products' to the Bulkmail Job that sends them an email about new products.
Once your Bulkmail Subscribe Page is created, you can configure its settings on its associated asset screens. The majority of these screens are the same or similar to those for a Standard Page and are described in the Asset Screens manual. In this chapter, we will describe the Details screen, which is different for a Bulkmail Subscribe Page.
Additional Dependant Assets

The additional dependant assets
When you create a Bulkmail Subscribe Page, several assets are automatically created beneath it, as highlighted in the figure to the right. You can use these assets to define the contents and layout of the Bulkmail Subscribe Page.
- Logged In Layout: this asset allows you to specify the overall layout of the Bulkmail Subscribe Page when the user is logged in. Users, Backend Users, System Administrators and the Root User use this page to change which emails they are subscribed to.
- Not Logged In Layout: this asset allows you to specify the overall layout of the Bulkmail Subscribe Page when the user is not logged in. Bulkmail Users use this page to change which emails they are subscribed to.
Unverified Users: this folder lists the Bulkmail Users that are in the process of verifying their details. Once they have confirmed their e-mail address, the Bulkmail User is removed from this folder and placed in the User Groups they have selected.
An unverified users
Details Screen
The Details screen for a Bulkmail Subscribe Page allows you to configure the asset. For more information about the Status, Future Status, Thumbnail, Details, CAPTCHA, Google reCAPTCHA, and Spam Prevention: Honeypot Question sections of the screen, refer to the Details Screen chapter in the Asset Screens manual and the Form Contents chapter to the Custom Form manual.
Configuration
This section allows you to define which User Group assets to use and how to the structure the list that the user sees on your web site.
The fields available are as follows:
- Submit Button Text: enter the text that will be used for the submit button on the subscription page. This is the button that the user will press once they have filled in the information on the page.
- Root Node: specify the location of the User Groups that the Bulkmail User will subscribe to. By default, the default value will be the Users Folder.
- Asset Statuses to List: select the Status for the User Groups to be included on the Bulkmail Subscribe Page. If no Statuses are selected, the system will work out which assets to show based on permissions. To select multiple Statuses from the list click on the first Status, hold down the Shift or Ctrl key on the keyboard and select all other relevant Statuses.
- Bulkmail User Link Types: select the type of link to use when the Bulkmail User is created within Squiz Matrix. The default value for this field is TYPE_1.
- Location Selector Width: specify in pixels the width of the list shown on the Bulkmail Subscribe Page. You can specify 0 as the width to size the selector based on the longest User Group name shown in the list.
- Location Selector Height: specify in pixels the height of the list shown on the Bulkmail Subscribe Page. You can specify 0 as the height to size the selector based on the standard height.
Maximum Depth: specify the maximum number of levels to display in the selector. For example, in the figure shown, if you specify 1 as the maximum depth the list will contain Dept 1 Editors, Reviewers and Content Editors. The list will not contain Review Group 1 or User Group 2 because they are level 2 assets.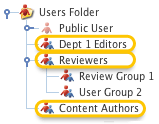
The Maxmimum Depth option
Separator: specify the text that will be displayed between the levels in the list. The default value is -. In the figure shown to the right, Review Group 1 and User Group 2 are level 2 assets under the Reviewers User Group. The - separator is placed in front of them to show this relationship.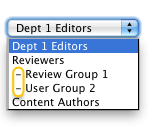
Level separators- Show Root Node: select whether or not to include the root node in the selection list. If you select No, the root node will not be included.
- Allow Multiple Selections: select whether or not to allow users to select multiple User Groups from the list. If you select No, users will not be able to select multiple user groups.
- Listing Style: select either Drop-down List or Radio Buttons from the list for the style of selector you want to show within your Site. If you have selected Yes to Allow Multiple Selections, the style of the Drop-down List or Radio Buttons will change to allow the user to select multiple values from the list. Examples of each of these styles are shown below in the figure below.

(From left to right) A Drop-down list, a radio button list, a multi-select list and a checkbox list
Email Verification
The Email Verification section of the Details screen allows you to specify whether or not you want to send a verification email to the Bulkmail User when they are subscribing and/or unsubscribing.
The email will contain a URL, which they will need to click in order to verify their account or confirm they want to unsubscribe. Once the account is verified, it is either linked under the appropriate User Groups or removed from the system. The fields available are as follows:
- From Address: enter the address that will appear in the email as the from address. The default from email address is the system defined email address.
- Verify Email Subject: enter the subject header of the verification email. If this field is left empty, the default subject header will be used: "Please confirm your subscription / unsubscription request".
- Logged In Users: for a user who is logged in and is subscribing to bulkmail, you can select either to send an email always, only when subscribing, only when unsubscribing or not at all. The default value is Do not verify.
- Public Users: for a user who is not logged in and is subscribing to bulkmail, you can select either to send an email always, only when subscribing, only when unsubscribing or not at all. The default value is Do not verify.
If a user has already subscribed to the bulkmail emails, an email will be sent to them informing them of this fact. For security purposes, the please check your email verification message will be displayed as normal on the Bulkmail Subscribe Page.
Logged In Layout Bodycopy
The Logged In Layout Bodycopy asset is used to specify the overall layout of the Bulkmail Subscribe Page when the user is logged in. Users, Backend Users, System Administrators and the Root User use this page to change which emails they are subscribed to. For example, for the Bulkmail Subscribe Page shown in the figure below, the Root User is currently logged in and they can choose which groups to subscribe to and unsubscribe from. This has been defined in the Logged In Layout Bodycopy.
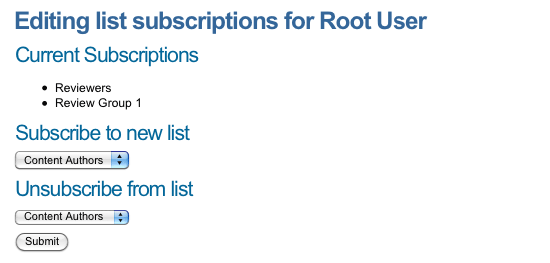
The Logged In Layout Bodycopy
To change what information is being shown, right click on the Logged In Bodycopy in the Asset Map and select Edit Contents. Click on the ![]() icon – the WYSIWYG Editor will appear where you can use keyword replacements and formatting to layout the information to show on the page. By default, the information shown in the figure below will appear in the WYSIWYG Editor.
icon – the WYSIWYG Editor will appear where you can use keyword replacements and formatting to layout the information to show on the page. By default, the information shown in the figure below will appear in the WYSIWYG Editor.
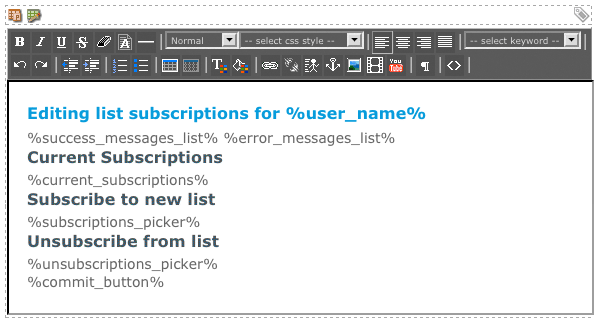
The WYSIWYG Editor on the Logged In Layout Bodycopy
Keyword Replacements on the Logged In Layout Bodycopy
A list of keyword replacements is provided in the WYSIWYG Editor toolbar on the Edit Contents screen of the Logged In Layout Bodycopy. You can use these keyword replacements in conjunction with text, images and links etc to layout what to show for each asset in the list. The standard keyword replacements that are available include the following:
- Error Messages List: this will show any errors that occur when the user clicks on the submit button.
- Success Messages List: this will show the successful messages that occur when the user clicks on the submit button.
- Current Subscriptions: this will show the list of User Groups the current logged in user is subscribed to or linked under.
- Subscriptions Picker: this will show a list of User Groups the user can subscribe to.
- Unsubscription Picker: this will show a list of User Groups the user can unsubscribe from.
- User Name: this will show the user name of the currently logged in user. The user will not be able to edit these details on this screen.
- User Short Name: this will show the short name of the currently logged in user. The user will not be able to edit these details on this screen.
- User Email: this will show the email address of the currently logged in user. The user will not be able to edit these details on this screen.
- Subscribe User Name: this will show a field where the user can enter their name for their bulkmail user asset.
- Subscribe Email Address: this will show a field where the user can enter their email address where they wish to receive the email.
- Commit Button: this will show a button to allow your users to submit their details entered on the Bulkmail Subscribe Page.
Not Logged In Layout Bodycopy
The Not Logged in Layout Bodycopy is used to specify the overall layout of the Bulkmail Subscribe Page when the user is not logged in. Public users use this page to create Bulkmail User accounts, and subscribe to appropriate groups. For example, for the Bulkmail Subscribe Page shown in the figure below, the user can enter their name, email address and select which groups they would like to subscribe to. This has been defined in the Not Logged In Layout Bodycopy.
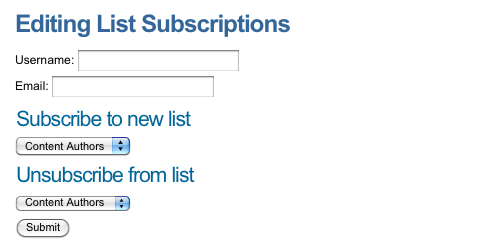
The Not Logged In Layout Bodycopy
To change what information is being shown, right click on the Not Logged In Bodycopy in the Asset Map and select Edit Contents. Click on the ![]() icon – the WYSIWYG Editor will appear where you can use keyword replacements and formatting to layout the information to show on the page. By default, the information shown in the figure below will appear in the WYSIWYG Editor.
icon – the WYSIWYG Editor will appear where you can use keyword replacements and formatting to layout the information to show on the page. By default, the information shown in the figure below will appear in the WYSIWYG Editor.
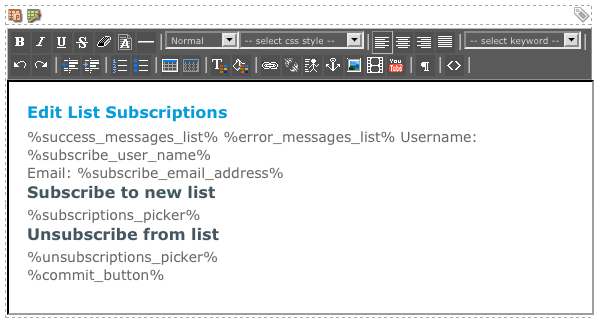
The WYSIWYG Editor on the Not Logged In Bodycopy
Keyword Replacements on the Not Logged In Layout Bodycopy
A list of keyword replacements is provided in the WYSIWYG Editor toolbar on the Edit Contents screen of the Not Logged In Layout Bodycopy. You can use these keyword replacements in conjunction with text, images and links etc to layout what to show for each asset in the list. The standard keyword replacements that are available include the following:
- Error Messages List: this will show any error messages that occur when the user clicks on the submit button.
- Success Messages List: this will show the successful messages that occur when the user clicks on the submit button.
- Subscriptions Picker: this will show a list of User Groups the user can subscribe to.
- Unsubscription Picker: this will show a list of User Groups the user can unsubscribe from.
- Subscribe User Name: this will show a field where the user can enter their name for their bulkmail user asset.
- Subscribe Email Address: this will show a field where the user can enter their email address where they wish to receive the email.
- Commit Button: this will show a button to allow your users to submit their details entered on the Bulkmail Subscribe Page.
