Editing a Custom Form
Last Updated: 30 Apr 2017
This page describes the unique editing functionality of the Custom Form asset.
You can use these screens to configure the general settings and content of the Custom Form.
Details Screen
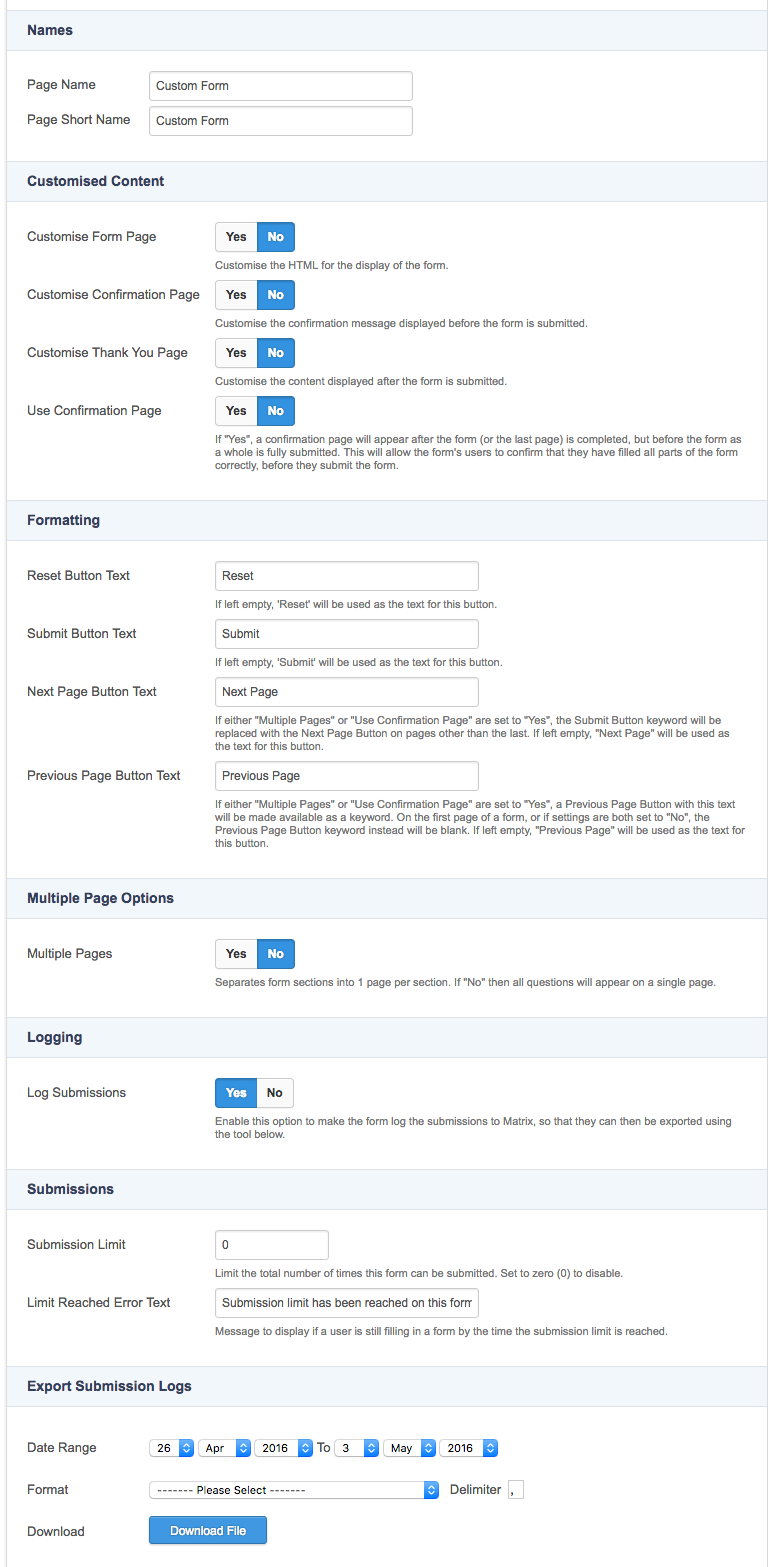
Customised Content
This section allows you to customise the default layout of your Custom Form.
- Customise Form Page: specify whether or not to customise the initial layout of the Custom Form where the user fills out the questions.
- Customise Confirmation Page: specify whether or not to customise the layout of the Custom Form's Confirmation page.
- Customise Thank You Page: specify whether or not to customise the layout of the Custom Form's Thank You page, displayed once the user has submitted the form.
- Use Confirmation Page: specify whether or not the Custom Form will display a Confirmation page. This will allow the user to ensure they have correctly completed the form before submitting it. The confirmation page can be used for both a single and multiple page Custom Form.
Formatting
This section allows you to customise the formatting of the buttons on the Custom Form.
The following fields are available:
- Reset Button Text: enter the text to be used for the reset button, for example Revert. If no test is entered into this field, the default value of Reset will be used.
- Submit Button Text: enter the text to be used for the submit button, for example Send or Apply. If no test is entered into this field, the default value of Submit will be used.
- Next Page Button Text: enter the text to be used for the next page button, for example Continue. This button replaces the Submit keyword on all but the last page of the Custom Form. By default, the text that appears on this button is Next Page.
- Previous Page Button Text: enter the text to be used for the previous page button, for example Back. By default, the text that appears on this button is Previous Page.
Multiple Page Options
This section allows you to modify the Custom Form to contain multiple pages and customise the multiple page features.
In the Multiple Page field, select whether or not to use multiple pages on the Custom Form. If you select Yes, then each section of your Custom Form will become a separate page. Any questions that have not been created under a section will appear at the beginning of the form.
When the Multiple Page field has been enabled, the following additional fields will be displayed:
- Next Page Button Text: enter the text to be used for the next page button, for example Continue. This button replaces the Submit keyword on all but the last page of the Custom Form. By default, the text that appears on this button is Next Page.
- Previous Page Button Text: enter the text to be used for the previous page button, for example Back. By default, the text that appears on this button is Previous Page.
Logging
This section allows you to enable and disable the logging of submissions on the Custom Form.
In the Log Submissions field, specify whether or not form submissions will be logged to Squiz Matrix. By default, this field is enabled, meaning form submissions will be logged. If this field is disabled, the details of a form submission will not be logged within the system and you will not be able to view it later.
Submissions logged to Squiz Matrix can be exported using the Export Submission Logs tool. For more information, refer to the Export Submission Logs section below.
Submissions
This section allows you to set a limit on the number of submissions allowed on the Custom Form.
- Submission Limit: enter the number submissions that will be allowed to be logged on the Custom Form asset. For example, if this field is set to 5, once five submissions have been logged on the Custom Form, no more submissions will be able to be made. If this value is set to 0 it means that the option is disabled and that no limit has been applied to the Custom Form submissions.
If a set submission limit is exhausted, an error message will be displayed to users who attempt to complete the form. - Limit Reached Error Text: enter the error message that will be displayed to users if the set submission limit is exhausted while they are completing the Custom Form.
Export Submission Logs
This section allows you to export the submission logs to either a CSV file or XML format.
- Date Range: select a date range for the submissions you want to export. For example, if you only want to export the submissions that have been made today, enter today's date in both sets of fields.
- Format: select the format for the exported file. You can choose from the following options:
- Comma Separated Values (CSV): this option exports the submissions as comma separated values, and includes a header row showing the title of each question. You can change the delimiter that is used by changing the value in the Delimiter field.
- Comma Separated Values (CSV) – no header row: this option exports the submissions as comma separated values, with no header row. You can change the delimiter that is used by changing the value in the Delimiter field.
- XML Format: this option exports the submissions in XML format.
- Download: click this button to begin the export of the selected submissions and download the file that is created. You will be prompted to choose whether to open the file or save it.
Contents Screen
The Contents screen is used to add to and edit the content of the Custom Form. Please note that the options on this screen are similar to those on the Form Contents screen of a Custom Form in the backend. For more information, refer to the Form Contents chapter in the Custom Form manual.
Form Fields
The Form Fields tab allows you to add sections and questions (form fields) to your form.
Sections
Sections allow you to group similar questions together for a Custom Form. For example, if you have a group of questions for the users contact details you can group them under a section called Contact Details.
If you are creating a form with multiple pages, each section of the form will be presented as a new page.
To add a section to the Custom Form, click the Insert Form Section button, enter a name for the new section, and click Insert.
The new section will be displayed, as shown in the figure below, which you can now add form fields to. Once you have finished configuring your section, click Save to save the section on your form.
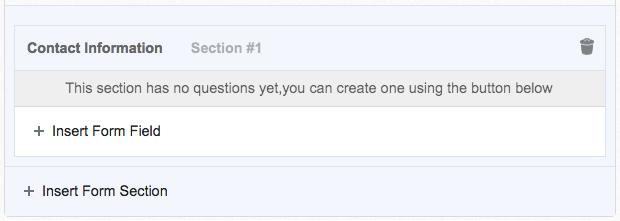
You can rearrange the order of the sections you have created on the form by clicking the Re-Order Sections button. A pop-up will be displayed, allowing you to drag and drop your sections into the desired order.
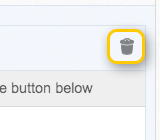
To delete a section, click the Delete Section button, shown in the figure to the right. The section will be highlighted red, meaning that it has been marked for deletion. Click Save to delete the section.;
Form Fields
Questions, or form fields, can be added either directly to the form, or within a section that has been created on the form.
To add a form field to you form, click the Insert Form Field button, select the field type you want to add, and click Insert.
The field types that are available on the Custom Form are:
Once a form field has been added on the form, as shown in the figure below, you can give your field a name, specify a default value and configure its settings.
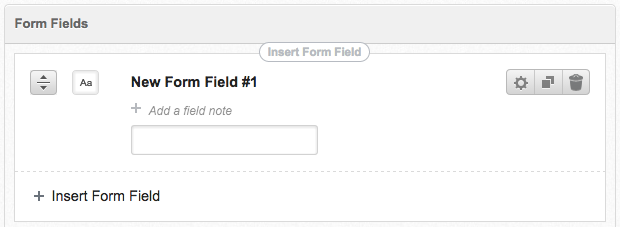
By default, your form field will be given a name like 'New Form Field #1'. You can set the name of your question in this field, for example, 'Name' or 'How did you hear about us?'.
The Add a field note field allows you to add a note to your form field to provide further information to your users on answering the specified question. So for example, if you had a form field asking for a user's name, the field note on this field might read 'Please include both your first and last names'.
You can set the default value of your field in the form field box. Please note that if your field requires you to set selection options, such as with the Selection List, Checkboxes and Radio Buttons form fields, this field will not initially contain any values to set. You will need to specify values by configuring the settings of these fields before setting the default value.
To configure the settings of your form, hover over the form field and click the Edit Question Settings button, shown in the figure to the right. A pop-up will appear detailing a list of settings for the form field. These settings will differ depending on the field type that is being configured. For more information on configuring the settings of the different form types available, refer to the question chapters in the Custom Form manual. Once you have finished configuring the settings of the form field, click Update.
The Clone Question button allows you to clone the current question, while the Delete Question button allows you to mark the form field for deletion. Clicking Save will delete any form fields that have been marked for deletion.
You can rearrange the order of the questions you have created on the form using the Reorder button, shown in the figure to the right. This button allows you to drag and drop your questions into the desired order. Questions can also be dragged and dropped from one section to another. Click Save to commit this change to your form.
You can change the field type of an existing form field by clicking the Change Field Type button. A pop-up will appear with a list of available field types. Select the field type you want to change your form field to, and click Update. Click Save to commit this change to your form.
Please note that some editing actions, such as changing the field type of a section and moving questions between sections, will result in a different asset ID for the form fields that are being changed.
Form Page
The Form Page tab allows you to customise the initial layout of the Custom Form where the user fills out their responses.
To edit the initial form page, click on the Form Page tab on the Contents screen. A WYSIWYG Content Container will be displayed, as shown in the figure below.
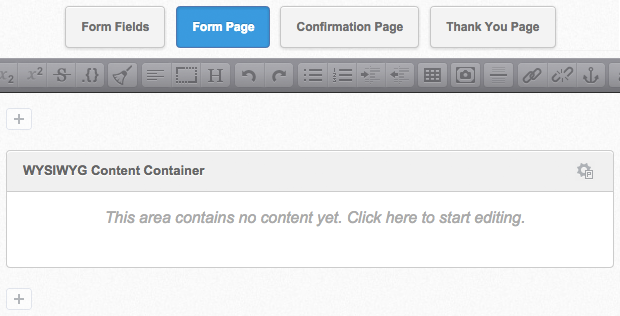
You can define the layout the initial form page using the tools available in the WYSIWYG Content Container as you would with a normal Standard Page.
Keyword Replacements on the Form Page Tab
A list of keyword replacements is provided in the Edit+ Editor toolbar on the Form Page tab. You can use the keyword replacements in conjunction with text, images and links etc to layout the form page.
The keyword replacements that are available include the following:
- Form Contents: this keyword will display the default layout of the questions and section fields. This keyword is useful if you are not individually formatting the layout of each section and/or question on the form.
- Current Page Contents: this keyword will display the default layout of the questions for an individual page. This keyword essentially replaces the %form_contents% keyword on forms that are using multiple pages.
- List of Submission Errors: this keyword will display any errors that the user may have received upon attempting to submit their form. On the default form page layout, these errors appear on the bottom of the page.
- Message indicating that there were errors: this keyword will display a message indicating that there were errors on the form. This message can be defined on the back-end. By default this message reads: "There were errors submitting the form. Please correct the marked fields and try again."
- Required field note: this keyword will display the 'Required Field' note, indicating the usage of the Required Field Mark .
- Reset Button: this keyword will display the Reset button on the form. This button is not mandatory.
- Submit Button: this keyword will display the Submit button on the form. If you do not include this keyword, the user will be unable to submit their form. On a form with multiple pages, this keyword will print the Next button on all but the last page of the form.
- Previous Page Button: this keyword will display the Previous Page button on the form, used on a form with multiple pages. If this keyword is used, the button will be displayed on all but the first page of the form.
- Honeypot Question: this keyword will display the configured honeypot question field.
Along with these keyword replacements, you can also display each individual question by using the keyword replacements listed below.
Please note that, in the following keyword replacements, <parent_id> refers to the asset ID of the Section the question has been added to or the asset ID of the Form Contents asset if the question does not belong to a section; and <question_id> refers to the asset ID of the question.
- %question_label_<parent_id>_<question_id>%: this keyword will display the name of the question.
- %question_note_<parent_id>_<question_id>%: this keyword will display the note for the question.
- %question_id_<parent_id>_<question_id>%: this keyword will display the asset ID of the question.
- %question_field_<parent_id>_<question_id>%: this keyword will display the question field, where the user can enter their response to the question.
Confirmation Page
The Confirmation Page tab allows you to customise the layout of the Custom Form's Confirmation page, where the user can confirm their responses before submitting their form.
To edit the Confirmation page, click on the Confirmation Page tab on the Contents screen. A WYSIWYG Content Container will be displayed, as shown in the figure below.
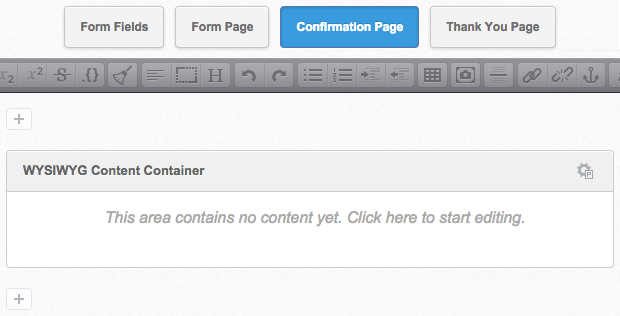
You can define the layout the Confirmation page using the tools available in the WYSIWYG Content Container as you would with a normal Standard Page.
Keyword Replacements on the Confirmation Page Tab
A list of keyword replacements is provided in the Edit+ Editor toolbar on the Confirmation Page tab. You can use the keyword replacements in conjunction with text, images and links etc to layout the Confirmation page.
The keyword replacements that are available include the following:
- Submission Summary: this keyword will display a summary of the responses that the user entered to each question on the form.
- Submission Summary (html): this keyword will display the submission summary in a HTML format.
- Submission Summary (semantic): this keyword will display the submission summary in a semantic format.
- Submission Info: this keyword will display the details of the Custom Form including its asset ID, name and URL, as well as the name and asset ID of the Site.
- Reset Button: this keyword will display the Reset button on the form. This button is not mandatory.
- Submit Button: this keyword will display the Submit button on the form. If you do not include this keyword, the user will be unable to submit their form. On a form with multiple pages, this keyword will print the Next button on all but the last page of the form.
- Previous Page Button: this keyword will display the Previous Page button on the form, used on a form with multiple pages. If this keyword is used, the button will be displayed on all but the first page of the form.
- CAPTCHA: this keyword will display the CAPTCHA fields on the form.
- CAPTCHA image: this keyword will display the image for the CAPTCHA field.
- CAPTCHA input field: this keyword will display the input field for the CAPTCHA field.
- CAPTCHA regeneration link: this keyword will display the link so the user can regenerate the CAPTCHA field.
Along with these keyword replacements, you can also display each section, individual question and response by using the keyword replacements listed below.
Please note that, in the following keyword replacements, <parent_id> refers to the asset ID of the Section the question has been added to or the asset ID of the Form Contents asset if the question does not belong to a section; and <question_id> refers to the asset ID of the question.
- %section_title_<parent_id>%: this keyword will display the name of the Section.
- %question_name_<parent_id>_<question_id>%: this keyword will display the name of the question.
- %question_note_<parent_id>_<question_id>%: this keyword will display the note for the question.
- %response_<parent_id>_<question_id>%: this keyword will display the response the user submitted for the question.
Thank You Page
The Thank You Page tab allows you to customise the layout of the Custom Form's Thank You page, displayed once the user has submitted the form.
To edit the Thank You page, click on the Thank You Page tab on the Contents screen. A WYSIWYG Content Container will be displayed, as shown in the figure below.
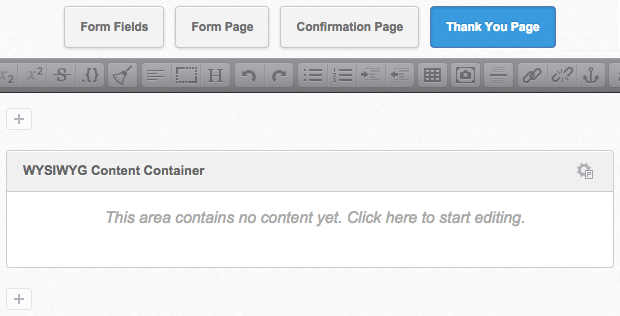
You can define the layout the Thank You page using the tools available in the WYSIWYG Content Container as you would with a normal Standard Page.
Keyword Replacements on the Thank You Page Tab
A list of keyword replacements is provided in the Edit+ Editor toolbar on the Thank You Page tab. You can use the keyword replacements in conjunction with text, images and links etc to layout the Thank You page.
The keyword replacements that are available include the following:
- Submission Summary: this keyword will display a summary of the responses that the user entered to each question on the form.
- Submission Summary (html): this keyword will display the submission summary in a HTML format.
- Submission Summary (semantic): this keyword will display the submission summary in a semantic format.
- Submission Info: this keyword will display the details of the Custom Form including its asset ID, name and URL, as well as the name and asset ID of the Site.
- Submission Info (html): this keyword will display the details of the Custom Form in a HTML format.
- Submission ID: this keyword will display the ID of the form submission.
- Submission IP Address: this keyword will display the IP address where the form was submitted.
- Time of Submission (yyyy-mm-dd hh:mm:ss): this keyword will display the date and time the form was submitted, in the specified format.
- Time of Submission (yyyy-mm-dd): this keyword will display the date the form was submitted, in the specified format.
- Time of Submission (dd m yyyy h:mm[am pm]): this keyword will display the date and time the form was submitted, in the specified format.
- Time of Submission (date only; dd M yyyy): this keyword will display the date the form was submitted, in the specified format.
- Time of Submission (time only; h:mm[am pm]): this keyword will display the time the form was submitted, in the specified format.
- Time of Submission (ISO8601 format): this keyword will display the date and time the form was submitted, in the specified format.
- Time of Submission (RFC2822 format): this keyword will display the date and time the form was submitted, in the specified format.
- Time of Submission (RFC2822 format, date only): this keyword will display the date and time the form was submitted, in the specified format.
- Time of Submission (relative time - eg. "X days ago"): this keyword will display the date and time the form was submitted, in the specified format.
- Time of Submission (Day/time if within 1 week of now, otherwise relative time): this keyword will display the date and time the form was submitted, in the specified format.
- Time of Submission (iCalendar format): this keyword will display the date and time the form was submitted, in the specified format.
Along with these keyword replacements, you can also display responses to individual questions by using the keyword replacements listed below.
Please note that, in the following keyword replacements, <parent_id> refers to the asset ID of the Section the question has been added to or the asset ID of the Form Contents asset if the question does not belong to a section; and <question_id> refers to the asset ID of the question.
- %response_<parent_id>_<question_id>%: this keyword will display the response the user submitted for the question.
- %response_<parent_id>_<question_id>_raw%: this keyword will display the raw value for the response the user submitted for the question.
Emails Screen
The Emails screen is used to add to and edit the content of the Custom Form. Please note that the options on this screen are similar to those on the Form Contents screen of a Custom Form in the backend. For more information, refer to the Form Contents chapter in the Custom Form manual.
Recipient Email Options
This section allows you to define the email notifying that a form submission has been made. For example, if the form is a job application, you can send an email to the HR Manager to notify them that a user has applied for a job.
The Recipient Email Options section is shown in the figure below.
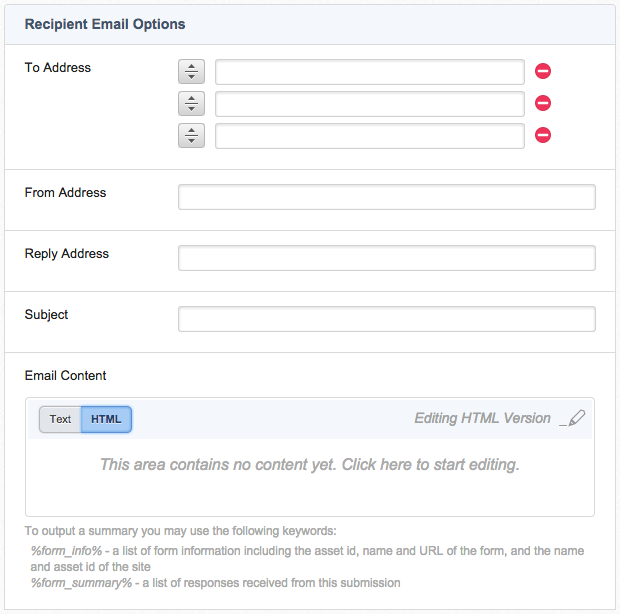
The fields that are available in this section are as follows.
- To Address: enter the email address of a person who should receive the email. You can enter their email address in the text fields or select their user account in the asset finder field.
- From Address: enter the email address that will appear in the from field in the email.
- Reply Address: enter the email address for a user to reply to. If no reply-to address is configured, the header will not be sent on the email.
- Subject: enter the text to be used as the subject of the recipient email. You can use keyword replacements for the responses to the questions the user entered on the form. For a full list of keyword replacements, click on the list of keywords available for use in emails hyperlink in the Keyword Replacements section of the screen.
- Email Content: enter the body of the email. You can enter either the text or HTML version of the email in this field.
You can use the following keyword replacements for the responses to the questions the user entered on the form within the body of the email:- %form_info%: this keyword will display information about the Custom Form including the asset id, name and URL of the form, and the name and asset id of the Site.
- %form_summary%: this keyword will display the responses that the user entered on the form.
Receipt Email Options
This section allows you to define the email sent to the user who submitted the form.
The Receipt Email Options section is shown in the figure below.
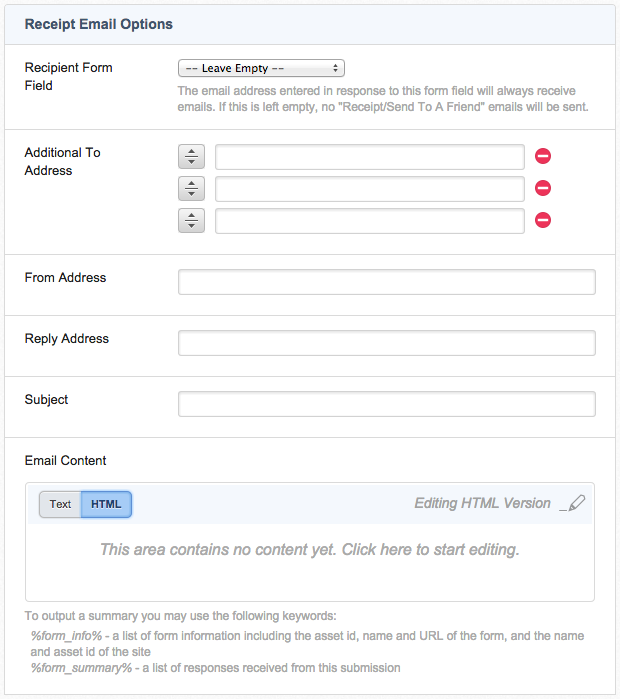
The fields that are available in this section are as follows.
- Recipient Question: select an Email Address question type from the Custom Form in this field. The email will be sent to the email address the user enters into the selected question on the form. If this field is empty, this email will not be sent.
- To Address: enter additional email addresses of the people who should receive the email. You can enter their email address in the text fields or select their user account in the asset finder field.
- From Address: enter the email address that will appear in the from field in the email.
Tip: You may want to put the email address of the person who will look after their submission, for example, the HR manager, so the user has someone to contact within your organisation.
- Reply Address: enter the email address for a user to reply to. If no reply-to address is configured, the header will not be sent on the email.
- Subject: enter the text to be used as the subject of the email. You can use keyword replacements for the responses the user entered on the form. For a full list of keyword replacements, click on the list of keywords available for use in emails hyperlink in the Keyword Replacements section of the screen.
- Email Content: enter the body of the email. You can enter either the text or HTML version of the email in this field.
You can use the following keyword replacements for the responses to the questions the user entered on the form within the body of the email:- %form_info%: this keyword will display information about the Custom Form including the asset id, name and URL of the form, and the name and asset id of the Site.
- %form_summary%: this keyword will display the responses that the user entered on the form.
Send To A Friend Email Options
This section allows you to set up an email that can be used in a Send to a Friend hyperlink.
The Send To A Friend Email Options section is shown in the figure below.
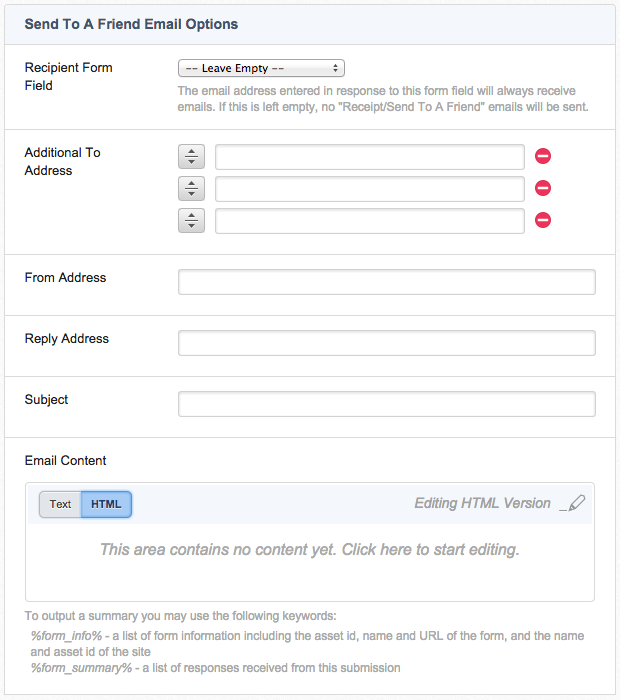
The fields that are available in this section are as follows.
- Recipient Question: select an Email Address question type from the Custom Form in this field. The email will be sent to the email address the user enters into the selected question on the form. If this field is empty, this email will not be sent.
- To Address: enter additional email addresses of the people who should receive the email. You can enter their email address in the text fields or select their user account in the asset finder field.
- From Address: enter the email address that will appear in the from field in the email. You can use a keyword replacement for the responses that the user entered on the form. For a full list of keyword replacements, click on the list of keywords available for use in emails hyperlink in the Keyword Replacements section of the screen.
- Reply Address: enter the email address for a user to reply to. If no reply-to address is configured, the header will not be sent on the email.
- Subject: enter the text to be used as the subject of the email. You can use keyword replacements for the responses that the user entered on the form. For a full list of keyword replacements, click on the list of keywords available for use in emails hyperlink in the Keyword Replacements section of the screen.
- Email Content: enter the body of the email. You can enter either the text or HTML version of the email in this field.
You can use the following keyword replacements for the responses to the questions the user entered on the form within the body of the email:- %form_info%: this keyword will display information about the Custom Form including the asset id, name and URL of the form, and the name and asset id of the Site.
- %form_summary%: this keyword will display the responses that the user entered on the form.
