How To Create a Multi-Page Custom Form
Beginner
22 Nov 2016 For version 5.3.0.0
The following tutorial will take you through an example of how to create a Job Application online form using the Custom Form asset. The user will be able to complete the form over multiple pages including uploading a file attachment in one of the steps. They will then be able to confirm their responses on a Form Confirmation Page before finally submitting the form.
This tutorial assumes you already have some basic knowledge and understanding of the Custom Form asset.
Setting Up the Custom Form
We'll start with creating and setting up the Custom Form asset that will be used to power our Job Application form. Our form will consist of 3 main steps that the user needs to fill in, so we'll create a Section for each step.
- Start by creating a new Custom Form asset in a location where you can view it on the Frontend. Let's name it Job Application.
- Right click on the Custom Form's Form Contents asset and select the Form Contents screen.
- Add three Sections on the form, titled Personal Information, Upload a CV and Closing Comments.
- On the same screen, scroll down to the Formatting section and set the Use Confirmation Page? option to Yes.
- Find the Use Bodycopy field and select Page Contents, Confirmation Page Contents and Thank You. We'll want to customise these layouts later in the tutorial.
- Then further down in the Multiple Page From Options section, set the Multi-Page? option to Yes. This will make each of the sections created in the previous step represent a separate page on the Custom Form.
Adding the Form Questions
Now lets add some field questions to each of our sections. For our example we'll add the following questions:
- Under the Personal Information section:
- Text question called Name.
- Text question called Contact Number.
- Email Address question called Email Address.
- Under the Upload a CV section:
- File Upload question called CV.
- Under the Closing Comments section:
- Text question called Comments. Also make this field present as a textarea by changing the Height attribute to something like 5.
Creating a File Submission Folder
Because we have a File Upload question in one of our steps, we need to define a place for the files to get uploaded to.
- Create a new Folder asset under the Job Application Custom Form asset and name it CVs.
- Go to the Details screen of the CV question.
- In the Create Locations field, select the CV Folder as the asset selection and save the screen.
You should probably also add additional Complex Validation Rules to this question such as restrictions on file type and file size.
Your Custom Form asset in the tree should now look similar to this:

Configuring the Layout
Next we'll work on the presentation layout of the various steps including the Confirmation and Thank You page formats.
Page Contents Layout
Let's start with the Page Contents layout of the form first as we'll need to add a couple of additional features such as a Previous Page button.
- Right click on the Page Contents asset and select the Edit Contents screen.
- Open the Edit Container Properties popup and change the Content Type to Raw HTML, save the screen.
- We're going to use a very basic format which looks like this:
<p>Please fill in the values below:</p>

%form_errors_message%

%current_page_contents%

<div>
  %previous_page_button% %submit_button%
</div>
Let's have a look at what each of these elements are for:- At the top we just have some static text that will appear at the top of each step of the form.
- %form_errors_message% - This will print a message telling the user that there were issues submitting the current step.
- %current_page_contents% - This will print the contents of each step (Section) of the form.
- %previous_page_button% and %submit_button% - This will print the Previous and Next step buttons dynamically. So if we are on step 1 of the form, the %previous_page_button% will not print anything. If we are on the Confirmation Page of the form, the %submit_button% will say "Submit" instead of "Next Page".
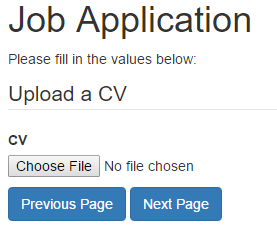
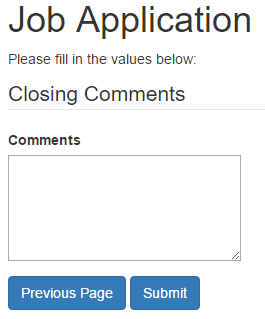
If you preview the Custom Form asset on the frontend now, you should see similar layouts to these for all of the 3 steps:
Step 1

Step 2

Step 3

Confirmation Page Layout
Next, we'll customise the layout of the Confirmation Page.
- Go to the Edit Contents screen of the Confirmation Page Contents asset.
- Convert the Content Container to Raw HTML.
- For this format we'll use the following code:
<p>Please confirm your details:</p>

%form_summary%

<div>
  %previous_page_button% %submit_button%
</div>
Which consists of the following elements:
- Static text.
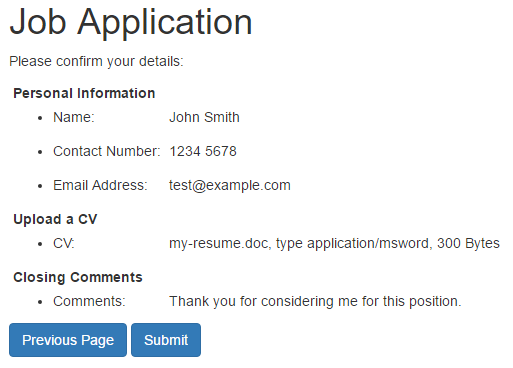
- %form_summary% - This will print a summary of all form responses grouped by each step (Section) of the form.
- %previous_page_button% and %submit_button% - This will print the Previous Page button (allowing the user to go back and change the values) and the Submit button.
The Confirmation Page layout should now look similar to this on the frontend:

Thank You Layout
Lastly, we'll configure our Thank You Page layout that shows the user a message after they have successfully submitted their job application.
- Go to the Edit Contents screen of the Thank You asset.
- Convert the Content Container to Raw HTML.
- For this format we'll use the following code:
<p>Thank you %response_10154_q1% for your submission.</p>

<p>Outlined below is the information you have supplied to us. If any of this is incorrect, please contact us and quote the following reference number:<br/>
<strong>%form_submission_id%</strong></p>

%form_summary%
Lets step through these elements:
- The first paragraph consists of some static text as well as a Keyword Replacement for the response to the Name question of the Personal Information section. Replace the asset ID with the one matching your example.
- In the next paragraph we print the asset ID of the Form Submission asset that gets created as part of the submission using the %form_submission_id% keyword, telling the user they can use this as a reference ID when contacting us about their Job Application submission.
- %form_summary% - This will print the same summary that we saw on the Confirmation Page.
That pretty much takes care of the basic steps of creating a multiple page form and configuring the layouts for the various screens.
Incomplete Submissions
When you use a multi page form, Matrix will need to store Form Submission assets temporarily while the user goes through and fills out the various steps of the form. These temporary submission assets are stored in an Incomplete Submissions folder that gets created by Matrix automatically the first time a user uses the form and goes from step 1 to step 2.
Seeing as you probably would have tested the form before publishing it to the public, this folder should be available already under the Form Contents asset in the tree:

Once the user goes through the form and submits it, the Form Submission asset will get moved from this folder to the Submissions folder and be available on the Submission Logs on the Form Contents asset.
For more information about this functionality, view the documentation of the Submissions Logs chapter of the Custom Form manual.
You can download the assets used in this tutorial below and import them into your own Matrix system using the Import Assets from XML Tool.
