Bulkmail Tools
Last Updated: 24 Jan 2019
bulkmail|feature|5.5.2.0
There are a number of tools and scripts that can be used within Squiz Matrix that you can use to help you manage bulkmail user accounts and Bulkmail Jobs.
Bookmarks to the headings on this page:
Import Bulkmail Users Tool
The Import Bulkmail User tool allows you to import a list of names and emails you want to send bulkmail jobs to from a spreadsheet. Squiz Matrix creates a Bulkmail User for each email address listed in the imported file. You can then use these Bulkmail Users as recipients in Bulkmail Jobs. This tool is available in the Tools section of Squiz Matrix.
Preparing the File to Import
The file type that must be used for the import is CSV. The format for each line of the file must be:
- name
- email address
The example below shows how to create a CSV file to import using Microsoft Excel.
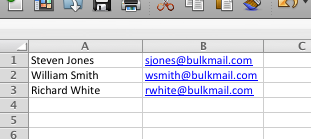
Create an Excel spreadsheet with the name in the first column and the email address in the second column as shown in the figure to the right.
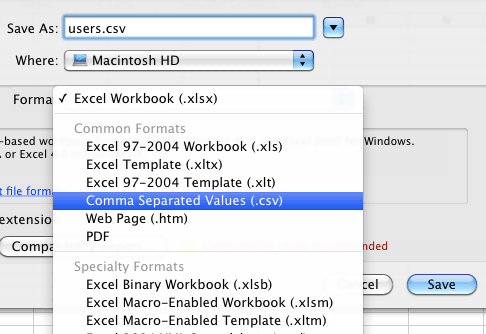
An example spreadsheet- Once your list is complete, go to File -> Save As. Select CSV from Save as type and click on save. Your CSV file of Bulkmail Users is now ready to import into Squiz Matrix.

Save as CSV
Importing a CSV File of Bulkmail Users
Tip: When you import Bulkmail Users into Squiz Matrix, you will need to select a User Group to create the users in. Before importing the file, ensure you create a User Group.
- To access the Tools section of Squiz Matrix click the
 icon located at the top right hand corner of the screen. The list of available tools will appear.
 - Click on Import Bulkmail User.
- Select the CSV file you created in the Import CSV File field by clicking on the Browse... button. Browse to the CSV file and click OK.
Tip: If your CSV file contains column headers, enabling the Column Headings in CSV File? will indicate this to Squiz Matrix. When this field is enabled, these header values will be ignored, allowing the system to correctly import the user information.
- Select the User Group where you want to create the Bulkmail Users in the Create Users in field.
- If you think there will be duplicate email addresses in the file or email addresses in the file that already exist in the system, click Link user with an existing email address. This means that if a Bulkmail User is found in the system with the same name and email address as one being imported, that user will be linked to the User Group selected in the Create Users in field.
- Click Commit.
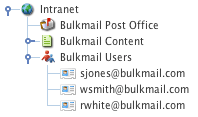
For each name and email combination in the file, a Bulkmail User will now be created under the User Group you selected, as shown in the figure to the right.
Bulkmail Users
Delete Bulkmail Users Tool
The Delete Bulkmail Users tool allows you to delete Bulkmail Users from your system based on their email address. Bulkmail Users can be deleted system-wide or from a specified Root Node.
To access the Delete Bulkmail Users tool, click the ![]() icon located at the top right hand corner of the screen and click on Delete Bulkmail Users.
icon located at the top right hand corner of the screen and click on Delete Bulkmail Users.
The fields available are as follows:
Text File of Email Addresses to Remove: select a text file containing a list of email addresses of the users that you want to delete.
An example text file
This file should list each email address on a new line, as shown in the figure to the right.- Root Node: select a root node to specify the location where the Bulkmail Users will be deleted. To delete Bulkmail Users from the entire system, leave this field blank.
- Confirm deletion of bulkmail users: select Yes to confirm the deletion of the Bulkmail Users. If this field is set to No, the tool will not delete any users.
- Move Under Asset: select an asset to link Bulkmail Users under the asset instead of deleting them. Not specifying an asset in this field will delete the selected Bulkmail Users from the system.
- Using the Link Type: select a link type to use when moving Bulkmail Users under an asset. You can select TYPE_1, TYPE_2, TYPE_3 and NOTICE as the link type. By default, TYPE_1 is selected. An asset must be selected in the Move Under Asset field for this option to work.
reset_bulkmail_job.php
The reset_bulkmail_job.php script prepares a Bulkmail Job to be resent. This means that it changes the Status from Live to Under Construction. A user can then update the contents of the email and run the Bulkmail Job again by changing its Status to Live. The script is located in <system_root>/packages/bulkmail/scripts, where <system_root> is the location of the Squiz Matrix system you are using. It can be added to the system crontab to run on a schedule and takes the Squiz Matrix system root directory and the asset ID of a Bulkmail Job as parameters.
schedule_bulkmail_job.php
The schedule_bulkmail_job.php script allows you to queue up a Bulkmail Job to run immediately and is located in <system_root>/packages/bulkmail/scripts, where <system_root> is the location of the Squiz Matrix system you are using. It can be used by a cron system outside of Squiz Matrix to schedule a time to send a Bulkmail Job and takes the Squiz Matrix system root directory and the asset ID of a Bulkmail Job as parameters. However, the Bulkmail Job will only be queued if its Status is set to Under Construction.
