Using the Asset Map
Last Updated: 29 Jan 2021
The Asset Map is used to manage the assets that comprise your website, including sites, pages, files, and users. Each asset that has been added to the system is displayed in the Asset Map. It also shows the hierarchy of the different assets within Squiz Matrix and is located on the Administration Interface's left-hand side, as shown in the figure below.
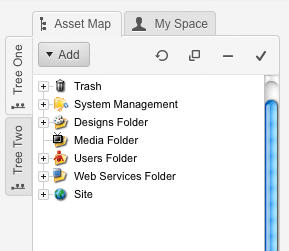
The Asset Map in the Administration Interface
The Asset Map allows you to navigate your way through a Site and allows you to view the Status of each asset and access the editing screens for each asset. The Asset Map also allows you to add, delete, move, clone, and link assets. For more information on adding, deleting, moving, cloning, and linking assets, refer to the relevant chapters in this manual.
Using the Asset Map in Matrix 5 from Squiz on Vimeo.
By default, the top-level assets are displayed in the Asset Map, as shown in the figure to the right. System Administrators can decide to change this default view and only show a certain section of the system. For example, a System Administrator can change the Asset Map to only show a Site when you log in.
Assets, Asset Icons, and Asset IDs
Each name and icon in the Asset Map is an asset in the system. For example, in the figure above, Trash and Site are both assets. The icon for an asset shows you what type of asset it is. For example, the Site asset is an icon that corresponds to a Site asset. Other common asset icons include:
 Folder
 Image
Image PDF File
 Standard Page

A pop-up in the Asset Map
To find out what type an asset is, hover the mouse over the name of the asset in the Asset Map. A pop-up will appear, as shown in the figure to the right. The asset type, along with the asset ID, will appear.
Asset ID
Every asset in the system has its own unique number known as an asset ID. When an asset is created in the system, it will automatically be assigned an asset ID by Squiz Matrix. To find out what is the ID of an asset, hover the mouse over the name of the asset in the Asset Map. A pop-up will appear, as shown in the figure above. The asset ID, along with the asset type, will appear.
Standard System Assets
At the top of the Asset Map, there are several standard assets that are created when Squiz Matrix is installed. These are standard system assets and cannot be deleted from your system.
Trash
The Trash contains the assets that have been deleted from the system. You can restore any of the assets in the Trash by moving them back to the required location. For more information on how to move an asset, refer to the Moving an Asset chapter in this manual.
System Management
The System Management folder contains several tools for managing your Squiz Matrix system. Only System Administrators and the Root User can access this directory.
Users Folder
The Users Folder can be used to store the user accounts that are created for the system. By default, this folder contains the Public User asset. You can only store User, Backend User, System Administrator, User Group, and Role assets in this folder.
Navigating Through the Asset Map
By default, the assets in the Asset Map are collapsed to show the top-level assets, as shown in the figure to the right. If an asset has child assets, a expand icon will be shown on the left-hand side of the asset icon.
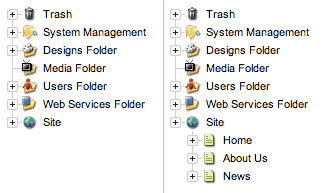
Expanding a Site
For example, in the figure to the right, the Site has child assets as it has a expand/collapse icon but the Media Folder does not have child assets as it does not have one.
To view the child assets, click on the expand/collapse icon – the asset will expand to show its child and dependant assets. For example, when the expand/collapse icon for the Site is clicked, it is expanded to show the Home, About Us and News pages, as shown in the figure to the right. To close or collapse the asset, click on the expand/collapse icon again.
To expand and collapse the Asset Map assets, you can also double click on the name of the asset. For example, to expand the Site in the figure above, double click on the name Site. To collapse the Site, double click on the asset name again.
Accessing Assets
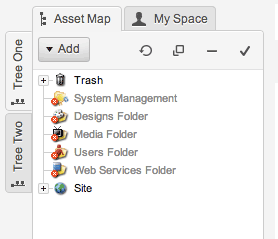
Red crosses in the Asset Map
The assets that you can and cannot view or edit will depend on the level of access you have been granted. If you cannot access an asset to view it, a red cross will appear on the asset icon. For example, in the figure to the left, this user only has access to the Trash and Site asset. They do not have access to the other assets marked with red crosses.
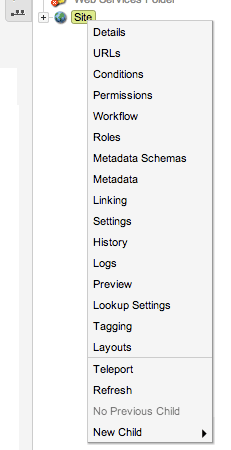
The Asset Map menu
To access the editing screens for any of the other assets, right-click on the name of the asset. The asset menu will appear, as shown in the figure to the right. When you select one of the menu options, the screen for that asset will appear on the right-hand side of the Administration Interface. For example, if you select Details from the Site's asset menu, the Details screen will appear on the right-hand side of the screen. The options available in the asset menu will differ depending on the type of asset you are viewing. For an explanation of the common asset screens available in the asset menu, refer to the Asset Screens manual.
Three additional options are also available in the asset menu: Teleport, Refresh, and New Child. For more information on the Teleport and Refresh options, refer to the Teleporting an Asset and Refreshing the Asset Map sections in this chapter. For more information on the New Child option, refer to the Adding an Asset chapter in this manual.
The Asset Map does not communicate with the editing screen until you select an asset menu option. If you click on the asset's name, the editing screen will not update until you right-click and select an option, for example, Details. Therefore, the asset you have selected in the Asset Map may not be the asset you are viewing on the editing screen. To find out which asset current displayed in the editing screen, refer to the information in the screen's info bar.
Teleporting an Asset
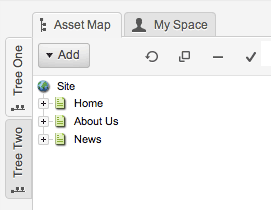
A teleported Site
By default, when you first log in to Squiz Matrix, you will see all of the assets in the Asset Map. If you are only working in one particular part of the system, for example, your Site, you can teleport that section. This will mean that you will only see that section and its child assets in the Asset Map. You can then work within that section and not have to worry about the other assets in the system.
To teleport an asset, right-click on the name of the asset and select Teleport. The Asset Map will change to only show that asset and its children and dependants. For example, the figure to the right shows that a Site has been teleported. To return back to the original view click on the Restore the root folder button in the top right hand corner of the Asset Map.
Refreshing the Asset Map
While you are using Squiz Matrix, to see the latest assets that have been added to your system by other users, you need to refresh the Asset Map. For example, if a another user added an asset to a Site, you will not see it in the Asset Map until you refresh it.
If you want to refresh all of the assets in the Asset Map, click on the Refresh all assets![]() button in the top right-hand corner of the Asset Map. To refresh a certain section of the Asset Map, right-click on the name of the asset and select Refresh. For example, to refresh the Site in the figure above, right-click on the name Site and select Refresh.
button in the top right-hand corner of the Asset Map. To refresh a certain section of the Asset Map, right-click on the name of the asset and select Refresh. For example, to refresh the Site in the figure above, right-click on the name Site and select Refresh.
Asset Map Buttons
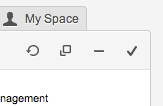
The Asset Map buttons
At the top of the Asset Map, there are four buttons that allow you to control the Asset Map. These buttons are shown in the figure to the right.
Refresh All Assets
The Refresh all assets ![]() button allows you to refresh the contents of the Asset Map. The Asset Map will be updated, showing any assets that have been added by another user or remove any asset that has been deleted.
button allows you to refresh the contents of the Asset Map. The Asset Map will be updated, showing any assets that have been added by another user or remove any asset that has been deleted.
Restore the Root Folder
The Restore the root folder ![]() button allows you to restore the Asset Map view if you have teleported a particular section. For example, if you have teleported a Site, you will only see the Site and its child assets in the Asset Map. To go back to the original view, click on the
button allows you to restore the Asset Map view if you have teleported a particular section. For example, if you have teleported a Site, you will only see the Site and its child assets in the Asset Map. To go back to the original view, click on the ![]() button - the Standard System Assets along with any other Sites you may have in the system will reappear. For more information on how to teleport an asset, refer to the Teleporting an Asset section in this chapter.
button - the Standard System Assets along with any other Sites you may have in the system will reappear. For more information on how to teleport an asset, refer to the Teleporting an Asset section in this chapter.
Collapse All
The Collapse All ![]() button allows you to collapse all of the expanded assets in the Asset Map and return back to the original view.
button allows you to collapse all of the expanded assets in the Asset Map and return back to the original view.
Show Status Colours
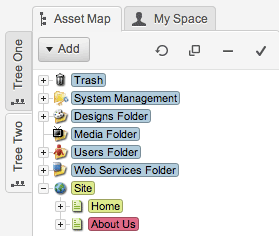
Asset Statuses in the Asset Map
The Show Status Colours ![]() button allows you to view the current Status of each asset in the Asset Map. When you click the
button allows you to view the current Status of each asset in the Asset Map. When you click the ![]() button, the name of the asset will be highlighted with the colour reflecting its current status, as shown in the figure to the right. Click on the
button, the name of the asset will be highlighted with the colour reflecting its current status, as shown in the figure to the right. Click on the ![]() button to switch this option off.
button to switch this option off.
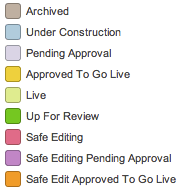
The Asset Status legend
If you are not sure which colours indicate which Statuses, click on the up black arrow located at the bottom of the Asset Map. A legend of Statuses will appear as shown in the figure to the left. To hide the legend, click on the down black arrow.
Tree Tabs
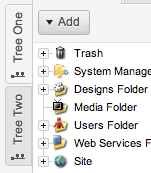
The Tree tabs
Within the Asset Map, there are two different Asset Tree views that you can use. These views allow you to navigate to different parts of your system within the Asset Map. These two views are available by clicking on either the Tree One or Tree Two tab on the side of the Asset Map, as shown in the figure to the left.
You can open one section of your Site in one tab and a different one in the other. You can also teleport to a section of your Site on one tab and teleport to a different section of your Site on the other tab. For more information on how to teleport, refer to the Teleporting an Asset section in this chapter.
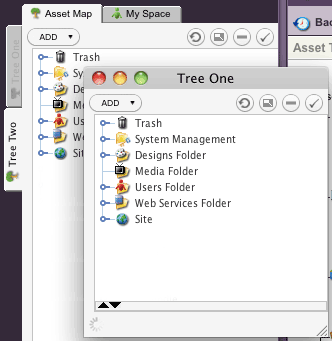
The Tree One Asset Map in a new window
You can also open the Asset Map in a new window by double-clicking on either Tree One or Tree Two. When you do this, that tree tab in the Asset Map is greyed out and cannot be used within the Administration Interface.
The figure to the right shows Tree One open in a new window. When you navigate to one of the editing screens for an asset in the Asset Map, it will still open in the editing section of the Administration Interface. To return the Asset Map back into the Administration Interface, close the window by clicking on the X button in the top right hand corner of the window.
Resizing the Asset Map
By default, the Asset Map will be set at a width of 275 pixels.
This default width can be altered by clicking to the right of the Asset Map and dragging it across to either decrease or increase its size.
Dragging the Asset Map completely to the left of the screen will collapse and hide it.
This resized Asset Map width will be stored in your browser's local storage and will be retained the next time you log into your Squiz Matrix system.
The Asset Map's minimum width is determined by the system's Asset Map Width setting in your system's Global Preferences. For more information, refer to the Global Preferences chapter in the System Configuration manual.
Hiding the Asset Map
The white arrow button
You can hide the Asset Map when you are editing an asset to create more space in the editing interface. This is especially useful if you are working on a small monitor and space is limited. To hide the Asset Map click on the white arrow in the middle of the Asset Map, as shown in the figure to the right. To show the Asset Map again, click on the white arrow.
Folders With Large Numbers of Assets

The Asset Map
If there is a large number of child assets in the Asset Map, arrows will appear to allow you to navigate through the list, as shown in the figure to the right. These arrows help increase the speed of the Asset Map when it is loading the assets. By default, the number of assets shown is set to 50 assets. If an asset has more than 50 child assets, the arrows will appear in the Asset Map. System Administrators and the Root User can change this setting. For example, in the Asset Map shown in the figure to the right, the Asset Map has been set to only show 3 assets at a time.
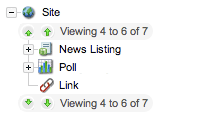
Navigation arrows
To move to the next section of assets, double click on the small green down arrow ![]() . For example, when the small green down arrow was double-clicked in the Asset Map in the figure to the right, the next set of three assets are shown in the Asset Map. To move to the last set of assets, double click on the large green down arrow
. For example, when the small green down arrow was double-clicked in the Asset Map in the figure to the right, the next set of three assets are shown in the Asset Map. To move to the last set of assets, double click on the large green down arrow ![]() .
.
Once you have moved down the list of assets, green up arrows will appear in the Asset Map, as shown in figure to the right. Double click on the small green up arrow ![]() to move back up one set of assets or double click on the large green up arrow
to move back up one set of assets or double click on the large green up arrow ![]() to move back to the first set of assets.
to move back to the first set of assets.
Site Navigation Menu and the Asset Map
The navigation menu within a Site is a direct reflection of the Asset Map, as shown in the figure below. The Asset Map for the Site is shown in the figure on the left and the navigation menu within the Site is shown in the figure on the right.
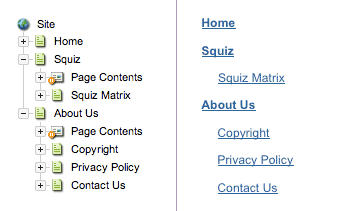
The relationship between the Asset Map and a Site navigation menu
Because of this, the order of the assets in the Asset Map is important. For example, if you wanted to create a page called Your Feedback and have it appear as the first page under the About Us page, you would need to create it before the Copyright page. If you added the page after the Contact Us page, that is where the Your Feedback page would appear in the navigation menu of the Site.
By default, when you create an asset, it will appear in the Site's navigation menu. You can choose to hide an asset from the navigation by changing its link type. For example, if you do not want to show the Contact Us page in the navigation menu, you can change its link type.
For more information on adding, moving, and hiding assets, refer to the relevant chapters in this manual.
Asset Map Shortcuts
There are a number of shortcuts that are available in the Asset Map. These are listed in the table below.
| Action | Shortcut |
|---|---|
| To increase the size of the text in the Asset Map. | Ctrl + Shift + Plus |
| To decrease the size of the text in the Asset Map. | Ctrl + Shift + Minus |
| To jump to an asset in the Asset Map. | The first letter of the asset name |
| Move up the Asset Map. | Up arrow |
| Move down the Asset Map. | Down arrow |
| Expand the assets in the Asset Map. | Right arrow |
| Collapse the assets in the Asset Map. | Left arrow |
