Settings
Last Updated: 08 Mar 2018
The Settings screen for an asset allows you to change various information for the asset including the version number, when it was created, when it was published and the Design to use for the asset. This screen is only available to users with administration permission.
Versioning
This section allows you to change the current version number of an asset.

The Versioning section of the Settings screen
- Current Version: this field displays the current version number of an asset. Each version number is made up of three sections: MajorNo.MinorNo.MicroNo.
- Micro Version Number: this number is updated when the Commit button is clicked on the asset. For example, in the figure shown above, the micro version number is 4 meaning that the Commit button has been clicked at least four times.
- Minor Version Number: this number is updated when the Status of the asset is changed to Live. For example, in the figure shown above, the minor version number is 2 meaning that the Status of the asset has been changed to Live twice.
- Major Version Number: an administrator can manually update this number. For example, in the figure shown above, the major version number is 0 meaning that it has not been changed. If an administrator updated this number, the version number would change to 1.0.0 for this asset.
- Update Major Version? : to update the major version number, check this box and click Commit. The major number in the version will be incremented by one. For example, in the figure shown above, if an administrator increments the major version number, the version number for this asset will change to 1.0.0.
Dates
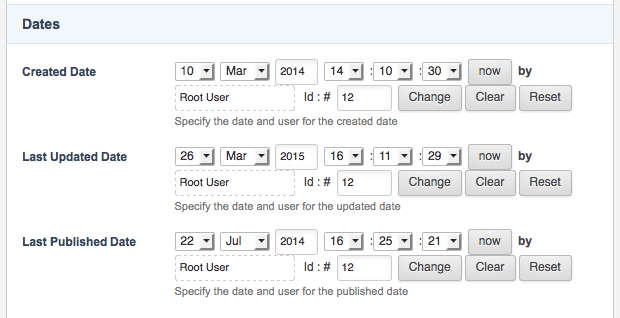
The section allows you to change the created and published details for the asset.

The Dates section of the Settings screen
This is useful if you are displaying this information as content on the web site and need to update it to the date and time it was made Live. For example, if it is a media release that was created a few days before it was released, you can change this information to make it look like it was created the day it was released.
- Created Date: by default, the date and time that the asset was created and who created it will be shown in this field. You can use the fields provided to change the date and time that the asset was created and the user who created the asset.
- Last Updated Date: by default, the date and time that the asset was last updated. You can use the fields provided to change the date and time that the asset was last updates and the user who made the changes to the asset.
- Last Published date: by default, the date and time that the asset was made Live and who made it Live will be shown in this field. You can use the fields provided to change the date and time that the asset was made Live and the user who made the asset Live.
SSL
force_secure|feature|5.5.0.0
The Force Secure option in this section allows you to specify that the asset can only be viewed through a secure (SSL) connection.
This means that if you link to this asset, Squiz Matrix will always use a secure connection. In other words, it will prefix the URL with https://. This will only work if your Site has been set up to use a secure connection.
Designs
This section allows you to apply a Design to the asset. A Design defines the look and feel of the page and is created in the Designs Folder. For more information on how to create a Design, refer to the Design manual. You only need to have Write Permission to apply a Design to an asset.
System Defined Frontend Design
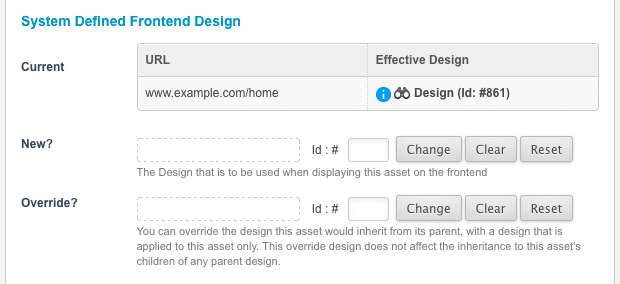
This section allows you to apply a frontend design to the asset.

The System Defined Frontend Design section
By default, no design is applied to the asset. If it is created under a parent asset that has a design applied, it will automatically inherit that design. For example, if you have applied a design to the Home page and you create another asset as a child of the Home page, it will inherit the design from the Home page.
- Current: this section lists the designs that have been applied to this asset. By default, if no design has been applied to this asset, no information will appear in this field. Once you have applied a design, it will appear in this section.
- New? : this field allows you to apply a Design or Design Customisation to the asset. If this asset currently inherits the design from its parent, setting a new design in this field will override the current design. When you set a new design, it will be automatically cascaded to its child assets. Any new child assets will also inherit this design.
- Override? : this field allows you to apply a Design or Design Customisation to this asset only. If this asset currently inherits the design from its parent, setting a new design in this field will override the current design, however, it will not be cascaded to its child assets. Any new child assets will not inherit this design; instead it will inherit the design applied to this asset's parent.
System Defined Login Design
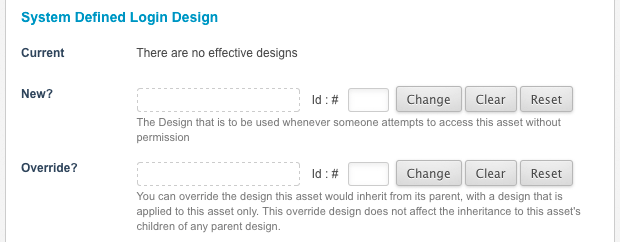
This section allows you to apply a design for the login page for the asset.

The System Define Login Design section
This login page is displayed whenever a user tries to access an asset they do not have permission to view. For example, if you have denied Public Read Permission to your Home page, when a public user tries to view the Home page they will see the login page instead of the Home page.
By default, no login design is applied to the asset. If it is created under a parent asset that has a login design applied, it will automatically inherit that design. For example, if you have applied a login design to the Home page and you create another asset as a child of the Home page, it will inherit the login design from the Home page.
- Current: this section lists the login designs that have been applied to this asset. By default, if no login design has been applied to this asset, no information will appear in this field. Once you have applied a login design, it will appear in this section, as shown in the figure below.
The list shows the different login designs that have been applied for each URL. For example, in the figure above, for the URL www.example.com/home, the Matrix Design asset has been applied.
An applied Login Design - New? : this field allows you to apply a Design or Design Customisation to the asset. If this asset currently inherits the login design from its parent, setting a new design in this field will override the current design. When you set a new login design, it will be automatically cascaded to its child assets. Any new child assets will also inherit this login design.
- Override? : this field allows you to apply a Design or Design Customisation to this asset only. If this asset currently inherits the login design from its parent, setting a new design in this field will override the current design. However, it will not be cascaded to its child assets. Any new child assets will not inherit this design; instead it will inherit the login design applied to this asset's parent.
System Defined Password Change Design
This section allows you to apply a design for the Change Password screen for the asset, displayed when a user is required to change their password, for example, if their account is Up For Review.
By default, no Change Password design is applied on an asset. If the asset is a child of another asset which has a Change Password design applied, this asset will automatically inherit this design. If no design is set or inherited, the default Change Password design on the system will be used.
- Current: the custom Password Change design that has been applied to the asset. If no custom design has been applied on the asset, not information will appear in this field. Once a custom design has been applied, it will appear in this section.
- New: this option allows you to apply the custom Password Change design for the asset. This can be either a Design or Design Customisation. If the current asset is inheriting a design from its parent, setting a design in this field will override the current design. Setting a new Password Change design will automatically cascade this design to any child assets.
- Override: this option allows you to apply a custom Password Change design, exclusive to the current asset. If this asset is inheriting a design from its parent, setting a design in this field will override the current design, without interrupting the cascade of the parent Password Change design. Both existing a newly created children of this asset will inherit the design of its parent.
Create New User Defined Design
The section allows you to specify an alternative design for the asset, for example a printer friendly design.
Each user defined design needs to be set up within the parse file of your frontend design. For example, if you are using a printer friendly design, a button should be added to the frontend design to allow the user to view the printer friendly design. For more information on how to do this refer, to the Designs manual.
By default, no user-defined designs will be applied to an asset. To add a new user defined design, fill in the following fields:
- Design Code: enter a code into this field, for example, printer_friendly. This code is referenced within the parse file of the frontend design.
- New? : select the Design or Design Customisation to use for this user defined design. When you set a new user defined design, it will be automatically cascaded to its child assets. Any new child assets will also inherit this user-defined design.
- Override? : select the Design or Design Customisation to use for this asset only. This design will not be cascaded to its child assets. Any new child assets will not inherit this design; instead it will inherit the user-defined design applied to this asset's parent.
Once you have filled out this information, click Commit. A new section will appear on the screen for the user-defined design, as shown in the figure below.

An applied User Defined Design
You can change the settings for each user-defined design, by using the fields provided.
Internationalisation
internationalisation|feature|5.5.0.0
This section allows you to change the language and character set that is sent in the headers of the page. This does not change the way that Squiz Matrix works but rather tells web browsers, such as Internet Explorer and Mozilla Firefox, how to interpret the content of the page on the frontend of your Site. For example, if the content of your page is in French, you can select French in the Languages section so that the web browser knows that the content is French and not English. By default, the language and character set that is used for the page is defined in the Internationalisation Settings section on the System Configuration screen. For more information on the System Configuration screen,refer to the System Configuration manual.
To set the language for an asset, select the language from the list provided in the Add Language field and click Commit. The language will be added into the Current section.
You can add as many languages to the list as you want. To delete a language, click the Delete box in the Current field and click Commit.
To set the character set for an asset, select the character set from the list provided in the Current field and click Commit.
