
Design Asset
Last Updated: 12 Apr 2018
The Design asset allows you to create a design in the system. This Design is then applied to either a Site, a section of a Site or a page and is used to display the content on the frontend. Each Design will have a parse file that contains the HTML for the design along with any required files, including CSS files and images, being stored under it in the Asset Map. There is no limit on the number of Designs that you can create in a system. Each Design should be created under the Designs Folder in the Asset Map.
Once you have added a Design asset, you can configure its settings on its associated asset screens. The majority of these screens are the same or similar to those for a Standard Page and are described in the Asset Screens manual. In this chapter, we will describe the Details, Edit Parse File, Usage and Import/Export screen, which are different for a Design. The Customisation screen is described in the Design Customisations chapter in this manual.
Details Screen
The Details screen of a Design allows you to upload the parse file and associated files for the design. For more information on the Status, Future Status and Thumbnail sections, refer to the Details chapter in the Asset Screens manual.
The use of Safe Edit on Design and Customisation assets is NOT advised. Due to the complex nature of designs, customisations, and their system-wide dependencies, you may experience inconsistent (publicly viewable) results when applying changes. A better approach would be to create a copy of your Design, applied to a series of test assets. This will allow you to safely make changes before applying the new Design.
Details
This section allows you to change the name of the design and configure the frame settings when the design is viewed in the Simple Edit interface.

The Details section of the Details screen
The fields available are as follows:
- Design Name: enter a name for the Design. By default, the name that was entered when the asset was first created will appear in this field.
- No frames in Simple Edit Interface: when a design is viewed in the Simple Edit interface, the tool bar and Asset Map are displayed. This field allows you to select whether or not to view these frames for the Design in the Simple Edit interface. If this field is set to Yes, only the main content frame will be displayed in Simple Edit.
- Include File Version in Static URL: this option allows you to append a query parameter for version numbers on the statically served URLs of files associated with this Design. Enabling this option will help bust external caching of statically served content.
- File Reference Method: this option allows you to specify the reference method used when printing 'mysource_files' links in the CSS design on the frontend. The options available are:
- Absolute Path, e.g. http://www.site.com/path/to/file.
- Scheme Relative Path, e.g. //www.site.com/path/to/file.
- Domain Relative Path, e.g. /path/to/file.
Parse File
This section allows you to upload the static HTML file of the design.

The Parse File section of the Details screen
The fields available are as follows:
- Manual: check this box and click Commit if you need to manually re-parse the HTML file. You will only be able to re-parse the file if you have already uploaded it to the Design.
If the Design does not appear to be working correctly and the syntax in the parse file is correct, try to manually re-parse the file.
- Upload: this field allows you to upload the static HTML file that has been created for the design. Select the file to upload and click Commit. The HTML code will appear on the Edit Parse File screen where you can modify it.
Associated Files
This section allows you to upload the associated files for the Design. You can upload these files individually or as part of a tar archive (.tar) or gzipped tar archive (.tar.gz or .tgz).

The Associated Files section of the Details screen
To upload associated files, select the file(s) in the available selection fields and click Commit. You can upload up to two files at a time. Uploaded files will be placed in the system's file directory.
To reduce the number of uploads, you can upload a single tar file containing all the files to associate with the Design. Once you have uploaded the tar file, Squiz Matrix will extract the files from the archive before placing them into the system's file directory.
Once you have uploaded the associated files of a Design, they will appear under the Design asset in the Asset Map. You will then be able to reference these assets in the parse file of the Design. For more information on how to do this, refer to the Steps to Creating a Design chapter in this manual.
Edit Parse File Screen
By default, the Edit Parse File screen will be blank. Once you have uploaded the parse file on the Details screen, the HTML code from that file will appear in the Edit Parse File section of the screen.
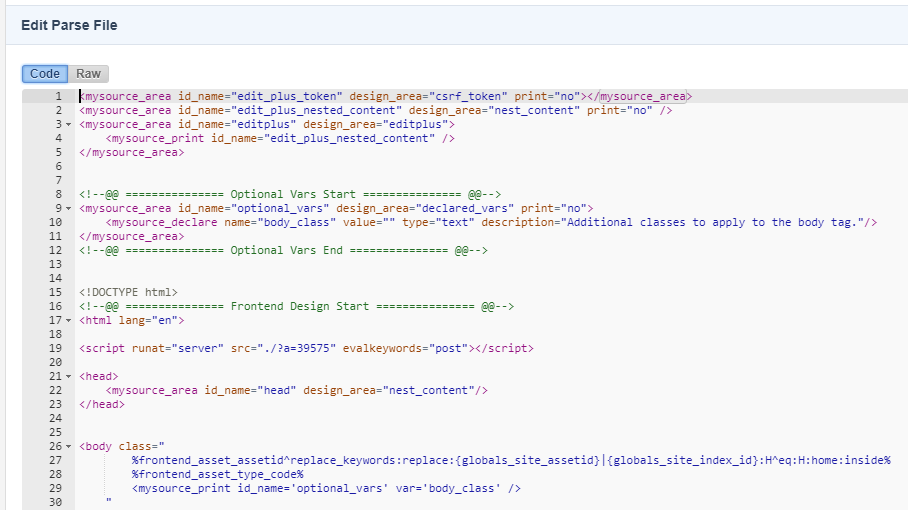
You can use the following comment syntax format to add notes within the Design code that won't be printed on the front-end: <!--@@ Comment goes here @@-->
Keep in mind that any modifications made to a parse file can alter existing Design Customisations. Care should be taken to prevent any unintended changes to your Design.
Global keywords and links to files using ./?a= are not recommended to be used directly in the Design parse file content as they do not get evaluated when viewing a page with /_edit appended (Simple Edit Mode). Instead, place these keywords and links in a Standard Page and nest it into the Design using the Nested Design Area.
Usage Screen
The Usage screen shows the assets in the system that are using the Design. This means that the Design is currently applied on the asset. The Design Usage section of the Usage screen is shown in the figure below.

By default, if the Design has not been applied on any assets, no information will appear on the screen, as shown in the figure above. Once the Design has been applied to an asset, the information shown in the figure below will appear.

The Usage screen listing the assets that the Design has been applied to
The top-level assets where the Design has been applied are shown, along with the number of child assets also using the Design. You can click on the name of the asset to go to its Settings screen.
Import/Export Screen
This screen allows you to export the current Design as a gzipped tar archive (.tar.gz) file or import a tar archive (.tar) or a gzipped archive (.tar.gz) file that contains the design. If you have an existing design, you can use this screen instead of uploading the parse file and associated files on the Details screen. The Import/Export screen is shown in the figure below.
Import
This section allows you to import an external file or an existing asset.

The Import section of the Import/Export screen
The fields available are as follows:
- Import File: this field allows you to import a tar archive (.tar) or a gzipped archive (.tar.gz) file that contains the design to use. Select the file to import and click Commit. The file will be added to the Current Files section.
- Existing Asset: this field allows you to import an existing asset to use as the design. Create a File asset using the tar archive (.tar) or a gzipped archive (.tar.gz) file and select it in this field. The file will be added to the Current Files section.
For more information on how to import a design, refer to the Importing a Design section in this chapter.
Export
This section allows you to export the current design and its associated files as a gzipped archive (.tar.gz) file. However, any Design Customisations that have been created for the Design will not be exported. These will need to be recreated when the file is imported into a new Design.

The Export section of the Import/Export screen
To export the design, enter a name for the file in the Export File Name field and click Commit. The file will be added to the Current Files section. To download the file, click on the Download hyperlink in the Current Files section.
Current Files
By default, no files will be listed in this section. Once you have imported or exported the design, the file will be listed in this section, as shown in the figure below.

The Current Files section
To download the file, click on the Download hyperlink. To apply the design to the Design asset, click the Apply button and click Commit. When you are applying a design, any Design Customisations and associated files that exist for the Design will be removed.
Styles Screen
This screen allows you to determine the CSS styles of the current Design that will appear on the WYSIWYG Editor and DIV Properties pop-up.
WYSIWYG Styles
This section allows you to select which style classes of the Design will be available for use on the Classic WYSIWYG Editor's -- select css style -- drop-down list or the Edit+ WYSIWYG Editor's select style plugin.
To add a new style, click on the Add Style button at the bottom of the table. This will add a new row with configuration options for the style. For each style the following configurations are available:
- Friendly Name: enter the friendly name of the style. This is the value that will be displayed in the select list for the user to select a style from.
- Class Names: enter the class names that this style will apply when selected.
- Show For: enter the HTML elements that this style will only be shown as an option for. Leave empty to show for all elements.
- Hide For: enter the HTML elements that this style should not be available for. Leave empty to not hide for any elements.
For example, if you want a style to only be available for img tags, you only have to enter "img" into the Show For field. You don't have to enter all other possible HTML elements into the Hide For field.

The Classic WYSIWYG CSS Selection List
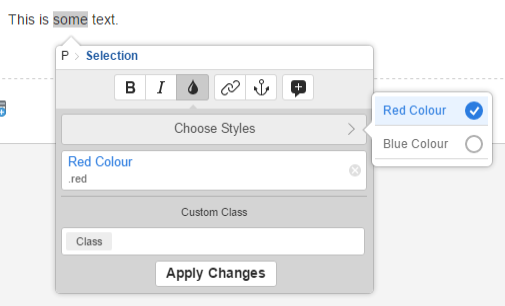
The Edit+ WYSIWYG Style Selection List
Content Container Styles
This section allows you to select which style classes will be available for use on the DIV Properties pop-up of a content container.
To add a new style, click on the Add Style button at the bottom of the table. This will add a new row with configuration options for the style. For each style the following configurations are available:
- Friendly Name: enter the friendly name of the class This is the value that will be displayed in the select list for the user to select a style from.
- Class Names: enter the class names that this style will apply when selected.

The Class menu
For example, say the Design contained a CSS class named "center" that makes selected text centered on the page. If you set the Class Names field to "center" and the Friendly Name field to "Center", the option "Center" will be displayed in the Class list of the DIV Properties pop-up, as shown in the figure to the right. If a user then selects this option, the CSS class of "center" will be applied to the container.
Editing the Design
To edit the parse file of the Design, right click on it in the Asset Map and select Edit Parse File. The HTML code will appear on the right hand side of the screen. Edit the code and click Commit. The changes that you have made will automatically be applied to the assets that are currently using the Design.
Updating the Associated Files
When the associated files are uploaded to a Design, the files with the extension of .css are created as a Text File asset and files with the extensions .gif, .jpg, .jpeg or .png are created as an Image asset. To edit the .css file, go to the Edit File screen and to upload a new version of an image, go to the Details screen. For more information on these assets, refer to the Core Assets manual.
Deleting an Associated File
To delete an associated file, click on it in the Asset Map, press the Delete key on the keyboard and confirm that you want to delete it. The asset will be moved to the Trash.
Adding a New File to the Design
To add a new file to the Design, go to the Details screen of the Design, select the file in the Associated Files section and click Commit. The file will appear under the Design asset in the Asset Map.
Importing a Design
To import a design, right click on the Design and select Import/Export. Select the tar archive (.tar) or a gzipped archive (.tar.gz) file in the Import File field and click Commit. The file will be added to the Current Files section, as shown in the figure below.
The Current Files section

The imported files
In the Current Files section, click the Apply button for the file and click Commit. Squiz Matrix will extract the files and place them in the files directory. The files will also appear under the Design asset in the Asset Map, as shown in the figure to the right. The parse file for the design will appear on the Edit Parse File screen, where you can make changes.
Structure of the File to Import
When you import a design, you need to import a .tar or .tar.gz file. This file must contain the following files:
- parse.html: this file must contain the HTML code for the design. The content of this file is used as the parse file for the Design.
- associated_files.tar.gz: this file must contain the images and CSS files that are needed for the design. These files will be uploaded as associated files.