Cart
Last Updated: 02 Jun 2020
Please note that as of version 6.0.0 of Matrix, the functionality described on this page has been deprecated.
ecommerce_cart|asset|6.0.0
The Cart asset allows you to create a shopping cart that can be used to assist site users to complete e-commerce transactions. The Cart holds a list of user's intended purchases that can be revised and edited before proceeding to the Checkout Page.
Bookmarks to the headings on this page:
Once you have added a Cart, you can configure its settings on its associated asset screens. The majority of these screens are the same or similar to those for a Standard Page or Asset Listing and are described in either the Asset Screens manual or the Asset Listing manual. In this chapter, we will describe the Details screen, which is different for a Cart.
Additional Dependant Assets

The additional dependant assets
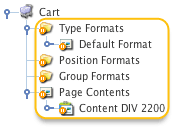
When you create a Cart, several assets are automatically created beneath it, as shown in the figure to the right. You can use these assets to define the contents and layout of the Cart.
- Page Contents: this Bodycopy is used to define the overall layout of the Cart page including the layout of the items, item information and a heading for the page.
Please note that the additional dependant assets that are created under the Cart are similar to the dependant assets created under the Asset Listing Page. For more information on these assets, refer to the Asset Listing manual.
Multiple E-Commerce Carts

A Site with multiple Carts
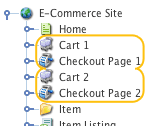
When configuring an e-commerce system, multiple Carts can be used on a Site to give users greater control over their purchases. More than one e-commerce Cart will allow users to add items to a number of different Carts, completing the payment of the contents of each Cart individually. This could be utilised in a Buy Now/Save For Later Cart setup or by providing users with a Wish List Cart.
Please note that, when using multiple Carts on a Site, each Cart must be associated with its own individual Checkout Page. For example, in the figure to the right, an e-commerce Site is set up with two Carts, each having its own corresponding Checkout Page.
Details Screen
The Details screen for the Cart allows you to edit the settings for the asset.For more information about the Status, Future Status, Thumbnail, Details, List Settings and List Position Settings sections, refer to the Details Screen chapter of both the Asset Screens manual and the Asset Listing manual.
Cart Settings
This section allows you to configure the main settings for the Cart including the corresponding Checkout Page and which items to list in the Cart.
The fields available in this section are as follows:
- Ecommerce Checkout Asset: select a Checkout Page for the e-commerce system. This will allow the users to select a delivery method and confirm their purchases before proceeding to payment. Without a Checkout Page the Cart will fail to display e-commerce functionality. For more information on the Checkout Page, refer to the Checkout Page chapter in this manual.
- Restricted Root Nodes: select the root nodes that the user can add products into the cart from. Leaving this option empty will allow products from anywhere in the system. The current user must have at least read permission on the product to be able to add it to the cart. Regardless of root node restriction and user permission, the product asset must not be exclusively linked to the trash. So if the product is trashed and is not linked elsewhere outside the trash folder, then it cannot be added to the shopping cart.
- Cart Items to List: select the types of assets to list as items in the Cart. To select more than one asset type, click on the More… button. An additional list will appear on the screen. You can also check the inherit box to specify that the Cart should include all child types of the selected asset type.
Dynamic Parameters
This section allows you to specify a source for adding items to the Cart based on GET, POST or SESSION variables, current asset, current user, current site, set value or any super global. The Dynamic Parameters section is shown in the figure below.

The Dynamic Parameters section of the Details screen
The fields available in this section are as follows:
- Parameter: select the parameter to replace in this field. The only option available is Add an item to the cart.
- Source: select where the Cart should source item additions. You can select one of the following options:
- GET Variable Name: this allows you to enter a GET parameter. You can set a link on another page to call this page with the appropriate GET parameter. For example, an Asset Selection could be created on an Asset ListingPage with the Asset Target as the Cart. Entering the name of the Asset Selection in this field will allow items from that Asset ListingPage to be added to the Cart. For more information on Asset Selections, refer to the Asset Listing manual.
- POST Variable Name: this allows you to enter a POST parameter.
- SESSION Variable Name: this allows you to enter a SESSION parameter.
- Current Asset: this allows you to set the Cart add item source to the asset the user is viewing.
- Current User: this allows you to set the Cart add item source to the user who is currently viewing the page. This can be a logged in user.
- Current Site: this allows you to set the Cart add item source to the Site the user is currently viewing.
- Set Value: this allows you to enter a static value.
- Any Super Global: this allows you to enter a value for any of the major super global arrays. The SESSION, POST and GET variables will be checked in succession until a value is found.
To set up a dynamic parameter, select the parameter you want to use from the first list, select a Source from the second list and click Commit. An additional field will appear in the Dynamic Parameter section, as shown in the figure below.

Additional fields in the Dynamics Parameters section
Enter the value for the source into the field. To delete a dynamic parameter, click the Delete box and click Commit.
Submit Button
This section allows you to change the wording of the buttons for the Cart. The Submit Button section is shown in the figure below.

The Submit Button section of the Details screen
The fields that are available in this section are as follows:
- Update Cart Button Text: enter the text to show on the update cart button. By default, this button will read Submit. This button is shown when the keyword replacement Cart Update Button is used on the Page Contents Bodycopy.
- Reset Button Text: enter the text to show on the reset button. By default, this button will read Reset. This button is shown when the keyword replacement Reset Button is used on the Page Contents Bodycopy.
- Checkout Cart Button Text: enter the text to show on the checkout cart button. By default, this button will read Proceed to Checkout. This button is shown when the keyword replacement Checkout Cart Button is used on the Page Contents Bodycopy.
Messages
This section allows you to change the wording of the messages on the Cart page. The Messages section is shown in the figure below.

The Messages section of the Details screen
The fields that are available in this section are as follows:
- Cart Updated Message: enter the text to show when the Cart's contents are updated. By default, this button will read Your Cart has been Updated. This message is shown when the keyword replacement Cart Updated Message is used on the Page Contents Bodycopy.
- No Items Message: enter the text to shown when the Cart is empty. By default, this button will read There are currently no items in your cart. This message is shown when the keyword replacement Asset Listing is used on the Page Contents Bodycopy and the Cart contains no items.
Page Contents Bodycopy
The Page Contents Bodycopy is used to define the layout of the Cart page. To create a layout for this page, right click on the Page Contents Bodycopy in the Asset Map and select Edit Contents. Click on the ![]() icon – the WYSIWYG Editor will appear where you can use the keyword replacements and formatting to set the layout of the information to show on the Cart page. By default, no information will appear in the WYSIWYG Editor.
icon – the WYSIWYG Editor will appear where you can use the keyword replacements and formatting to set the layout of the information to show on the Cart page. By default, no information will appear in the WYSIWYG Editor.
Keyword Replacements on the Page Contents Bodycopy
A list of keyword replacements is provided in the WYSIWYG Editor toolbar on the Edit Contents screen of the Page Contents Bodycopy. You can use these keyword replacements in conjunction with text, images and links etc to configure the layout of the form page. Many of these keyword replacements are the same as those for an Asset Listing. For more information on these keywords, refer to the Asset Listing manual. The standard keyword replacements that are available include the following:
- Cart Updated Message: this will show the text entered in the Cart Updated Message field on the Cart Details screen when the Cart's contents have been updated.
- Cart Item Count: this will show the number of items in the Cart.
- Cart Total Value: this will show the total value of the items in the Cart.
- Cart Update Button: this will update the contents of the Cart.
- Cart Checkout Button: this will show the checkout button to proceed to the checkout process.
- Cart Checkout href: this will show the URL to proceed to the checkout process.
- Insufficient Product Quantity Message: this will show text entered in the Cart Insufficient Product Quantity Message field on the Checkout PageQuantity Tracking screen when there is insufficient stock to proceed with the order. Please note that the Quantity Tracking settings must be enabled for Quantity Tracking to work. For more information, refer to the Quantity Tracking section of the Checkout Page chapter in this manual.
