Promotional Code
Last Updated: 02 Jun 2020
promotional_code|asset|6.0.0
The Promotional Code asset allows customers to receive discounts on items when entering store promotional codes. These discounts are rule based, determined by either Fixed Amount or Percentage promotional rules.
Bookmarks to the headings on this page:
Details Screen
The Details screen allows you to set up the Promotional Code asset. For more information about the Status, Future Status and Thumbnail sections, refer to the Details Screen chapter in the Asset Screens manual.
Details
The section allows you to configure the promotional code and the assets it is applied to. The Details section of the Details screen is shown in the figure below.

The Details section of the Details screen
The fields available are as follows:
- Name: enter a name for the Promotional Code. By default, this will be the name that was entered when the asset was first created.
- Promotional Code: enter a code to use for the Promotional Code asset. This will be the code customers must enter to receive a discount. This code is case-sensitive and can include special characters (e.g. $, % or @).
- Applied Assets: select the assets to apply the Promotional Code to. You can select multiple assets by clicking on the More... button.
Tip: To allow Promotional Codes to be used on items, enable the Accept Promotional Code option on the Details screen of the Product asset. For more information, refer to the Product chapter in this manual.
Promotional Conditions
This section allows you to configure conditional rules against which the Promotional Code will be measured against before being applied on the e-commerce order. The Promotional Conditions section of the Details screen is shown in the figure below.
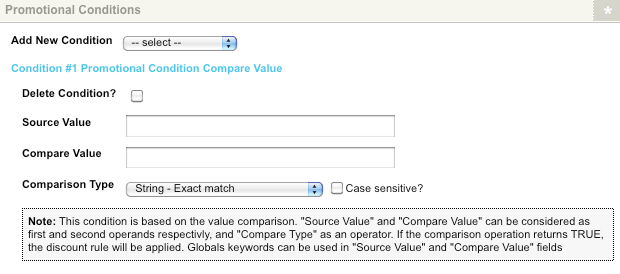
The Promotional Conditions section of the Details Screen
Promotional Condition Compare Value
The Compare Value condition allows you to compare two values on the e-commerce order, based on a variety of comparison types.
This condition can be used, for example, to provide a discount to only Australian users of your store, or for users of a specific membership level.
The fields available for this condition are as follows:
- Delete Condition: select this checkbox and click Commit to delete this condition.
- Source Value: enter the source value to compare with the value entered in the Compare Value field. You can use global keywords in this field.
- Compare Value: enter the comparison value to compare against the value entered in the Source Value field. You can use global keywords in this field.
- Comparison Type: specify how the Source and Compare Values will be matched against each other in order to satisfy the condition. The options available are:
- String: Exact match, Begins with, Ends with, Contains.
- Numeric: Equals, Less than, Greater than, Less than or equals, Greater than or equals.
- Regular Expression: Match, Not match.
Promotional Rules
This section allows you to configure rules to define the Promotional Code discount. The Promotional Rules section of the Details screen is shown in the figure below.
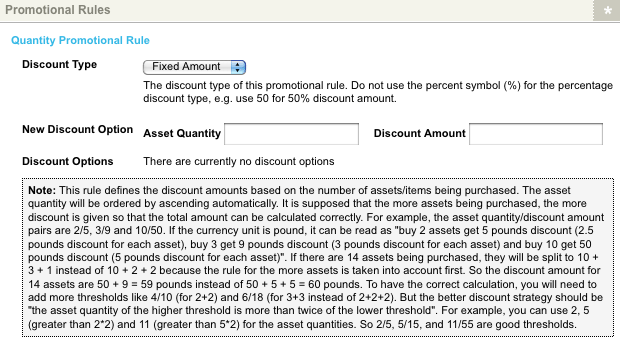
The Promotional Rules section of the Details screen
Free Shipping Promotional Rule
The Free Shipping Promotional Rule allows you to configure a full discount on the shipping of a user's e-commerce order, determined by a threshold on either the total cost of the order or the number of items being purchased.
This rule can be used, for example, to create a Promotional Code that provides free shipping when the total cost of an e-commerce order is $50 or greater. Alternatively, you could configure a Promotional Code to provide free shipping when two or more items have been purchased.
The fields available for this rule are as follows:
- Delete Rule: select this checkbox and click Commit to delete this rule.
- Discount Type: specify the type of discount that will be applied when customers enter the promotional code. The discount type selected will determine how Squiz Matrix interprets the value entered into the Quantity/Cost Threshold field. The discount types available are:
- Amount: the discount will be applied based on the total cost of the order.
- Quantity: the discount will be applied based on the number of items on the order.
- Quantity/Cost Threshold: specify the threshold of either the total cost or the total number of items of the order. This will determine the minimum amount/quantity, after which the free shipping discount will be applied.
Tip: Set the Quantity/Cost Threshold to 0 (zero) to provide free shipping when users enter the correct Promotional Code, regardless of the cost of their order or the number of items purchased.
Quantity Promotional Rule
The Quantity Promotional Rule allows you to define the discount of the Promotional Code, determined by the number of items that are being purchased.
The fields available for this rule are as follows:
- Discount Type: select the type of discount that will be applied when customers enter the correct promotional code. The Discount Type selected will determine how Squiz Matrix interprets the value entered into the Discount Amount field. The discount types available are:
- Fixed Amount: a specified monetary amount. For example, a $10.00 discount.
- Percentage: a discount amount specified as a percentage of the price. For example, a 10% discount.
- New Discount Option: specify the amount discounted on an item quantity. For example, you can configure a Discount Option so that when a customer buys 2 items they will get a 5 dollar discount.
- Asset Quantity: the number of purchased items required for the discount.
- Discount Amount: the discount amount granted. This value will be interpreted as either a monetary amount or a percentage, depending on the Discount Type specified.
- Discount Options: this field lists the Discount Options that have been configured for the promotional code asset, as shown in the figure below.
To delete a Discount Option, select the Delete? field for the corresponding option and click Commit.
Discount Options
Tip: You can set a discount on an Asset Quantity of 0 (zero) in order to provide a flat-rate discount when users enter the correct Promotional Code, regardless of the number of items purchased.
Setting Up the Promotional Code
Consider the following examples, in order to set up a Promotional Code on your e-commerce store.
Using a Cart and Checkout Page
In the following example, we want to display a Promotional Code input field on the 'Confirmation' page of e-commerce orders, allowing users to enter a promotional code to retrieve a discount on their order. The input field and button for a promotional code can be displayed using the following keyword replacements:
- %promotional_code_field%
- %promotional_code_button%
You can configure the size of the Promotional Code field and the displayed button text on the Display Formatting Options screen of the Checkout Page asset.
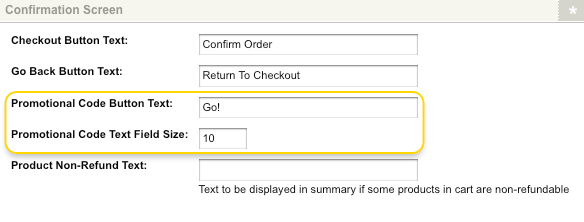
The Promotional Code Button Text and Text Field Size fields on the Checkout Page asset
The keyword replacements for the Promotional Code field and button are appended to the Confirmation Bodycopy of the Checkout Page asset.
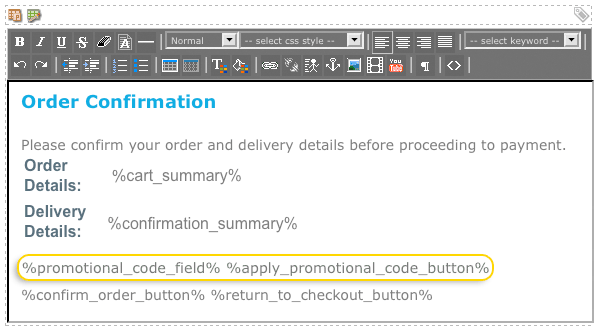
The Confirmation Bodycopy of the Checkout Page asset
In the example below, a user has selected to add one lettuce and three carrots to their cart. When the user clicks the Proceed to Checkout button, they will be taken to the Checkout Page asset, where they can review their order and input their delivery details before proceeding to the order 'Confirmation' page.
While confirming their details, users can input a promotional code to append to their order.
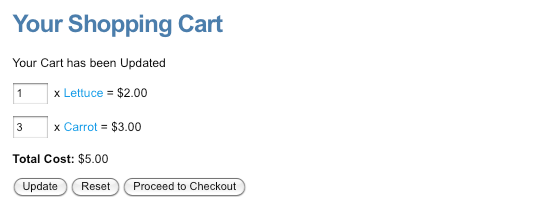
The Cart with items selected to purchase
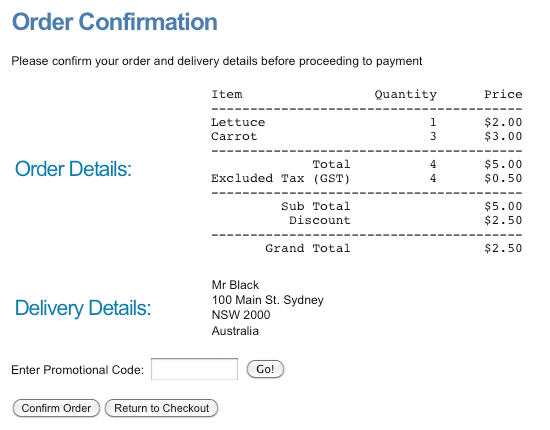
A Promotional Code applied on the Confirmation page
The %total_discount% and %grand_total_ex_discount% keyword replacements can be used on the Receipt Bodycopy of the Checkout Page to display the amount discounted on the e-commerce order and order grand total (the order total, minus the discount).
Using an Ecommerce Form Page
When creating an e-commerce system using an Ecommerce Form Page, Promotional Codes must be linked to the form using the variables specified in the Asset Purchase section of the Ecommerce Form Contents Details screen. In the following example, the Asset Promotional Code Request is set to promo_code and the Promotability Source is set to %asset_attribute_accept_promotional_code%, as shown in the figure below.

Variables set on the Details screen of a Product
Products can be sent as POST requests to the Ecommerce Form Page, with the promotional code entered either before or after the product is added to the form.
Tip: You will also need to configure the Asset ID and Asset Quantity Request Variables as well as the Price and Multiplicity Sources of the Ecommerce Form Page. For more information, refer to the Ecommerce Form Page and Product chapters in this manual.
Entering the Promotional Code Before Adding the Product to the Form
In this example, we have an Ecommerce Form Page with item selection fields and a Promotional Code input field. This allows users to enter a promotional code at the time of selecting the items they wish to purchase.
The code shown in the figure below is used on the Form Bodycopy of the Ecommerce Form Page.
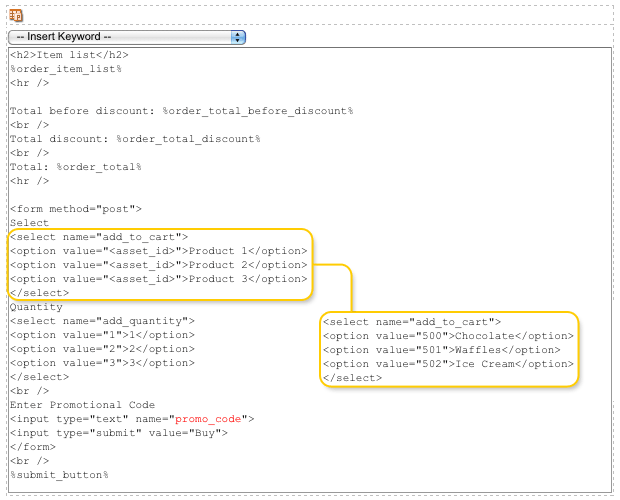
The WYSIWYG Editor on an Ecommerce Form Page
The asset IDs and names of the products have been added to the code, as highlighted in the image above. The Asset Promotional Code Request Variable has also been used in the code, highlighted in red.
In the example below, the user has selected to purchase two Waffles and has entered a 50% off promotional code. When this user clicks the Buy button, the page will be updated with the total cost of their order and the discount they are receiving.
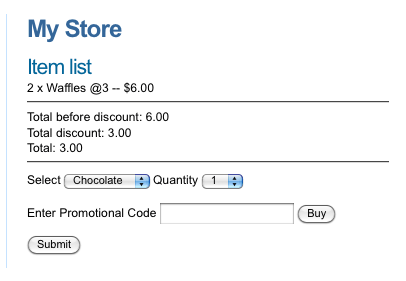
The Promotional Code input field on the Ecommerce Form Page
The user can then click the Submit button to proceed to checkout.
Entering the Promotional Code After Adding the Product to the Form
In this example, we have a products page with item selection fields, linking to an Ecommerce Form Page. This form page contains a Promotional Code input field, allowing users to enter a promotional code to append to their order.
The code shown in the figure below is used on the Page Contents Bodycopy of a Standard Page.
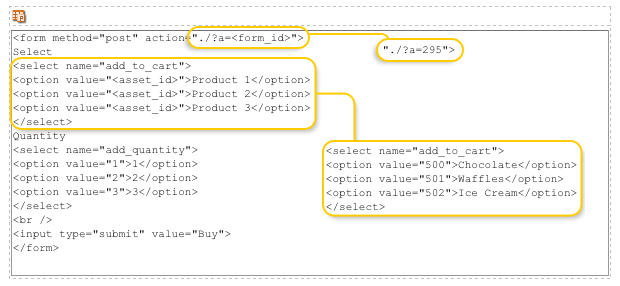
The WYSIWYG Editor on the Products Page
The asset ID of the Ecommerce Form Page and the asset IDs and names of the available products have been added to the code.
Before configuring the Ecommerce Form Page, we need to create a new Trigger to create session variables for use on the form. To do this, create a new Trigger with the following configuration:
- Event : Asset Accessed
- Condition: Asset ID. This is the ID of the Ecommerce Form Page.
- Condition: Request Method. Select the POST HTTP Request Method.
- Actions: Set Session Var Trigger Action. Set the session variable name to add_to_cart and create a new Value parameter with the POST Variable Name add_to_cart.
- Actions: Set Session Var Trigger Action. Set the session variable name to add_quantity and create a new Value parameter with the POST Variable Name add_quantity.
Once you have configured and enabled the Trigger, you can set up the Ecommerce Form Page. The code shown in the figure below is used on the Form Bodycopy of the form.
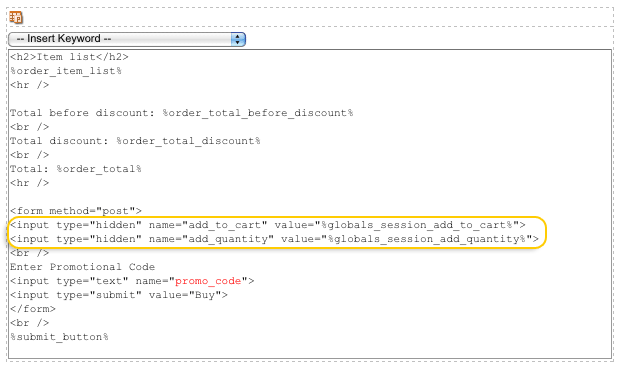
The WYSIWYG Editor on the Ecommerce Form Page
The add_to_cart and add_quantity session variables have been added to the code, as highlighted in the figure above. The Asset Promotional Code Request Variable has also been added, highlighted in red.
Tip: You can change the hidden session variable fields to text fields to check that the correct asset ID and quantity amounts are passed to the Ecommerce Form Page.
In the example below, the user has selected to purchase two Waffles on the products page. When this user clicks the Buy button, they will be taken to the Ecommerce Form Page, where they can input a promotional code.
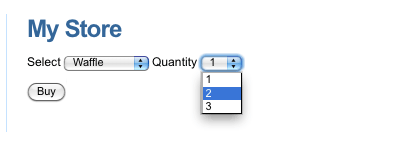
The Products page linking to an Ecommerce Form Page
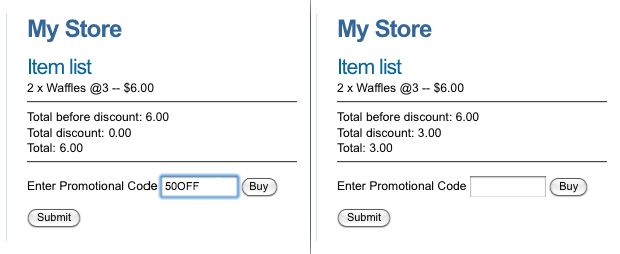
Entering a Promotional Code on the Ecommerce Form Page
