Workflow Steps and Conditions
Last Updated: 17 Dec 2015
A step within a Workflow Stream allows you define which users will approve the changes made to an asset. Each step is made up of a number of conditions with each condition being a user, User Group or Role. You can have as many steps as you like on a Workflow Stream.
Bookmarks to the headings on this page:
Adding a Step
To add a step to a Workflow Stream, go to the Details screen of the Workflow Schema. Click on the ![]() icon, next to the Workflow Stream you want to add a step to.
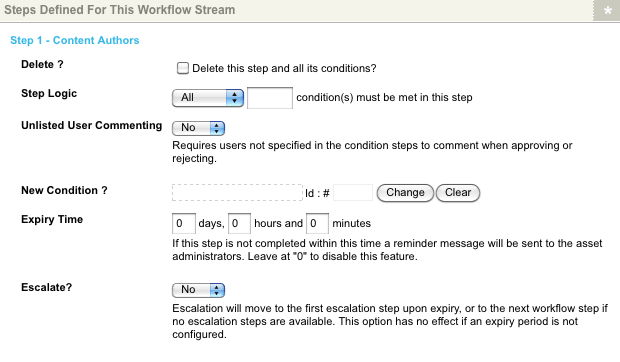
Enter the name of the new step into the Create a new step called field and click Commit. The new step will appear in the Steps Defined For This Workflow Stream section, as shown in the figure below.
icon, next to the Workflow Stream you want to add a step to.
Enter the name of the new step into the Create a new step called field and click Commit. The new step will appear in the Steps Defined For This Workflow Stream section, as shown in the figure below.

A Step on the Workflow Stream
Editing a Step
To edit a step on a Workflow Stream, go to the Details screen of the Workflow Schema. Click on the ![]() icon, next to the Workflow Stream you want to edit the step
for. The steps for the selected Workflow Stream will now be able to be edited in the Steps Defined For This Workflow Stream section.
icon, next to the Workflow Stream you want to edit the step
for. The steps for the selected Workflow Stream will now be able to be edited in the Steps Defined For This Workflow Stream section.
Workflow Conditions
A condition within a Workflow Stream allows you to define the user, User Group or Role that must make the approval in the step of the Workflow Stream. Each condition needs to be added to a step and you can add as many conditions as you like.
Adding a Condition
To add a condition to a step, go to the Details screen of the Workflow Schema. Click on the ![]() icon, next to the Workflow Stream you want to add the condition to. The steps for the selected Workflow Stream
will be displayed in the Steps Defined For This Workflow Stream section. In the New Condition field for the step, select the user, User Group or Role you want to use and click Commit. The condition will be added to the Conditions section for the step.
icon, next to the Workflow Stream you want to add the condition to. The steps for the selected Workflow Stream
will be displayed in the Steps Defined For This Workflow Stream section. In the New Condition field for the step, select the user, User Group or Role you want to use and click Commit. The condition will be added to the Conditions section for the step.
Editing a Condition
To edit a condition, go to the Details screen of the Workflow Schema. Click on the ![]() icon, next to the Workflow Stream you want to edit the condition for. The steps for the selected Workflow Stream
will be displayed in the Steps Defined For This Workflow Stream section, where you can edit the condition for each step.
icon, next to the Workflow Stream you want to edit the condition for. The steps for the selected Workflow Stream
will be displayed in the Steps Defined For This Workflow Stream section, where you can edit the condition for each step.
Deleting a Condition
To edit a condition, go to the Details screen of the Workflow Schema. Click on the ![]() icon, next to the Workflow Stream you want to delete the condition from. The steps for the
selected Workflow Stream will be displayed in the Steps Defined For This Workflow Stream section. Check the Delete field for the condition and click Commit. The condition will be removed from the step in the Workflow Stream.
icon, next to the Workflow Stream you want to delete the condition from. The steps for the
selected Workflow Stream will be displayed in the Steps Defined For This Workflow Stream section. Check the Delete field for the condition and click Commit. The condition will be removed from the step in the Workflow Stream.
Order of Steps and Conditions
If the order of conditions is important, then you should add each condition as a separate step. For example, if you want a user from the Content Authors User Group to approve your changes before a System Administrator, then this needs to be two steps within the Workflow Stream. If you do not mind which user approves the changes first, then you can add a step with two conditions.
