TRIM Saved Search
Last Updated: 17 Dec 2015
The TRIM Saved Search asset allows you to configure a set of TRIM search criteria in Squiz Matrix, storing and updating the results of the search on the system. These results are stored as Data Source Record Set shadow assets and can be used with other Squiz Matrix assets to provide additional TRIM functionalities. For more information on the functionalities of the TRIM Saved Search, refer to the examples in this manual.
Bookmarks to the headings on this page:
Tip: A TRIM Saved Search should be created within a Site with an assigned URL. TRIM Saved Search assets without a URL will not function correctly.
Once created, you can configure the settings of your TRIM Saved Search on its associated asset screens. These screens are often the same or similar to those for a Standard Page and are described in the Asset Screens manual. In this chapter, we will describe the Details screen, which is different for a TRIM Saved Search .
Details Screen
The Details screen for the TRIM Saved Search allows you to configure the asset. For more information about the Status, Future Status, Thumbnail and Details sections of this screen, refer to the Details chapter in the Asset Screens manual.
Connection Setup
This section allows you to configure the connection to the TRIM system, creating the TRIM bridge for the saved search.
The fields available in this section are as follows:
- WSDL: enter the URL to the WSDL of the TRIM system.
- Username: enter the username used to connect to the TRIM system.
- Password: enter the password used to connect to the TRIM system. This password must be
entered twice for validation purposes - Authentication Method: select the authentication method to use to connect to the TRIM system. The options available are:
- HTTP Basic: uses basic HTTP authentication.
- NTLM: uses NTLM authentication.
Use a Connector Asset
This section allows you to select a TRIM Connector with a configured connection to the TRIM system, creating the TRIM bridge for the saved search. The Use a Connector Asset section of the Details screen is shown in the figure below.

The Use a Connector Asset section of the Details screen
In the TRIM Connector Asset field, select a configured TRIM Connector to use as the TRIM bridge for the saved search.
Tip: If a TRIM Connector has been selected in the TRIM Connector Asset field, the Connection Setup section fields will have no effect and, therefore, do not need to be completed.
Synchronize Options
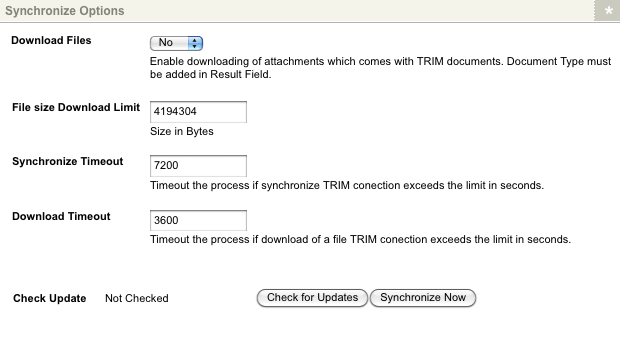
This section allows you to manage the results of the TRIM Saved Search. The Synchronize Options section of the Details screen is shown in the figure below.

The Synchronize Options section of the Details screen
The fields available in this section are as follows:
- Download Files: select whether or not to enable the downloading of attachments of record sets. Attachments are the electronic documents of a record, such as a text file. If this option is set to Yes, the attached documents of the listed TRIM records will be available to download. By default, this field will be set to No.
- File Size Download Limit: enter a size limit (in bytes) of attachments downloaded to Squiz Matrix on the TRIM Saved Search. By default, this option will be set to 4194304 bytes (4mb).
- Synchronize Timeout: specify a time limit (in seconds) for the sychonisation process of the TRIM connection. If this process exceeds this set limit, the TRIM Saved Search will display a warning. By default, this option will be set to 7200 seconds.
- Download Timeout: specify a time limit (in seconds) for the downloading of attachments on the TRIM connection. If the download process for an individual file exceeds this set limit, the TRIM Saved Search will display a warning. By default, this option will be set to 3600 seconds.
- Check Update: this field allows you to check the record set results of the saved search for any new updates and synchronize them accordingly. The Check for Updates button will check the results for updates, displaying the message <#> out-of-date Records when updates are available. If this message is displayed, clicking the Synchronize Now button will update the saved search results. Once this is done, the message Successfully Synchronized will be displayed. If there are no updates available the message No Update Is Required will be displayed when the Check for Updates button is clicked.
Retrieve Fields From Server
This section allows you to request standard and additional metadata fields from the connected TRIM server. These fields can then be used in search queries for the TRIM Saved Search. The Retrieve Fields From Server section of the Details screen is shown in the figure below.

The Retrieve Fields From Server section of the Details section
To retrieve these fields, click the Retrieve Now button; a message will be displayed totaling the number of standard and additional fields that have been retrieved, as shown in the figure below. If no fields can be retrieved or the TRIM Saved Search is not connected to a TRIM server, the message EMPTY will be displayed.

The Retrieved Fields section
Fields that have been retrieved will now be available for selection in the Search Fields and Result Fields sections of the Details screen.
Search Fields
This section allows you to configure search clauses on specific metadata fields of the records on the TRIM system. These queries are constructed in groups of search clauses that can be linked with different search logic to determine the parameters of the search. The Search Fields section of the Details screen is shown in the figure below.

The Search Fields section of the Details screen
To add a new group, select a search field in the -- Add search field -- list under the Add search field in a new group field. Once you have selected a field, click Commit. A new group will be created and additional fields will be available for configuring the query, as shown in the figure below.

A search group
Tip: You can add additional metadata fields for selection to the -- Add search field -- list using the Retrieve Now button. If no additional fields have been retrieved, this list will only display the default fields for the TRIM Saved Search. For more information, refer to the Retrieve Fields From Server section in this chapter.
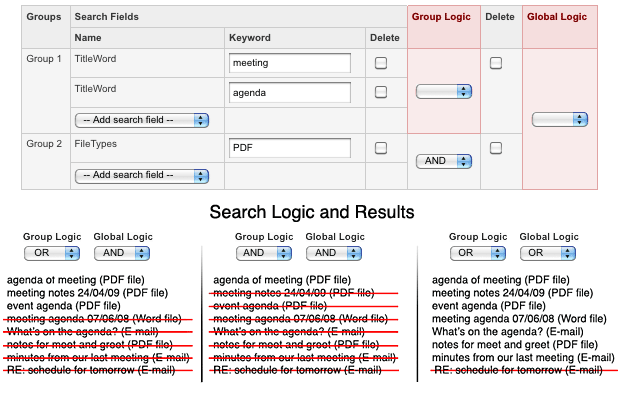
To add additional search fields to a group, select a field in the -- Add search field -- list located under that group in the Search Fields table. Once you have selected a field, click Commit. The new search field will be created in the group. An example of a set of search clauses is shown in the figure below.

A set of search clauses
These search clauses are configured using the settings in the Search Fields table. The fields available are as follows:
- Group: the group that is being configured.
- Name: the search field that is being configured.
- Keyword: enter a keyword to query the specified metadata field on records in the TRIM system.
For example, if you are configuring the TitleWord field, entering meeting as the Keyword will
search for records that contain meeting in their title. - Delete (under search field): to delete a search field, click the Delete box and click Commit.
- Group Logic: select the search logic to use for the search fields in a group. The options available
are:- AND: select this option if all search field queries in the group must be met on the results of
the TRIM Saved Search. - OR: select this option if at least one of the search field queries in the group must be met on
the results of the TRIM Saved Search.
- AND: select this option if all search field queries in the group must be met on the results of
- Deleted (under group): to delete a group, click the Delete box and click Commit.
- Global Logic: select the search logic to use for the groups. The options available are:
- AND: select this option if all group queries must be met on the results of the TRIM Saved Search.
- OR: select this option if at least one of the group queries must be met on the results of the TRIM Saved Search.

The Group and Global Search Logic
Result Fields
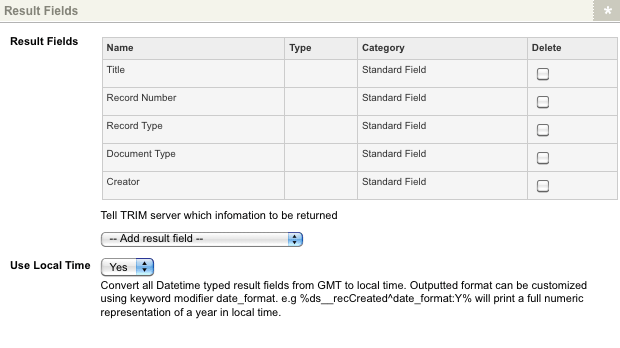
This section allows you to select the metadata field information that will be returned on record results of the TRIM Saved Search. The Connection Setup section of the Result Fields screen is shown in the figure below.

The Result Fields section of the Details screen
Please note that only metadata information returned on results can be used within Squiz Matrix. For example, if Record Number is not selected in this section, you will not be able to use the keyword replacement to call this information.
By default, the result fields listed in this section are:
- Title
- Record Number
- Record Type
- Document Type
- Creator
To add additional result fields to return in the search, select a field from the -- Add result field -- list and click Commit.
Tip: You can add additional metadata fields for selection to the -- Add result field -- list using the Retrieve Now button. If no additional fields have been retrieved, this list will only display the default fields for the TRIM Saved Search. For more information,refer to the Retrieve Fields From Server section in this chapter.
In the Use Local Time field, select whether or not to convert returned date values stored in UTC (GMT) format to the local time zone of the system.
Tip: You can customise the output of these date formats using the date_format keyword modifier (e.g. will print the full numeric representation of a year, in local time). For more information, refer to the Concepts manual.
Classification Options
This section specifies a Trim classification to restrict the saved search results to. For example, you could restrict search results to only contain records that have the Projects classification. The Classification Options section of the Details screen is shown in the figure below.

The Classification Options section
The fields available are as follows:
- Classification: enter the TRIM classification to restrict the saved search results by. You can also include sub-classifications with these classifications (e.g. RESEARCH - PROJECTS)
- Include Sub-classifications: select whether or not to restrict the specified Classification to return only top-level records or to also include the records of sub-classifications.
General Search Options
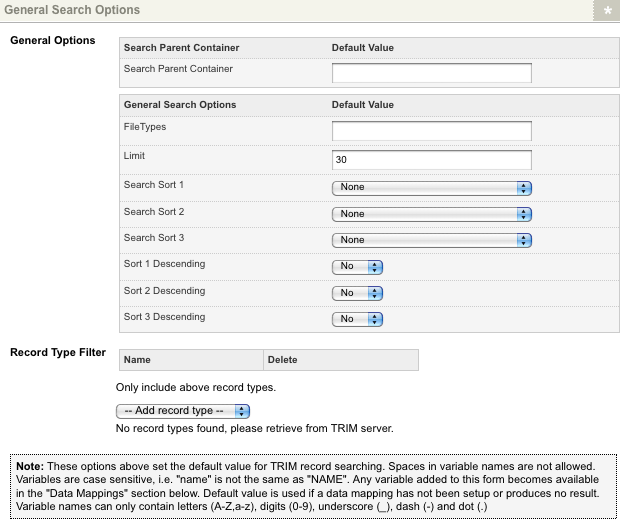
This section determines the general search options for the TRIM Saved Search. The General Search Options section of the Details screen is shown in the figure below.

The General Search Options section of the Details screen
In the General Options and Record Type Filter sections, define the search options using the following fields:
- Search Parent Container: enter the parent container to search in. For example, entering 09/1 into this field will only search the 09/1 container of the TRIM system.
- FileTypes: enter a file extension to limit the saved search results to that specific file type. For example, entering pdf into this field will only return TRIM records that are of the PDF file type.
- Limit: enter the maximum number of record set assets that will be listed as results of the saved search. For example, if 10 is entered into this field, only the first ten results will be listed. By default, 30 is entered into this field.
- Search Sort 1: select a field as the first preference for sorting the results of the saved search. For example, if DateCreated is selected, the record set assets will be listed by their creation date. By default, None is selected in this field, meaning the assets will not be sorted.
- Search Sort 2: select a value as the second preference for sorting the results of the saved search. This preference will be used for record set assets with the same value for the field selected in the Search Sort 1 field. For example if the Search Sort 1 field was set to DateCreated, results in the saved search with the same creation date will be listed by the Search Sort 2 field. By default, None is selected in this field, meaning these assets will not be sorted.
- Search Sort 3: select a value as the third preference for sorting the results of the saved search. This will be used for record set assets with the same values for the fields selected in both the Search Sort 1 and Search Sort 2 fields. By default, None is selected in this field, meaning these assets will not be sorted.
- Sort 1 Descending: select whether the results sorted by the field selected in the Search Sort 1 field will be sorted by descending order. By default, this field is set to no.
- Sort 2 Descending: select whether the results sorted by the field selected in the Search Sort 2 field will be sorted by descending order. By default, this field is set to no.
- Sort 3 Descending: select whether the results sorted by the field selected in the Search Sort 3 field will be sorted by descending order. By default, this field is set to no.
- Record Type Filter: select record types from the Add record type list, to restrict retrieved records to specific types. For example, a saved search can be configured to ony return Document types or configured to return both Document and Folder types only.
Record Set Asset Names
This section allows you to select how the record set results appear in the Asset Map. The Record Set Asset Names section of the Details screen is shown in the figure below.

The Record Set Asset Names section
In the Record Set Asset Names field, enter a string to use as the asset name for the record set results of the saved search. Keyword replacements can be used in this section. For example, if the keyword replacement is entered into this field, the record set assets will be named after their document type, such as TIF Image. If this field is left blank, the record sets will be named Data Source Record Set <assetID>. For a list of available keyword replacements, refer to the Available Keywords section below.
Available Keywords
This section lists the available keyword replacements for record set assets of a saved search determined by the attributes of the record sets in the TRIM system. These keyword replacements can be used either in the Record Set Asset Names field or when listing the saved search results on a TRIM record listing. For more information, refer to the Listing TRIM Saved Search Results on an Asset Listing Page example in this manual.
Please note that these keyword replacements will differ depending on the available attributes of the TRIM system and, as a result, they will only appear once a TRIM bridge has been established and Committed in either the Connection Setup or Use a Connector Asset sections. When a TRIM Saved Search is first created, the Available Keywords field will read No keywords available – this data source, as currently configured, does not have any record sets, as shown in the figure below.

Available Keywords section of the Details screen
Data Source Record Set
TRIM records that are found as results of the saved search are displayed as Data Source Record Set assets, under the TRIM Saved Search asset in the Asset Map. For more information about the Status, Future Status and Thumbnail sections of this screen, refer to the Details chapter in the Asset Screens manual.
User Details
The section displays the details of the record set as configured in the Record Operations Options. The Uri and Version fields are standard fields in this section as is the document_url field, if the record set has an attachment. To display additional fields, they must be selected in the Fields field of the Search Default Options. The User Details section with user-defined fields is shown in the figure below.

User Details section displaying the standard and user-defined information fields
Tip: TRIM documents specified as Data Source assets in Squiz Matrix are updated and downloaded automatically by the Update TRIM Cron Job, set to run on a nightly basis.
