Multi-Date Calendar Event
Last Updated: 17 Dec 2015
The Multi-Date Calendar Event allows you to add one asset that contains both single and recurring events. For example, to add a meeting that occurs every Monday and Wednesday between 8:30am and 9:00am to a calendar, you can create a Multi-Date Calendar Event and add 2 recurring instances to that event instead of having to create 2 Recurring Calendar Event assets. These events can then be displayed on a Calendar Page, Restricted-Period Calendar Page, Rolling Calendar Page and Upcoming Events List.
Bookmarks to the headings on this page:
Tip: The Status of a Multi-Date Calendar Event must be Live in order for it to appear on a calendar page.
Adding a Multi-Date Calendar Event
When you add a new Multi-Date Calendar Event, the Create new Multi-Date Calendar Event screen will appear. The Details section of this screen is show in the figure below.

The Create new Multi-Date Calendar Event
Enter the following details for the Multi-Date Calendar Event asset:
- Name: enter a name for the event. This will be displayed for all instances of the event on the calendar page.
- Date Summary: enter a summary of the dates for the event, for example Every Monday and Wednesday, 8:30am to 9:00am.
-
Instances: add each instance for the event. To do this, click More Dates – additional fields will appear as shown in the figure below.
In the Type field, select either Single Instance or Recurring Instance. If you select Single Instance, the fields available in the Details column will be the same as those available on the Single Calendar Event. If you select Recurring Instance, the fields available will be the same as those available on the Recurring Calendar Event. For more information on these fields refer to the Single Calendar Event and Recurring Calendar Event chapters in this manual. To add another instance, click More Dates. To delete an instance, click the Delete
The Instances fields icon.
icon.
Once you have entered the required information, click Commit. The Multi-Date Calendar Event will appear in the Asset Map on the left hand side of the screen. You can configure the settings of the Multi-Date Calendar Event on its associated asset screens. The majority of these screens are the same or similar to those for a Standard Page and are described in the Asset Screens manual. In this chapter, we will describe the Details screen, which is different for a Multi-Date Calendar Event.
Details Screen
The Details screen allows you to reconfigure the details of the Multi-Date Calendar Event. For more information about the Status, Future Status and Thumbnail section of the Details screen, refer to the Details Screen chapter in the Asset Screens manual.
Tip: The Status of a Multi-Date Event Cancellation must be Live in order for it to appear on a calendar page.
Details
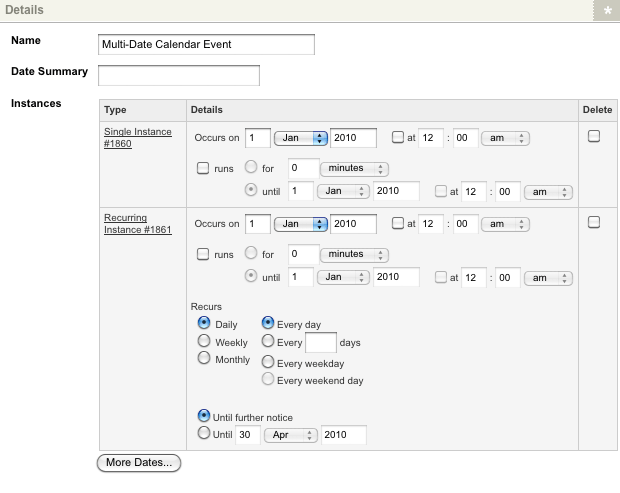
This section allows you to change the details of the event. By default, the information that was entered when the event was created will appear in this section. For more information on these fields, refer to the Adding a Multi-Date Calendar Event section above. The Details section of the Details screen is shown in the figure below.

The Details section of the Details screen
If you want to change the Name or Description for an instance, click on the hyperlink in the Type column. This will take you to the Details screen of the event where you can modify this information. For example, in the figure on the above, when you click on the Single Instance #1860 hyperlink, you will be taken to the Details screen for the Single Calendar Event.
