User Groups
Last Updated: 11 May 2019
User Groups allow you to organise user accounts into groups. Some examples of groups include the different departments the users work in, the section of the Site they are responsible for, the level of permission they have in the Site etc. Each User Group should be stored under the Users Folder in the Asset Map. It is recommended that when you create user accounts you create them within User Groups.
Advantages of Using User Groups
There are many different reasons why you would use User Groups. Some of the main advantages include the following:
- You can apply permissions to a User Group instead of an individual user. Any user account that is stored under that User Group will automatically receive the permissions that have been given to that group. For example, if you have a User Group called Content Authors and you have given them Write Permission to your Site, any user account created under the Content Authors User Group will automatically receive this Write Permission.
- You can use User Groups in a Workflow Schema to allow several people to approve the asset. This means that if a user is on holidays or is sick, another person from the User Group can make the Workflow approval.
- If a user joins your organisation, instead of changing the permissions in your system, create a user account for them in the appropriate User Groups. They will receive the permissions that have been granted to this User Group and be part of the any approval processes that this User Group is part of.
- If a user leaves you organisation, instead of changing the permissions in the system, remove their user account from the User Group and they will no longer have permissions.
- You can restrict which screens on a particular asset type the users in the User Group can view. For example, for your Content Authors you can deny them access to the Permissions screen on a Standard Page asset. The Permissions screen will not be removed from the menu but when they try to view it, they will see a log in box in the Editing screen.
- You can customise certain preferences for the users in the User Groups. Some of these preferences include which WYSIWYG Plugins they can see, the maximum file size they can upload and where the Commit button is positioned on the screen.
Linking User Accounts into Groups
Sometimes you may have a user that needs a number of different permissions and hence needs to be a part of a number of User Groups. To do this, you can link a user account into a number of different User Groups.
For example, the user John Smith can be linked into the Content Authors User Group and the Content Approvers User Group. This means that John Smith will receive the permissions that have been granted to both User Groups. If both of these User Groups have been used in Workflow, he will also be able to make approvals.
After you have linked or moved a user from one group to another, that user will first need to log out and back in before their permission changes will take effect.
For more information on how to link an asset refer to the Concepts manual.
Adding a User Group
Once your User Group is created, you can configure its settings on its associated asset screens. These screens are often the same or similar to those for a Standard Page and are described in the Asset Screens manual. In this chapter, we will describe the Details, Security Restrictions and Preferences screens, which are different for a User Group.
By default, any new User Group that you create within the system will have Denied Public Read Permission applied to it as a security precaution.
Details Screen
Details
By default, the name that was entered into the Group Name field when the User Group was created will appear in this section. You can change the name of the User Group by clicking into the Group Name field and entering the new name for the User Group. The Details section is shown in the figure below.

The Details section of the Details screen
Security Restrictions Screen
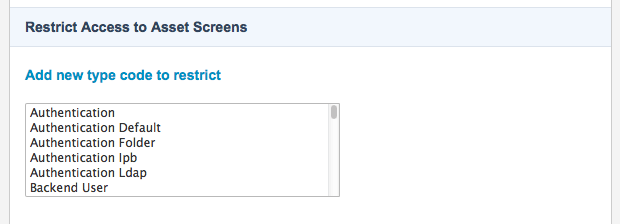
The Security Restrictions screen for a User Group allows you to specify which screens for a particular asset type can or cannot be viewed by the users in the User Group. For example, for your Content Authors you can deny them access to the Permissions screen on a Standard Page asset. The Permissions screen will not be removed from the menu but when they try to view it, they will see a log in box in the Editing screen. By default, access is granted to all screens on all asset types. The Restrict Access to Asset Screens section of the Security Restrictions screen is shown in the figure below.

The Security Restrictions screen
To add a restriction, select an asset type code from the list. You can select multiple asset types by holding down the Ctrl key on the keyboard and clicking on each asset type in the list. Once you have selected an asset type, click Commit. Additional fields will appear on the Security Restrictions screen, as shown in the figure below.

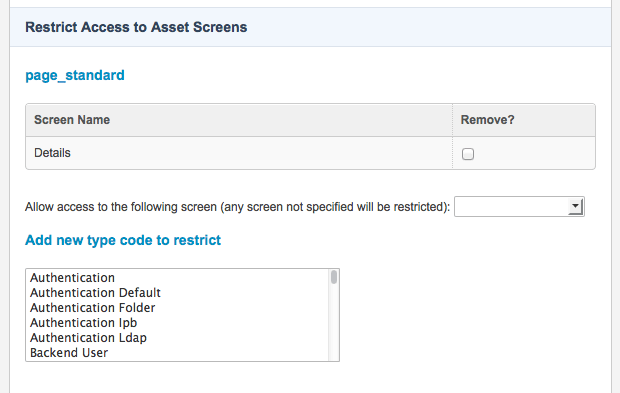
The page_standard restriction options
Each blue heading on the screen represents an asset type that has been restricted for the User Group. For example, in the figure above the page_standard type code appears in a blue heading. This means that the Standard Page asset has been restricted for this User Group. Each screen that the users have access to will be listed in the grey box under the blue heading. Any screen not listed will be restricted. For example, in the figure above, the Details screen has not been restricted but all other screens for a Standard Page asset have been restricted. To add additional screens to the list, select the screen from the Allow access to the following screen list and click Commit. The screen will appear in the grey box for that asset type. To remove the restrictions for a screen or an asset type, select Remove and click Commit.
Preferences Screen
The Preferences screen allows you to customise various options for the users in the User Group. For example, you can select which WYSIWYG Plugins the user can use in the WYSIWYG Editor toolbar. By default, the preferences for all users are set on the Global Preferences screen. You can then override these preferences on this screen for each User Group. For example, you may want to remove the Select Colour plugin from the WYSIWYG Editor toolbar for all users but allow your Content ApproversUser Group to have access to it. You can remove it on the Global Preferences screen but then add it back on the Preferences screen for that User Group.
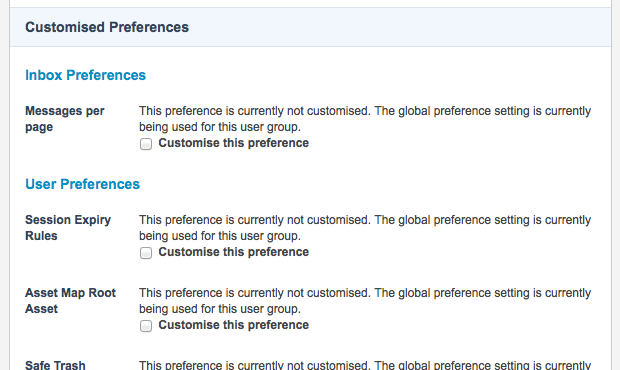
The initial fields in the Customised Preferences section of the Preferences screen are shown in the figure below.

Customised Preferences on the Preferences screen
To change a preference click Customise this preference and click Commit. Additional fields will appear on the screen for that preference. To revert back to the default setting, select Revert to global preference and click Commit. A list of all available preferences and their fields are outlined in the sections below.
The preferences available on this screen are the same as those available on the Global Preferences screen. For more information on these fields, refer to the Global Preferences chapter in the System Configuration manual.
