Creating a Bulkmail System
Last Updated: 24 Jan 2019
bulkmail|feature|5.5.2.0
The following example will create a bulkmail system that will send newsletters to subscribed users. These users can be either logged-in or public users and must verify their account details before being linked under the relevant User Group. Bulkmail emails will only be sent outside of business hours and each newsletter type will contain a unique subject and from address.
Bookmarks to the headings on this page:
Tip: Remember that you must Commit any asset changes that you make.
Setting Up the Bulkmail Manager
- Right click on the Bulkmail Manager in the Asset Map and select the Default Post Office Settings screen.
- In the Server Details section, input the details of your bulkmail server. These server settings will be used for each of the Bulkmail Jobs in this example. If different bulkmail servers were required, a Bulkmail Post Office would need to be configured for each server.
- In the Threshold Settings section, add an Excluded Time rule using the Add Rule field.
- Click Commit. Additional fields will appear on the screen. In these fields, configure the rule to not process jobs between 9:00 and 17:00 each weekday, as shown in the figure below. This will mean that Bulkmail Jobs will not be run during business hours.
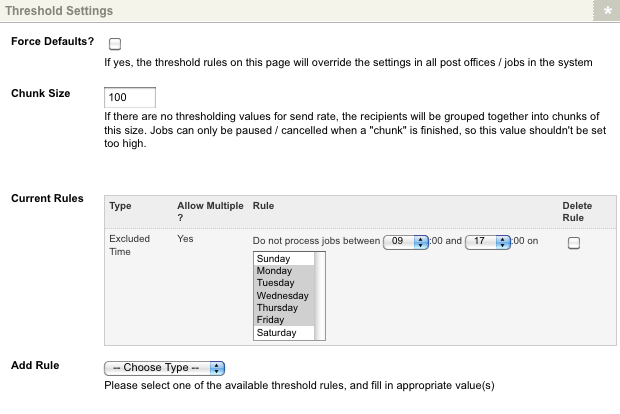
The Threshold Settings on the Bulkmail Manager
Setting Up the Content
- Create four Standard Page assets for each newsletter. These assets are used to set up the content of each Bulkmail Job (for more information about setting up the content of the email, refer to the Preparing the Bulkmail Content chapter in this manual.).
- Right click on one of the Standard Page in the asset map and select the Edit Contents screen.
- The content shown in the figure below is entered into the WYSIWYG Editor.
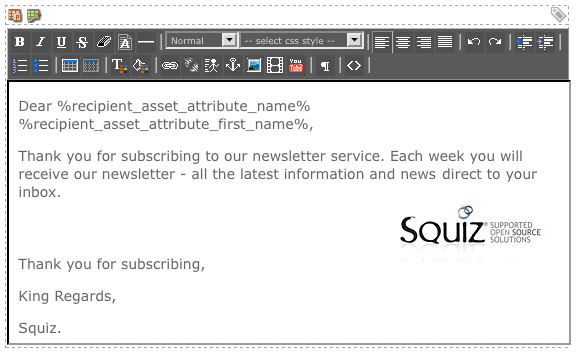
Example content for a Bulkmail Job - Repeat the above steps to add content to each of the Standard Page newsletters.
Setting up the Bulkmail Jobs and User Groups
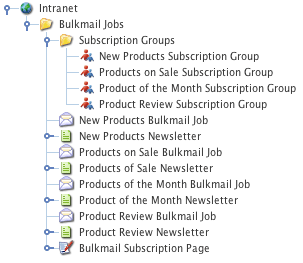
The assets for Bulkmail
- Create a Bulkmail Job for each Standard Page newsletter, as shown in the figure to the right (E.g. The New Products Bulkmail Job and the New Products Newsletter).
- Create a User Group for each Bulkmail Job, as shown in the figure in the right. (E.g. The New Products Subscription Group and the New Products Bulkmail Job).
- On the Details screen of each Bulkmail Job:
i) In the Recipients field, select the Bulkmail Job's corresponding User Group.
ii) In the Asset to Send field, select the Bulkmail Job's corresponding Standard Page asset.
iii) In the Subject Field, enter the subject for the email. For example, for the New Product Bulkmail Job, you could enter the subject Newsletter - New Products.
Once each of the Bulkmail Jobs has been configured, they must be validated. - On the Details screen of each Bulkmail Job, click the Validate Job button.
If your Bulkmail Jobs contain any errors, they will be displayed, as shown in the figure below. Review any errors that may be listed in the Result field and fix accordingly.
Once the Bulkmail Job is error free, the Job is valid message will be displayed, when the Validate Job button is clicked, as shown in the figure below. This message means that the Bulkmail Job is read to send.
Validate Job errors in the Validate Job section
The valid Bulkmail Job
Bulkmail Subscribe Page
- Create a Bulkmail Subscribe Page.
- On the Details screen, in the Root Node field, select the Folder that contains the subscription User Groups.
- In the Asset Statuses field, select Live. This means that only published user groups will be displayed on the subscribe page.
Tip: A User Group needs to be Live and have public Write permission applied to be able to be able to be selected in the subscription list.
- In the Logged In Users field, select Always verify. This means that when a logged-in user subscribes to bulkmail, they will receive an email to verify that their account details are correct.
- In the Public Users field, select Always verify. This means that when a public user subscribes to a Bulkmail Job, they will receive an email to verify that their account details are correct.
Configuring the Layout of the Subscription Page
The default layout of the Bulkmail Subscribe Page for a public user is shown in the figure below.
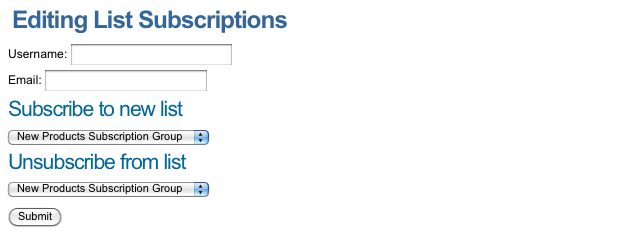
The default Subscription Page for a Public User
This layout allows public users to create a Bulkmail User account for themselves and pick which emails they would like to receive.
You can change the layout of the Bulkmail Subscribe Page for a public user in the asset's Not Logged In Layout Bodycopy. The default layout of this bodycopy is shown in the figure below.
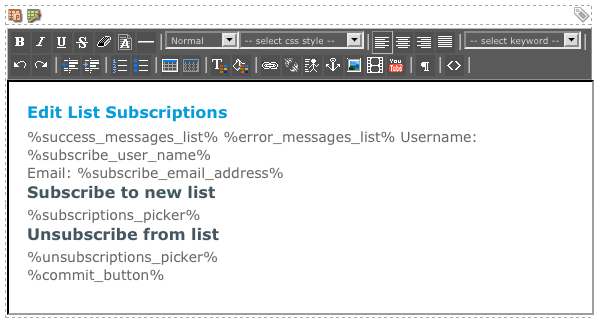
The WYSIWYG Editor on the Not Logged In Layout Bodycopy
Tip: To view the Bulkmail Subscribe Page as a public user, you need to change its Status to Live and grant Public Read Permission. Also, make sure that the User Groups are Live and have Public Write Permission granted. If you do not do it this way, they will not appear in the subscription list for a Public User.
The default layout of the Bulkmail Subscribe Page for a logged-in user is shown in the figure below.
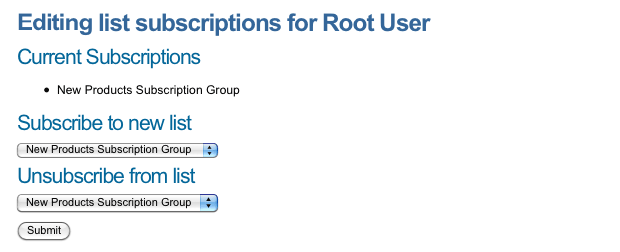
The default Subscription Page for a logged in User
The layout allows a logged-in user to change their account details, view their current email subscriptions, select additional email lists to subscribe to and unsubscribe from an email list.
You can change the layout of the Bulkmail Subscribe Page for a public user in the asset's Not Logged In Layout Bodycopy. The default layout of this bodycopy is shown in the figure below.
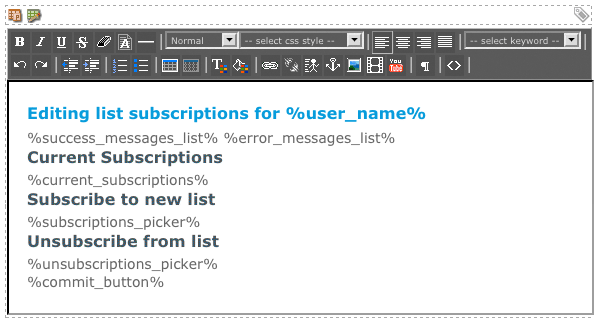
The WYSIWYG Editor on the Logged In Layout Bodycopy
Setting Up the Subscription List
By default, the subscription list on the Bulkmail Subscribe Page is displayed as a dropdown list containing the User Group assets found under the selected Root Node, as shown in the figure below.

The Subscription List listing the Subscription Groups
This format allows users to select one User Group from the subscription list. In this example, we want to allow users to select multiple groups from the subscription list. To do this:
- Right click on the Bulkmail Subscribe Page in the Asset Map and select the Details screen.
- In the Allow Multiple Selections field, select Yes. This will mean that the subscription list will now be formatted as a multi-selection list, as shown in the figure to the right.
The user can now select multiple groups to subscribe to by holding down the Shift/Ctrl key and click on each User Group.

The multi-select list
Another way of allowing multiple selections is by changing the listing style of the subscribe list. To do this:

The Check box list
- Right click on the Bulkmail Subscribe Page in the Asset Map and select the Details screen.
- In the Listing Style field, select the Radio Buttons listing style. This will mean that a checkbox list will be displayed, as shown in the figure to the right.
The user can now select multiple selections using the checkboxes for each User Group.

The All option
A user may want to subscribe to all emails. Instead of making them select each email individually, we can provide them with an All option, as shown in the figure to the right.
Selecting this option will automatically subscribe users to all available bulkmail emails. To do this:
- Right click on the Bulkmail Subscribe Page in the Asset Map and select the Details screen.
- In the Show Root Node field, select Yes.
The All option will now be available on the subscribe page.
How Does the Bulkmail Subscription Page Work for a Public User?
Once the Bulkmail Subscription Page has been set up, it is made available on the site so users can subscribe to the emails. The subscription process that the user will go through is as follows:
- The user will enter their name, email address and select which User Groups they want to subscribe to. In this example the user has selected to subscribe to the New Product Subscription Group and the Products on Sale Subscription Group. Once they have completed the form they click on the Submit button. A message will appear at the top of the page informing the user that they will receive a verification email, as shown in the figure below.
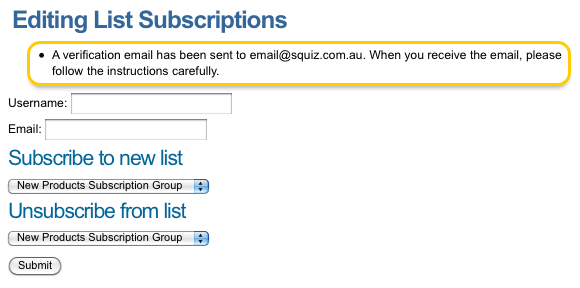
The verification email notification message on the Subscribe Page - A verification email is sent to the email address the user entered on the subscription form. An example of the email that is sent is shown in the figure below.

An example verification email
A Bulkmail User asset is also added to the Unverified Users folder under the Bulkmail Subscription Page as shown in the figure to the right.
An unverified user - When the user clicks on the URL within the email they are taken to the Bulkmail Subscription Page which will verify their account details and inform the user that they are now subscribed to the emails, as shown in the figure below.
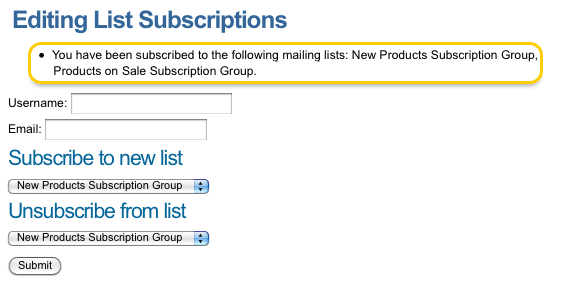
The subscription confirmed message
The Bulkmail User asset is also moved from the Unverified Users folder and is linked under the appropriate user groups. For example, the email@squiz.com.au Bulkmail User asset has been linked under the New Product Subscription Group and Products on Sale Subscription Group, as shown in the figure to the right.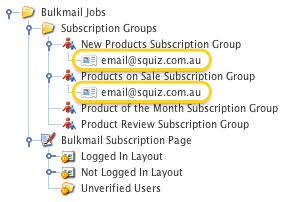
Verified user accounts - When the New Products Bulkmail Job or the Products on Sale Bulkmail Job email is sent, email@squiz.com.au will receive these two emails.
Running a Bulkmail Job
To run a Bulkmail Job change the Status of the asset from Under Construction to Live. Depending on the threshold settings the post office it is using, the job will start the next time the Scheduled Jobs Manager runs. For example, to run the New Products Bulkmail Job set its Status to Live. This will queue the job and when it is outside of business hours it will run the bulkmail job.
If you wish to re-run a Bulkmail Job, set the Status back to Under Construction and then to Live again. This needs to be done each time you want the job to be run.
Tip: If you want to set up the Bulkmail Job to run at a certain time, set up a Future Status job to change the status from Live to Under Construction. Then set up a Trigger in the Trigger Manager to change the Status from Under Construction to Live. This will mean, however, that to run the job for the first time you must change the Status manually on the Details screen.
