Selective Emails Screen
Last Updated: 20 Jun 2017
The Selective Emails screen allows you to set up rules so that emails can be sent to additional people depending on the values the user submitted on the form. For example, if the user selects NSW in the State field, send the email to the HR Manager in NSW, otherwise if they select VIC, send the email to the HR Manager in Victoria. Each rule can have a number of different rule parts allowing you to send an email based on what the user answers to several different questions. You can also add as many rules as you want to the form.
Adding a New Rule
By default, no rules are added to the form, as shown in the figure above. To add a new rule select New Rule in the Create a New Rule section and click Commit. The rule will be added to the Current Selective Email Rules section.
In the Add New Rule Part section, select the question that the rule should be applied to and click Commit. A list will appear in the Add Rule Part field.
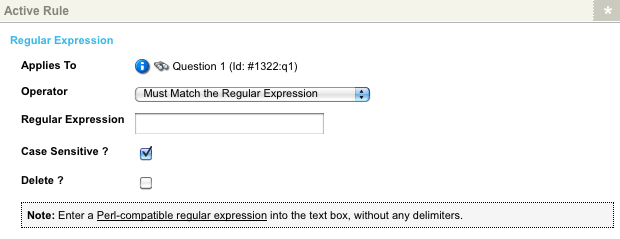
The list of available rule parts that are available will depend on what type of question you have selected in the Apply Rule To field. For example, if you select a text question type, the list will be different to a select question type. Select the rule part that you want to add from the list provided and click Commit. Additional fields will appear in the Active Rule section, as shown in the figure below. To add additional rule parts to the rule, select it from the Add Rule Part list and click Commit.

The Active Rule section displaying the options for the rule part
Set up the rule by using the fields provided in the Active Rule section. The fields that appear in this section will depend on what rule part you selected to add.
Set up the details of the email in the Email Options for Active Rule section. The fields that are available in this section are as follows:
- When: select the logic to be applied to the rule parts. Select ALL to specify that the email be sent if all of the rule parts are matched, or ANY to specify that the email be sent if at least one of the rule parts is matched.
- Send a: select the type of email to be sent if the rule is matched. You can choose from Recipient Email, Receipt Email or Send To a Friend Email. These emails are set up on the Email Options screen of the Form Contents asset.
- To: enter the email address of the person who should receive the email. You can enter multiple addresses by putting a space, comma or semi-colon between each address.
Once you have done this, click Commit. The rule will be marked as valid in the Current Selective Email Rules section, as shown in the figure below.

The valid rule in the Current Selective Email Rules section
For a rule to be valid it must contain at least one rule part and have at least one email address specified in the Email Options for Active Rule section. If it is not marked as valid, it will not work.
Editing a Rule
To edit a rule, click on the ![]() icon in the Current Selective Email Rules section. The rule will turn blue and the details of the rule will appear on the screen.
icon in the Current Selective Email Rules section. The rule will turn blue and the details of the rule will appear on the screen.
Deleting a Rule
To delete a rule, click on the Delete field for the rule in the Current Selective Email Rules section and click Commit.
