SAML Account Manager
Last Updated: 26 May 2023
Overview
The SAML Account Manager allows you to integrate SAML 2.0 federated access via a nominated Identity Provider.
When a user visits the SAML Account Manager asset, the system will redirect the user to the SAML authentication system. After successfully authenticating their account, the user will be redirected back to Matrix and logged into the system using their linked local user account, if one has already been created.
If no account has been linked to the current user, Matrix will either identify an associated account within Matrix to link to (i.e. one the user is also logged in with) or create a new local user account within the system to link.
After the SAML user has been successfully authenticated and linked, their user profile data will be retrieved via the service provider's profile API. This data is stored within the session and is available using the following keyword replacements:
- %globals_session_saml_attributes%: the entire attributes data as a JSON array.
- %globals_session_saml_attributes_x%: specified value from the attributes JSON array.
For example, if the JSON data is as follows:
{ "first_name":"John", "last_name":"Doe", "email":"jd@example.com"}We can use the following keyword to extract the first_name value of John by using: %globals_session_saml_attributes_first_name%
If a JSON key has non-alphanumeric characters in it (applies to all characters except for "_", "-", and "."), they will need to get replaced with underscores when using the SAML keyword to print the value. For example, if the JSON attribute has the following format:
{ "http://www.site.com/name":"John"}The keyword to extract that value would be: %globals_session_saml_attributes_http___www.site.com_name%
No caching settings should be used on a SAML Account Manager asset, including Squiz Matrix caching, HTTP cacheable headers, or any external proxy caching.
Additional Dependant Assets

The additional dependant assets
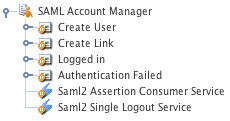
When you create a SAML Account Manager within your system, several assets are automatically created beneath it, as highlighted in the figure to the right. You can use these assets to define the contents and layout of SAML Account Manager.
- Create User: this Bodycopy is used to define the layout to display to a SAML user when no associated user account is found within Squiz Matrix. This will allow the user to create and link to a new user account within the system.
- Create Link: this Bodycopy is used to define the layout to display to a SAML user when an associated user account is found within Squiz Matrix. This will allow the user to link these user accounts, enabling federated access to the system.
- Logged In: this Bodycopy is used to define the layout to display to a logged-in SAML user with a linked Squiz Matrix account.
- Authentication Failed: this Bodycopy is used to define the layout to display to a user when authentication fails on the SAML Account Manager.
Details Screen
The Details screen allows you to configure the settings of the SAML Account Manager. The settings available on this screen are similar to those of the Account Manager asset.
This page will only cover the fields that specifically relate to the functionality of the SAML Account Manager.
General Settings
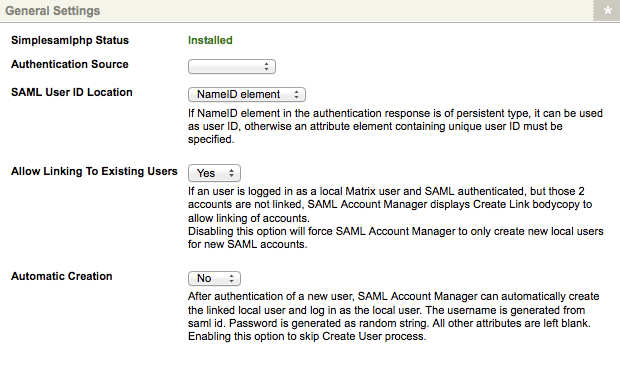
The General Settings section of the Details screen displays the status of SAML on your system and allows you to configure its general settings. The General Settings section is shown in the figure below.

The General Settings section of the Details screen
The fields available in this section are as follows:
- SimpleSAMLphp Status: displays the status of SAML on your system. If SimpleSAMLphp has been correctly integrated and installed on the Squiz Matrix system, this field will read Installed. If SAML is not found configured on your system, this field will read Not Installed. For more information on installing SAML on your system, refer to the Federate Access Management chapter in this manual.
This setting is not visible in Matrix 5.5.0.0 and above as SimpleSAMLphp is automatically installed.
- Authentication Source: select the authentication source type of the SAML Identity Provider. The options available here will depend upon the SimpleSAMLphp configuration on your system.
- SAML User ID Location: the location to source a unique user ID on the SAML authentication response. This setting can either be set as the NameID element of the SAML user or from a nominated Attribute Element. Selecting the Attribute Element setting in this field will display the Attribute Element Name field, where the attribute can be specified.
- Allow Linking to Existing Users: this option allows you to link a existing Squiz Matrix user accounts with their authenticated SAML identities. This means that if a user is logged into the system and their account is SAML authenticated, the SAML Account Manager will prompt the user to link their accounts, if they haven't already been. This allows for federated access to the system, automatically signing the user into their account as part of the SAML authentication process. By default, this option is enabled.
- Automatic Creation: this option allows for the automatic creation of linked local users when a user is not logged into Squiz Matrix. By default, this option is a manual process, with users being allowed to create a new user account during SAML authentication. Enabling this field will automate this creation, skipping this procedure.
- Disallow Password Login: this option allows you to randomise Squiz Matrix users' passwords when they are linked to a SAML account. This will prevent them from logging into the system using the standard username and password; they will only be able to log in via the SAML bridge.
Authentication Request
The Authentication Request section of the Details screen allows you to configure the request sent to the SAML Identity Provider from Squiz Matrix. The Authentication Request section is shown in the figure below.

The Authentication Request section of the Details screen
The fields available in this section are as follows:
- NameID Policy: the format of the NameID attribute on the SAML authentication request. This option can be either Persistent, Transient, or left empty.
- Protocol Binding: the format of the ProtocolBinding attribute on the SAML authentication request. This option can be either HTTP POST, HTTP Redirect, HTTP Artifact, SOAP, or left empty.
- AuthnContextClassRef: the value of the AuthnContextClassRef attribute on the SAML authentication request.
- Use Extensions: enables query extensions on the SAML authentication request. If this field is enabled, an additional Extensions field will be displayed, allowing you to configure extensions on the SAML authentication request.
Consult your Identity Provider's integration guide for more information on the settings in this section.
SAML 2.0 Service URLs
The SAML 2.0 Service URLs section of the Details screen displays the Service URLs of the SimpleSAMLphp configuration on your system. These URLs are displayed for use when configuring the settings of your SAML Identity Provider. The SAML 2.0 Service URLs section is shown in the figure below.

The SAML 2.0 Service URLs section of the Details screen
The fields available in this section are as follows:
- Assertion Consumer Service URL: the URL of the SAML Assertion Consumer Service on your system.
- Single Logout Service URL: the URL of the SAML Single Logout Service on your system.
- Service Provider Metadata Download URL: the download URL of the Service Provider metadata file, for use on the SAML Identity Provider.
Consult your Identity Provider's integration guide for more information on use of the SAML 2.0 Service URLs.
Parse Metadata XML
The Parse Metadata XML section of the Details screen allows you to convert your Identity Provider's SAML 2.0 metadata XML for use on your SimpleSAMLphp metadata configuration. The Parse Metadata XML section is shown in the figure below.

The Parse Metadata XML section of the Details screen
In the XML Metadata field enter the SAML 2.0 metadata XML of your Identity Provider and click Commit. This XML will be converted for SimpleSAMLphp for use within the saml20-idp-remote.php file on your SimpleSAMLphp installation within Squiz Matrix.
Asset Creation Settings
The Asset Creation Settings section of the Details screen allows you to configure the User asset types that will be created during the SAML authentication process when no linked Squiz Matrix user is found.
- Matrix User to Create: select the User account types to create for new Squiz Matrix users during the SAML authentication process. The account types available are:
- User
- Backend User
- Simple Edit User
- System Administrator
For more information on the User types available, refer to the Users and Permissions manual.
- Metadata Schemas to Apply: this field allows you to select a Metadata Schema that will automatically be applied to the created User assets. Users can input the metadata of the nominated schema when creating their account.
Populate User Attributes
The Populate User Attributes section of the Details screen allows you to define the user attributes of your SAML authorised users, using the profile data returned from the identity provider.
The follow user attributes can be set:
- First Name
- Last Name
- Login Date
- Login IP
- Disallow Password Login
- Restrictions
- History passwords
- Username
- Password
- Locale
To set an attribute, select it in the Add Attribute field and click Commit; the Attributes to Populate on Creation field will be displayed in the Populate User Attributes section. In the Value field of the attribute that is being set, enter the source string to retrieve the specified attribute data from.
To delete an attribute that has been set, click the corresponding Delete check-box and click Commit. The attribute will be removed from the Populate User Attributes section.
Sync User Attributes
The Sync User Attributes section of the Details screen allows you to configure a set of user attributes of your SAML authorised users, populated from the profile data returned from the identity provider, that will sync each time a user logs into the system.
The follow user attributes can be set:
- First Name
- Last Name
- Login Date
- Login IP
- Disallow Password Login
- Restrictions
- History passwords
- Username
- Password
- Locale
To set an attribute, select it in the Add Attribute field and click Commit; the Attributes to Sync on Login field will be displayed in the Sync User Attributes section. In the Value field of the attribute that is being set, enter the source string to retrieve the specified attribute data from.
To delete an attribute that has been set, click the corresponding Delete check-box and click Commit. The attribute will be removed from the Sync User Attributes section.
Return Location
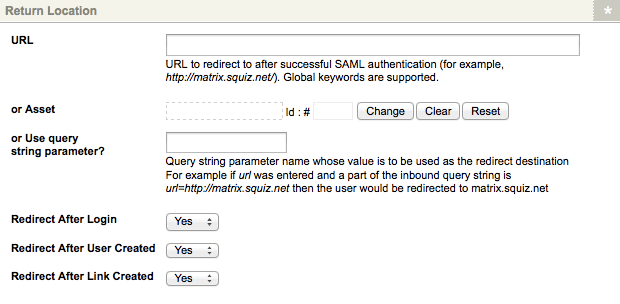
The Return Location section of the Details screen allows you to set the location for users to redirect to after the SAML authentication process. The Return Location section is shown in the figure below.

The Return Location section of the Details screen
The fields available in this section are as follows:
- URL: The URL of the web page to return users to, for example, http://www.example.com. This option is useful when wanting to return users to a page outside of your Squiz Matrix system. Please note that this URL requires the web protocol to be included (e.g. http://).
OR - Asset: An asset within the system to return users to.
OR Query String Parameter: The name of a query string parameter whose value will specify the URL to return users to, for example, if this value is URL and the inbound query string includes ?URL=http://example.com, users will be returned to http://example.com.
Letting the return location URL be dynamic using a query string can result in attackers using this to redirect users to malicious sites. Use custom redirect implementation on the "Logged In Bodycopy" instead to control what domains can be used for the dynamic redirect URL.
- Redirect After Login: If enabled, the user will get redirected to the specified location as soon as they log in.
- Redirect After User Created: If enabled, the user will get redirected to the specified location as soon as their linked Matrix user account has been created. Note that this setting will not work when Redirect After Login is enabled.
- Redirect After Link Created: If enabled, the user will get redirected as soon as their existing Matrix user account is linked with their external logged in account.
- Redirect Delay: The number of seconds to delay the redirect. By default, this field is set to 0 (zero), meaning that the redirect will not be delayed. When a value is set in this field, JavaScript code will be used to execute the delayed redirect.
Advanced Settings
- Secure Only Cookie: Specify whether or not to enable the
cookie_secureflag for theSQ_SAML_PRESERVED_SESSION_DATAcookie sent by the SAML Account Manager. Enabling this will cause browsers to not share the session cookie between HTTP and HTTPS. - HTTP Only Cookie: Specify whether or not to enable the
cookie_http_onlyflag for theSQ_SAML_PRESERVED_SESSION_DATAcookie sent by the SAML Account Manager. A HTTP Only cookie will only be used when transmitting HTTP or HTTPS requests. Additionally, a web browser will not allow client-side scripts (such as JavaScript) to access to the cookie. This can help mitigate the effects of cross-site scripting attacks.
Logging a user out
To logout of a SAML session, the standard method of logging out of Matrix:
http://example.com/page?SQ_ACTION=logoutwill often result in a redirection back to the SAML IdP if the Login Design Template is set to redirect the user to SAML Account Manager. However, as the SAML IdP session is still valid, the user will logged in again automatically by SAML IdP. This generally results in the user being logged back into Matrix. To ensure the user properly ends the SAML session, the user must be directed to:
http://example.com/path/to/saml-account-manager?logoutThis will log the user out of Matrix, and initiate a logout message back to the IDP.
Trigger Method
This slightly more reliable method will ensure users who logout of Admin using the Logout button will also end their SAML session with the IDP.
- Create a trigger called 'SAML Logout'.
- Set the event to 'After User Logs Out'.
- Set an action of 'Redirect to URL', with the URL set to:
http://example.com/path/to/saml-account-manager?logout