OAuth Account Manager
Last Updated: 01 Nov 2019
Overview
The OAuth Account Manager allows you to integrate OAuth2 authentication within Squiz Matrix. This will allow users to login as a local system user using, for example, their Facebook or Google account.
When a user visits the OAuth Account Manager asset, the system will redirect the user for OAuth 2.0 authentication. After successfully authenticating their account, the user will be logged into the system using their linked local user account, if one has already been created.
If no account has been linked for the current user, Squiz Matrix will either identify an associated account within Matrix to link to (i.e. one the user is also logged in with) or create a new local user account within the system to link.
After the OAuth user has been successfully authenticated and linked, their user profile data will be retrieved via the service provider's profile API. This data is stored within the session and is available using the following keyword replacements:
- %globals_session_oauth_profile%: the entire profile data as a JSON array.
- %globals_session_oauth_profile_xx_yy%: specified data from the profile JSON array, using the structure xx.yy.
Once your OAuth Account Manager asset is created, you can configure its settings on its associated asset screens.
The majority of the screens available on the OAuth Account Manager are similar to those of both a Standard Page and an Asset Builder Page. For more information on these screen, refer to the Asset Screens manual and the Asset Builder Page chapter of the Other CMS Assets manual.
In this chapter we will describe the Details and Linked Accounts screens, which are different for an OAuth Account Manager asset.
Additional Dependant Assets

The additional dependant assets
When you create a OAuth Account Manager within your system, several assets are automatically created beneath it, as highlighted in the figure to the right. You can use these assets to define the contents and layout of OAuth Account Manager.
- Create User: this Bodycopy is used to define the layout to display to a OAuth user when no associated user account is found within Squiz Matrix. This will allow the user to create and link to a new user account within the system.
- Create Link: this Bodycopy is used to define the layout to display to a OAuth user when an associated user account is found within Squiz Matrix. This will allow the user to link these user accounts, enabling access to the system.
- Logged In: this Bodycopy is used to define the layout to display to a logged-in OAuth user with a linked Squiz Matrix account.
- Login Failed: this Bodycopy is used to define the layout to display to a user when login fails on the OAuth Account Manager.
Details Screen
General Settings
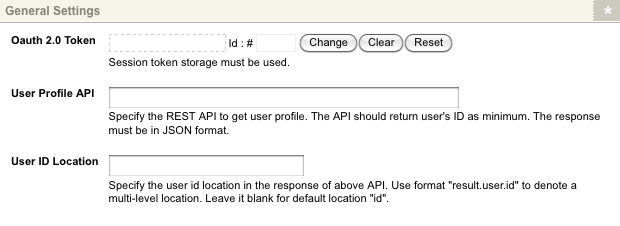
The General Settings section of the Details screen allows you to select the OAuth2 Token asset to use on the OAuth Account Manager, as well as configure its general settings. The General Settings section is shown in the figure below.

The General Settings section of the Details screen
The fields available are as follows:
- OAuth 2.0 Token: specify the OAuth2 Token asset to use for OAuth authorisation on the OAuth Account Manager. For more information on configuring this asset, refer to the OAuth2 Token chapter in this manual.
- User Profile API: specify the API location to retrieve the user profile information from (in JSON format). Please note that the specified API should return the user's ID as a minimum.
- User ID Location: specify the user ID location in the User Profile API response, specified above. To specify a multi-level location, use the format result.user.id. Leaving this field empty will use the default location of id to source the user ID.
User Creation Settings
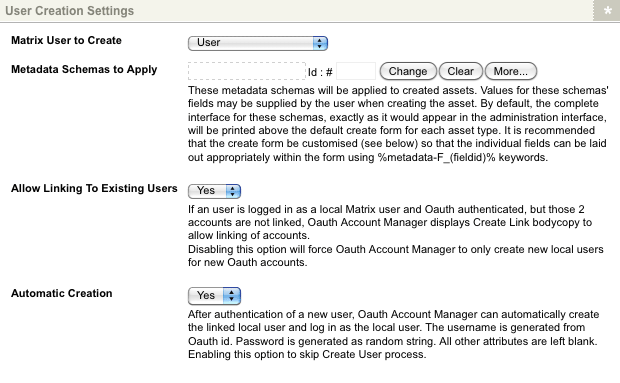
The User Creation Settings section of the Details screen allows you to configure the User asset types that will be created during the OAuth authentication process when no linked Squiz Matrix user is found. The Asset Creation section is shown in the figure below.

The User Creation Settings section of the Details screen
The fields available are as follows:
- Matrix User to Create: select the User account types to create for new Squiz Matrix users during the OAuth authentication process. The account types available are:
- User
- Backend User
- Simple Edit User
- System Administrator
For more information on the User types available, refer to the Users and Permissions manual.
- Metadata Schemas to Apply: this field allows you to select a Metadata Schema that will automatically be applied to the created User assets. Users can input the metadata of the nominated schema when creating their account.
- Allow Linking to Existing Users: this option allows you to link a existing Squiz Matrix user accounts with their authenticated OAuth identities. This means that if a user is logged into the system and their account is OAuth authenticated, the OAuth Account Manager will prompt the user to link their accounts, if they haven't already been. By default, this option is enabled.
- Automatic Creation: this option allows for the automatic creation of linked local users when a user is not logged into Squiz Matrix. By default, this option is a manual process, with users being allowed to create a new user account during OAuth authentication. Enabling this field will automate this creation, skipping this procedure.
Populate User Attributes
The Populate User Attributes section of the Details screen allows you to define the user attributes of your OAuth authorised users, using the profile data returned from the API.

The Populate User Attributes Settings section of the Details screen
The follow user attributes can be set:
- First Name
- Last Name
- Login Date
- Login IP
- Disallow Password Login
- Restrictions
- History Passwords
- Username
- Password
- Locale
To set an attribute, select it in the New attribute to set? field and click Commit; the attribute field will be displayed in the Populate User Attributes section. In the Location field of the attribute that is being set, enter the source string to retrieve the specified attribute data from, for example, when integrating Google authentication, the First Name user attribute can be sourced from the given_name attribute data of the Google API.
To delete an attribute that has been set, click the corresponding Delete check-box and click Commit. The attribute will be removed from the Populate User Attributes section.
A list of common user attribute strings can be found in the OAuth Provider Settings appendix in this manual.
Sync User Attributes
The Sync User Attributes section of the Details screen allows you to configure a set of user attributes of your Oauth authorised users, populated from the profile data returned from the API, that will sync each time a user logs into the system.
The Sync User Attributes Settings section of the Details screen
The follow user attributes can be set:
- First Name
- Last Name
- Login Date
- Login IP
- Disallow Password Login
- Restrictions
- History Passwords
- Username
- Password
- Locale
To set an attribute, select it in the Add Attribute field and click Commit; the Attributes to Sync on Login field will be displayed in the Sync User Attributes section. In the Value field of the attribute that is being set, enter the source string to retrieve the specified attribute data from.
To delete an attribute that has been set, click the corresponding Delete check-box and click Commit. The attribute will be removed from the Sync User Attributes section.
Return Location
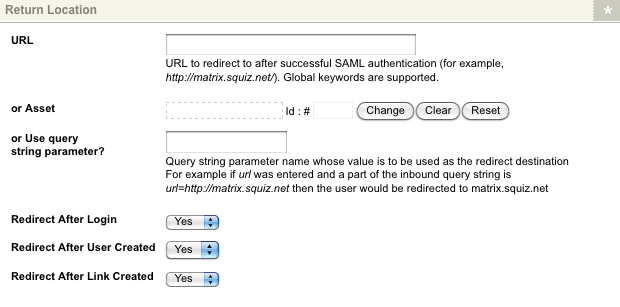
The Return Location section of the Details screen allows you to set the location for users to redirect to after the OAuth authentication process. The Return Location section is shown in the figure below.

The Return Location Settings section of the Details screen
The fields available in this section are as follows:
- URL: enter the URL of the web page to return users to, for example, http://www.example.com. This option is useful when wanting to return users to a page outside of your Squiz Matrix system. Please note that this URL requires the web protocol to be included (e.g. http://).
OR - Asset: select an asset within the system to return users to.
OR Query String Parameter: specify the name of a query string parameter whose value will specify the URL to return users to, for example, if this value is URL and the inbound query string includes ?URL=http://example.com, users will be returned to http://example.com.
Letting the return location URL be dynamic using a query string can result in attackers using this to redirect users to malicious sites. Use custom redirect implementation on the "Logged In Bodycopy" instead to control what domains can be used for the dynamic redirect URL.
- Redirect After Login: If enabled, the user will get redirected to the specified location as soon as they log in.
- Redirect After User Created: If enabled, the user will get redirected to the specified location as soon as their linked Matrix user account has been created. Note that this setting will not work when Redirect After Login is enabled.
- Redirect After Link Created: If enabled, the user will get redirected as soon as their existing Matrix user account is linked with their external logged in account.
Linked Accounts Screen
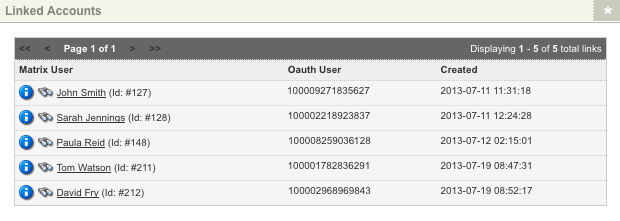
The Linked Accounts screen lists the Squiz Matrix User accounts that have been linked to an OAuth identity on the OAuth Account Manager. The Linked Accounts screen is shown in the figure below.

The Linked Accounts screen
The information displayed on this screen includes the Matrix User account that has been linked, the OAuth User identification number and the date the link was created.
