
How to implement single sign-on with Facebook
Advanced
02 Jul 2019 For version 5.0.0.0
This guide will take you through the steps needed to set up a single sign-on process for Matrix using Facebook and the OAuth Account Manager asset.
Setting up OAuth-based social login in Matrix is a 2-step process. In involves setting up a developer account on each social login service and corresponding assets in Matrix.
In this guide, we will focus on one platform (Facebook) however the steps provided here will apply to any other platform that offers OAuth-based login (such as Auth0). If you are only interested in the Matrix side of things, jump to step 2.
What are we building?
We will allow public users to login via a OAuth-based Login with Facebook button.
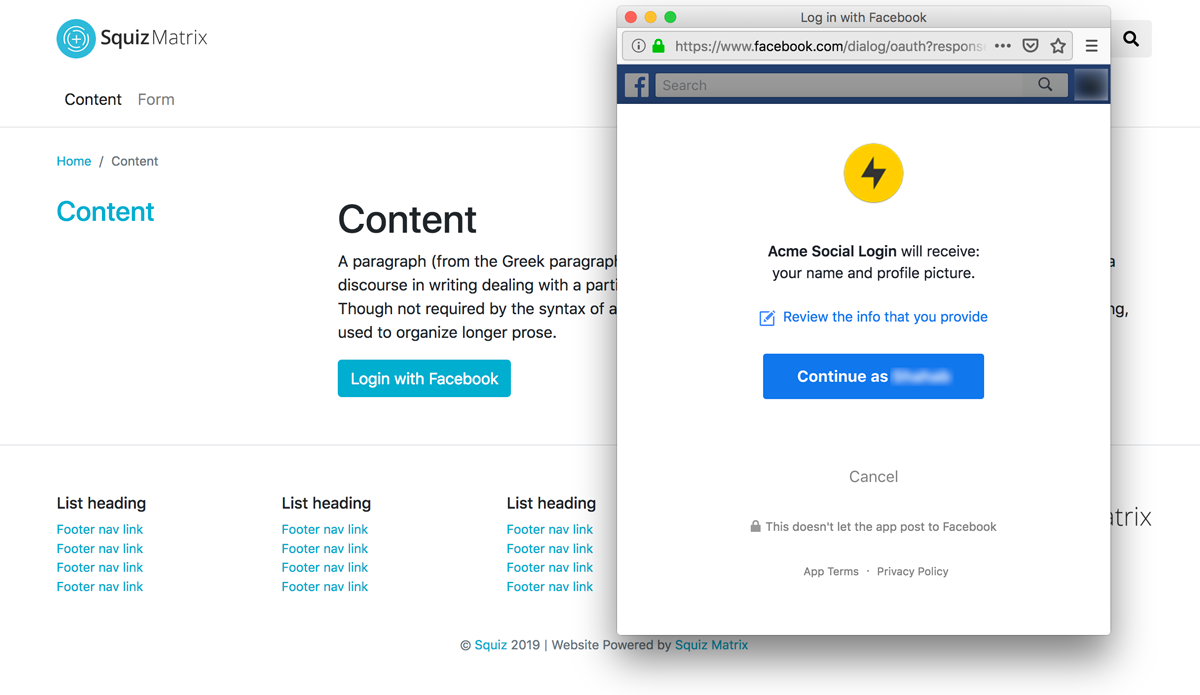
Once a user goes through the login process, the popup window refreshes the host page and then closes itself.
Don't like pop-ups? stick around as I have provided an alternative approach involving redirects at the end.
Setup a developer/service account on the social platform
Sign-in to your Facebook Developers account
Go to https://developers.facebook.com/ and sign-in.
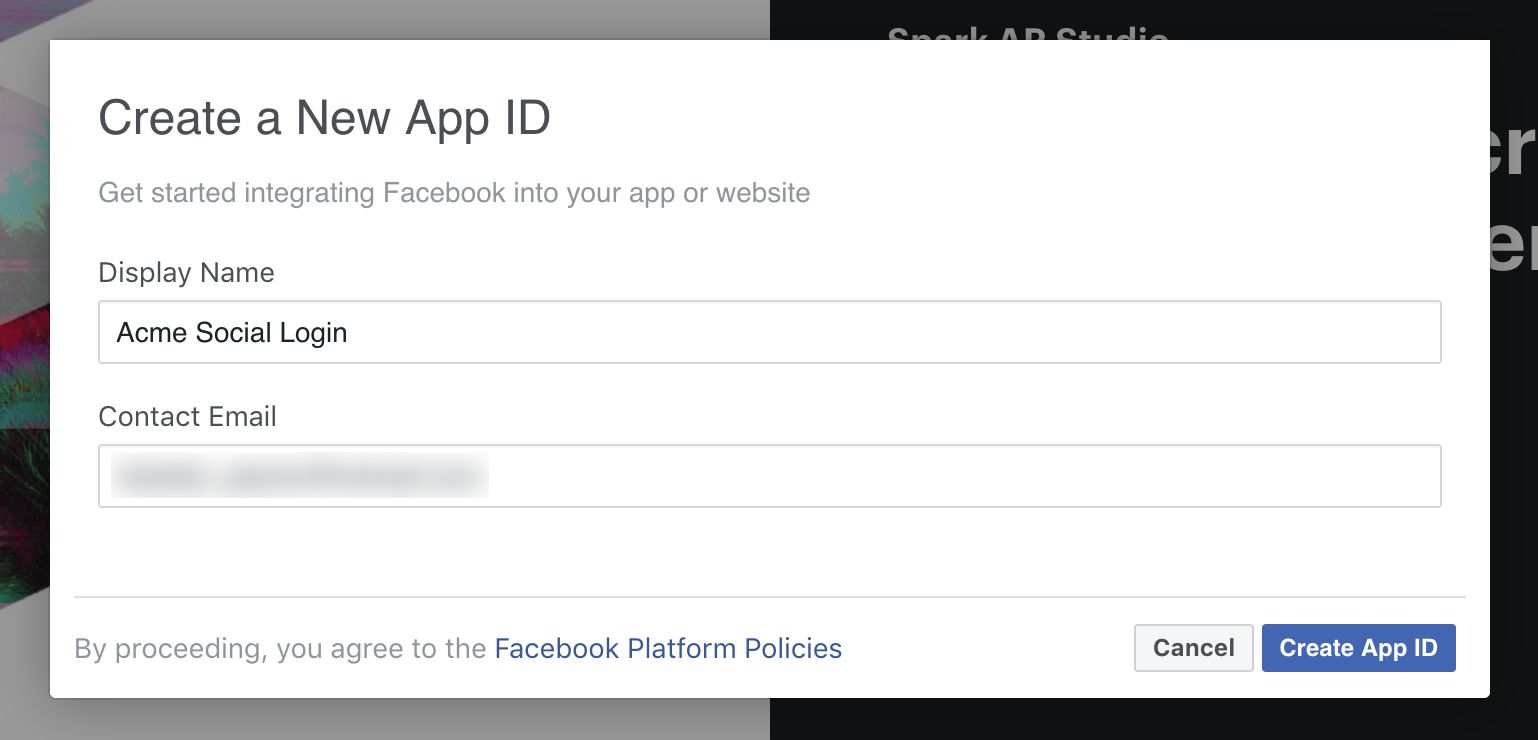
Create App
Click on My Apps > Create App

Create the new App by providing Display Name (App name), contact email address (defaults to Facebook account email) and click Create App ID.
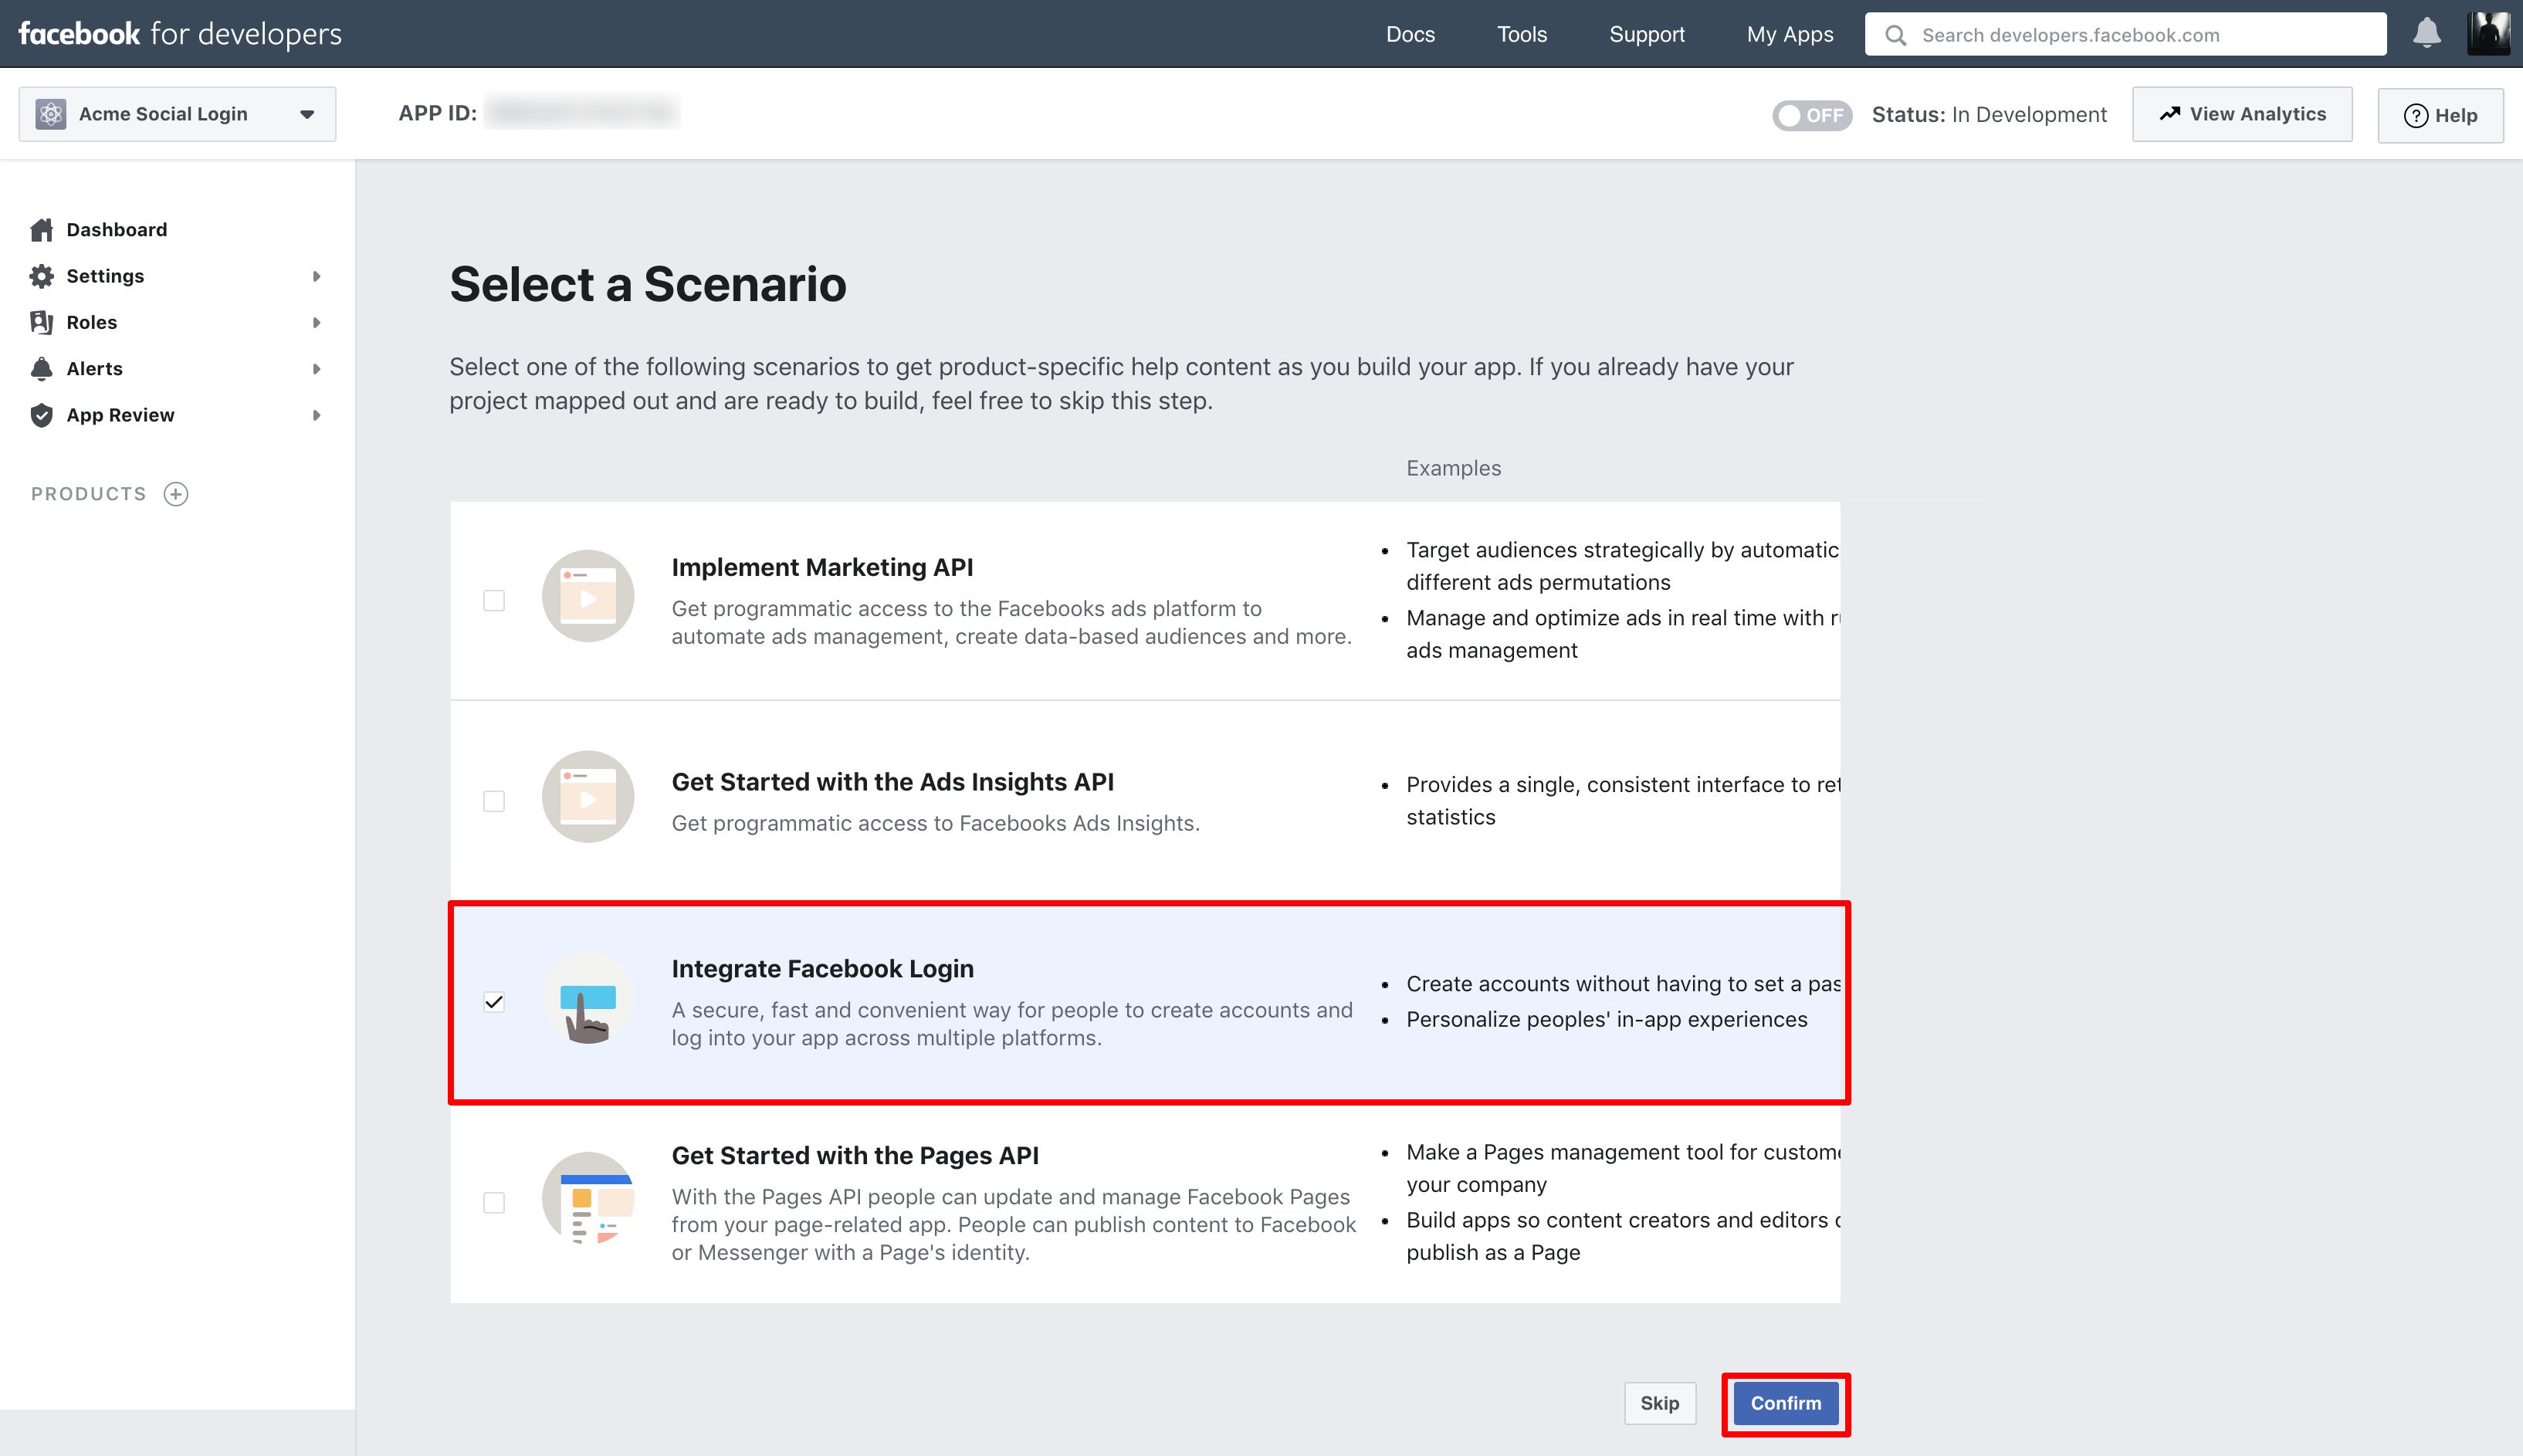
On the Select a Scenario screen, select Integrate Facebook Login and click on Submit.
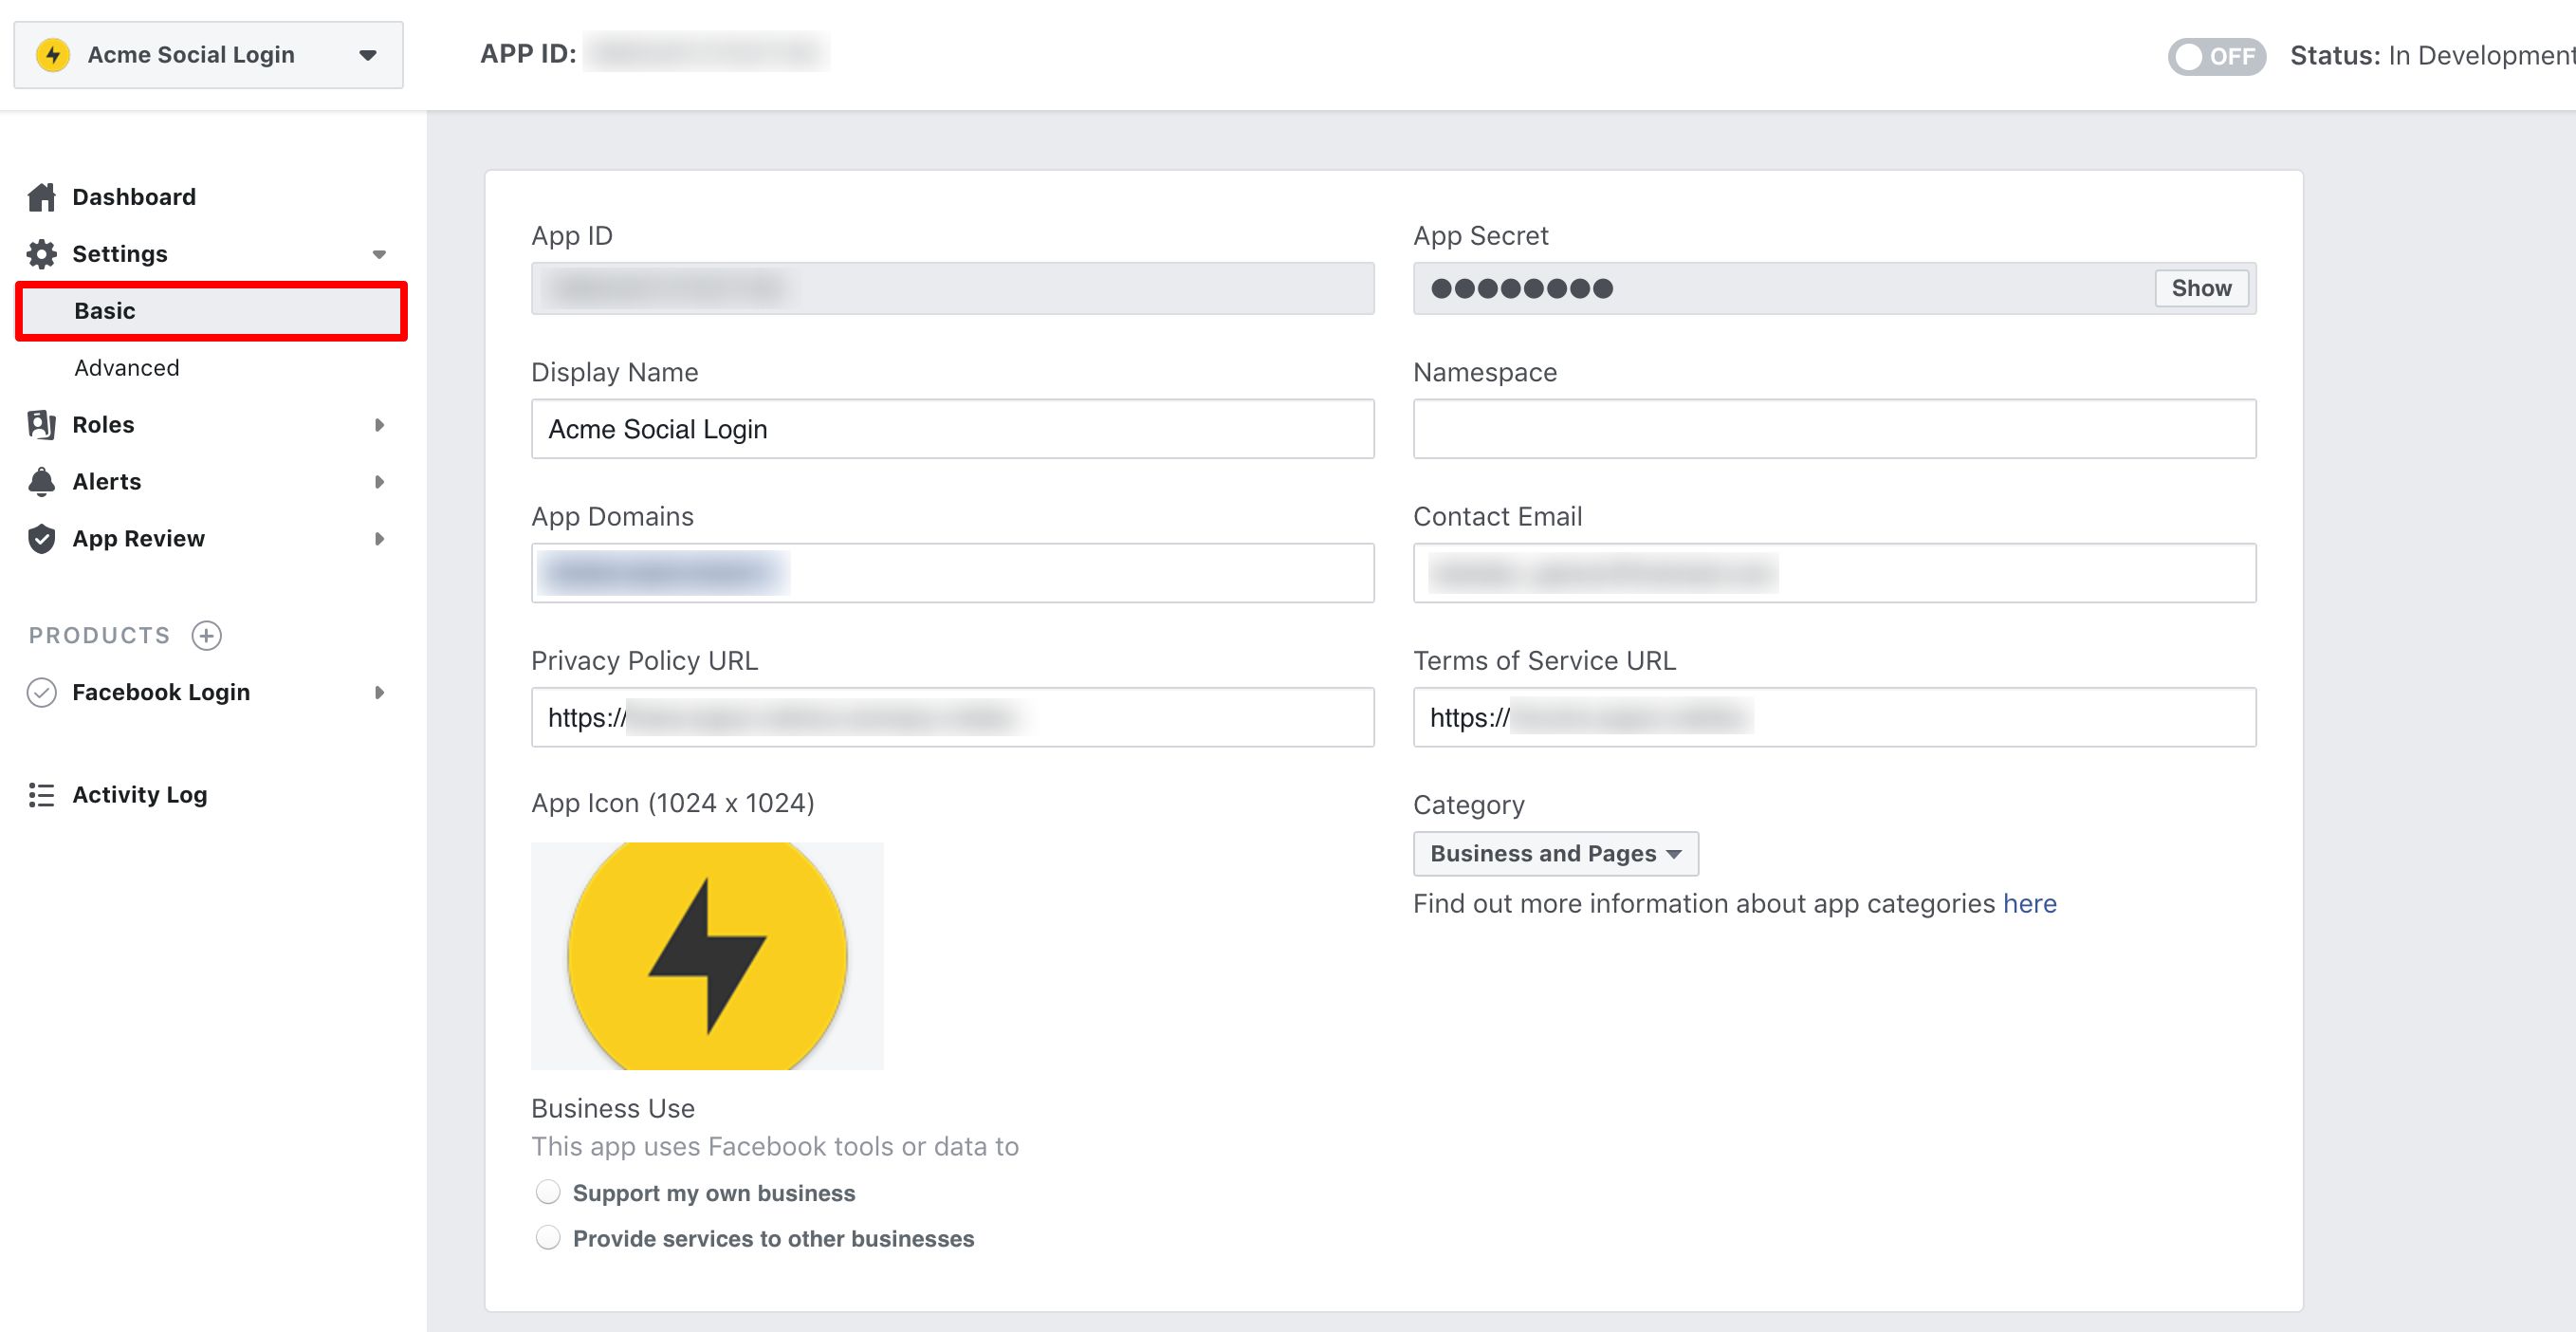
App Settings
On the Basic settings page, make note of App ID and App Secret. We will need this later. Additionally, enter values for:
- Display name.
- App Domains (domain name(s) of the sites that will use the social login e.g. acme.com.au)
- Privacy policy URL
- Terms of Service URL
- App Icon
- Save changes
Other fields on this screen are optional for the purposes of this guide.
Add Facebook login product
Add a new product by clicking on PRODUCTS
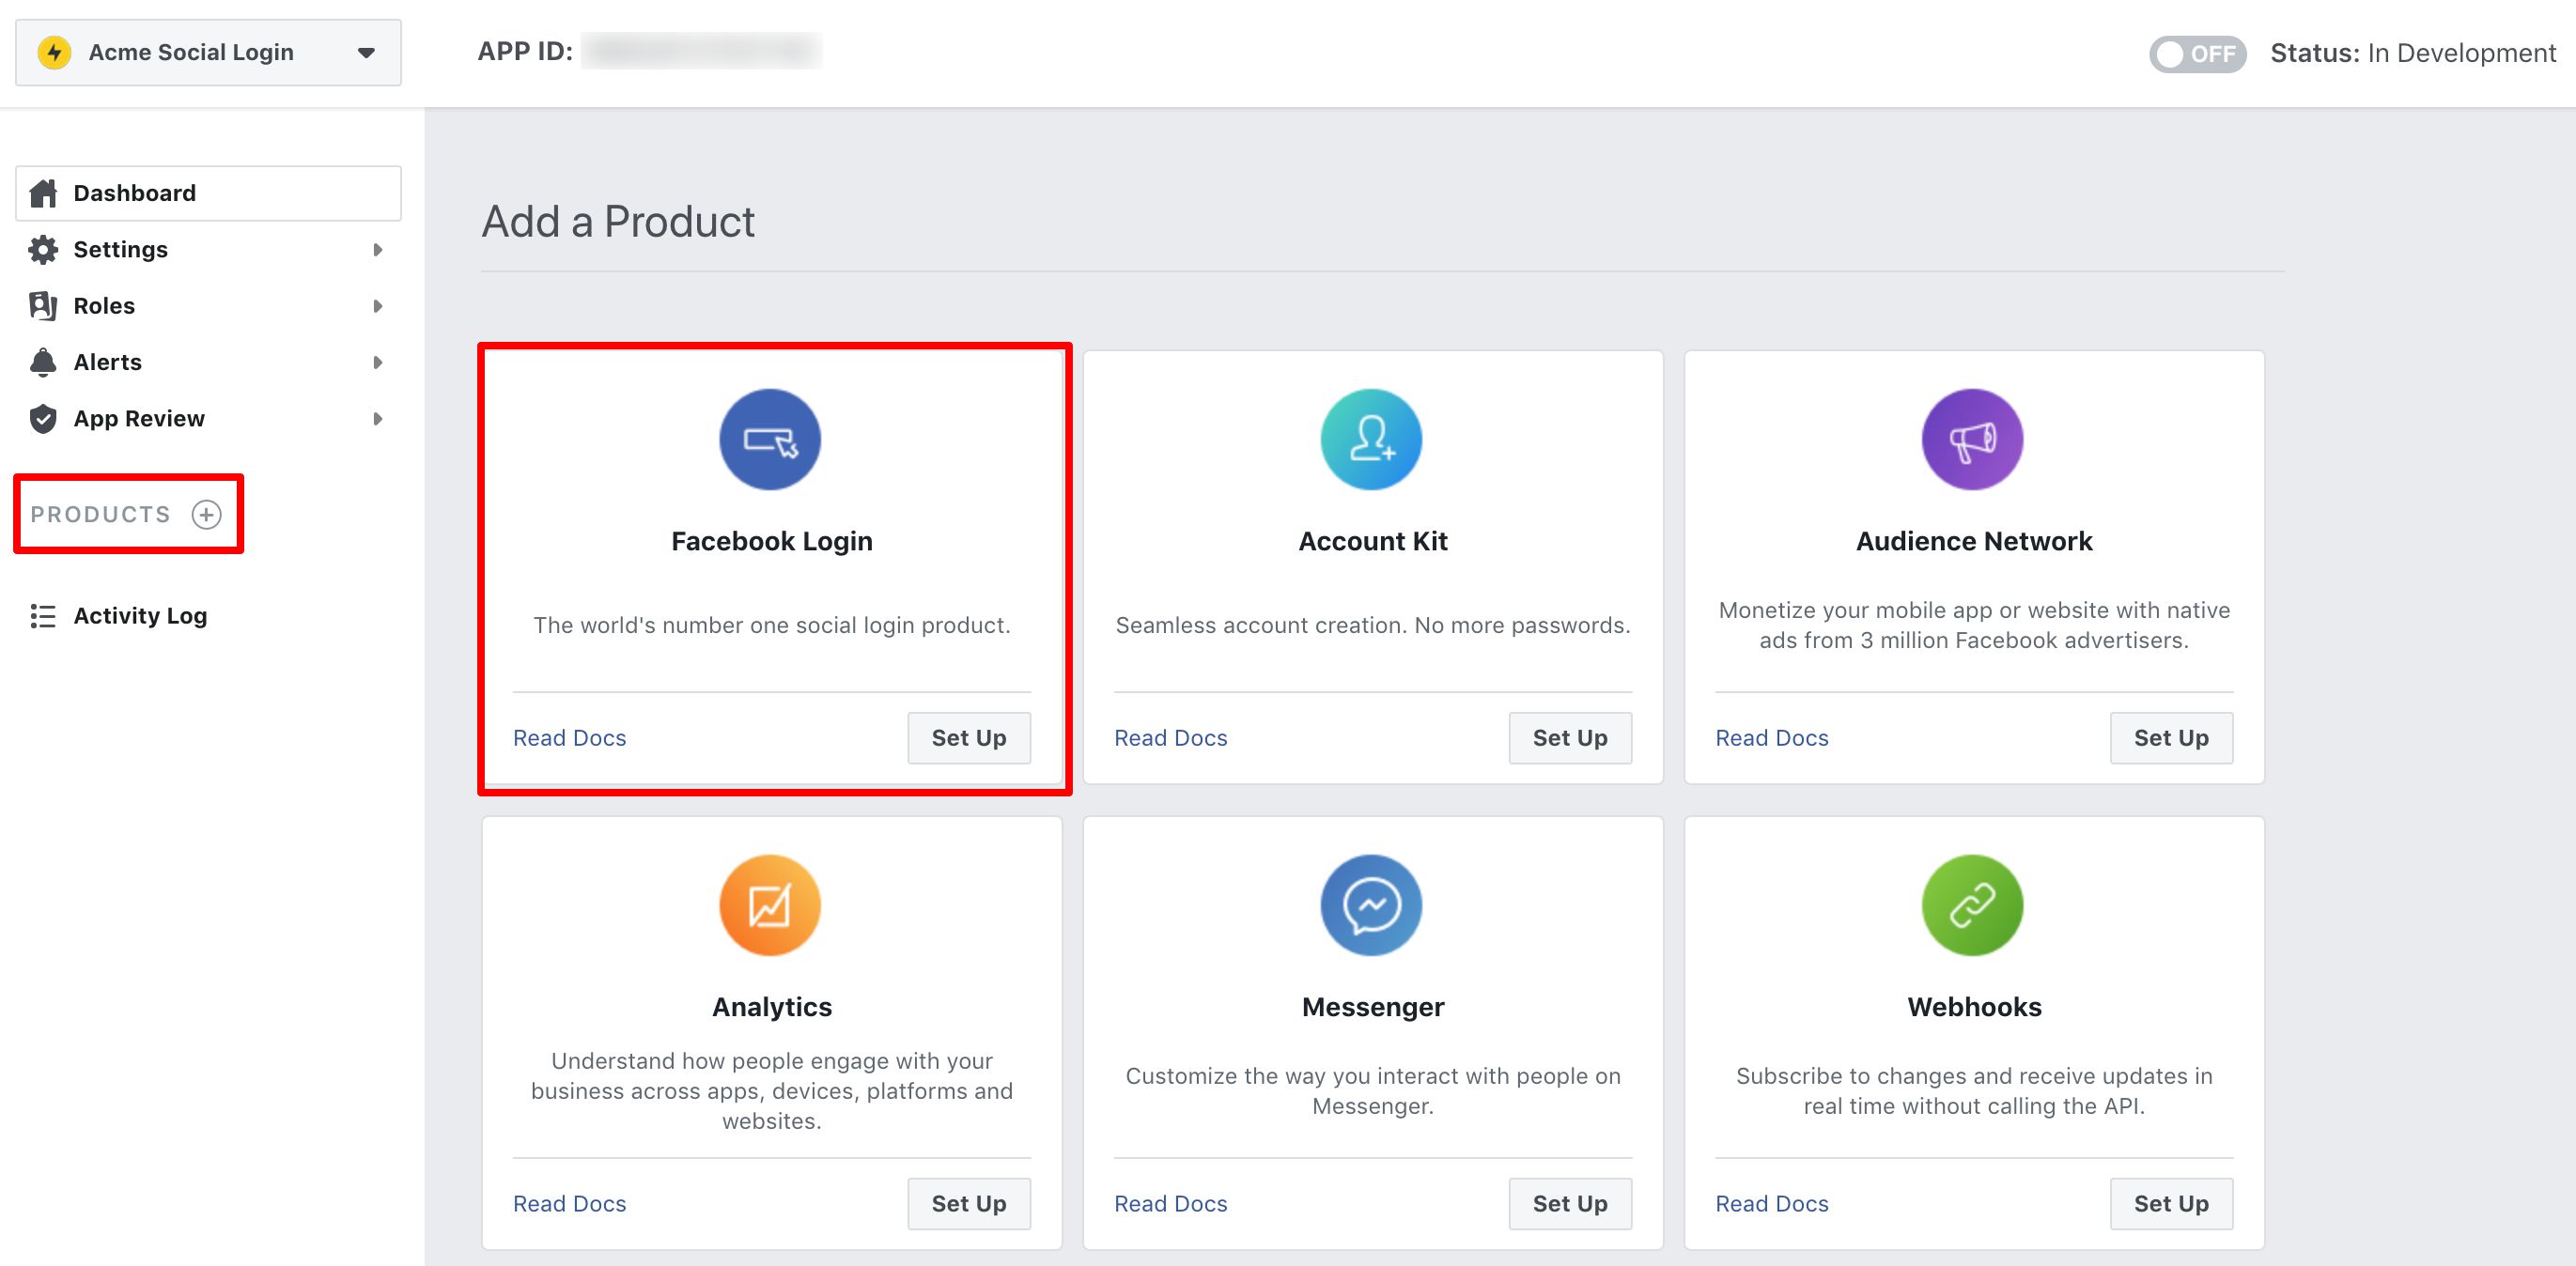
Facebook Login will now appear in the left hand menu under PRODUCTS. We will return to its Settings screen at a later step (step 2.5).
Matrix setup
In the following series of steps, we will setup OAuth assets required for the integration to work.
Create assets
It is up to the Matrix implementer regarding how she wants to create/organise the assets. A recommended approach is to setup all OAuth related assets under a Site asset with a fixed URL such as https://acme.com.au/_oauth.
For the purposes of this guide, we will use https://acme.com.au/_webservices. Create assets as highlighted in the screenshot below.
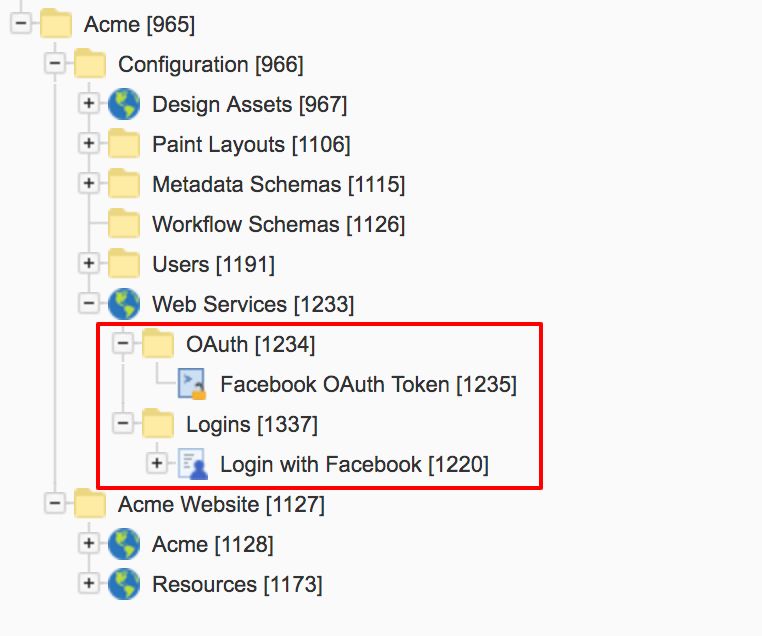
- Web Services (Site asset)
- OAuth (Folder asset)
- Facebook OAuth Token (OAuth 2.0 Token asset)
- Logins (Folder asset)
- Login with Facebook (OAuth Account Manager asset)
OAuth 2.0 Token asset
Go to the Details screen of Facebook OAuth Token asset and set values for:
- Client ID (this is the App ID value from step 1.3)
- Client Secret (this is the App Secret value from step 1.3)
- Authorization Endpoint:
https://graph.facebook.com/oauth/authorize - Token Endpoint:
https://graph.facebook.com/oauth/access_token - Scope -
public_profile,email - Access Token URI Parameter Name:
access_token - Authorization Type:
URI - Access Token Type:
URI - Token Storage:
Session
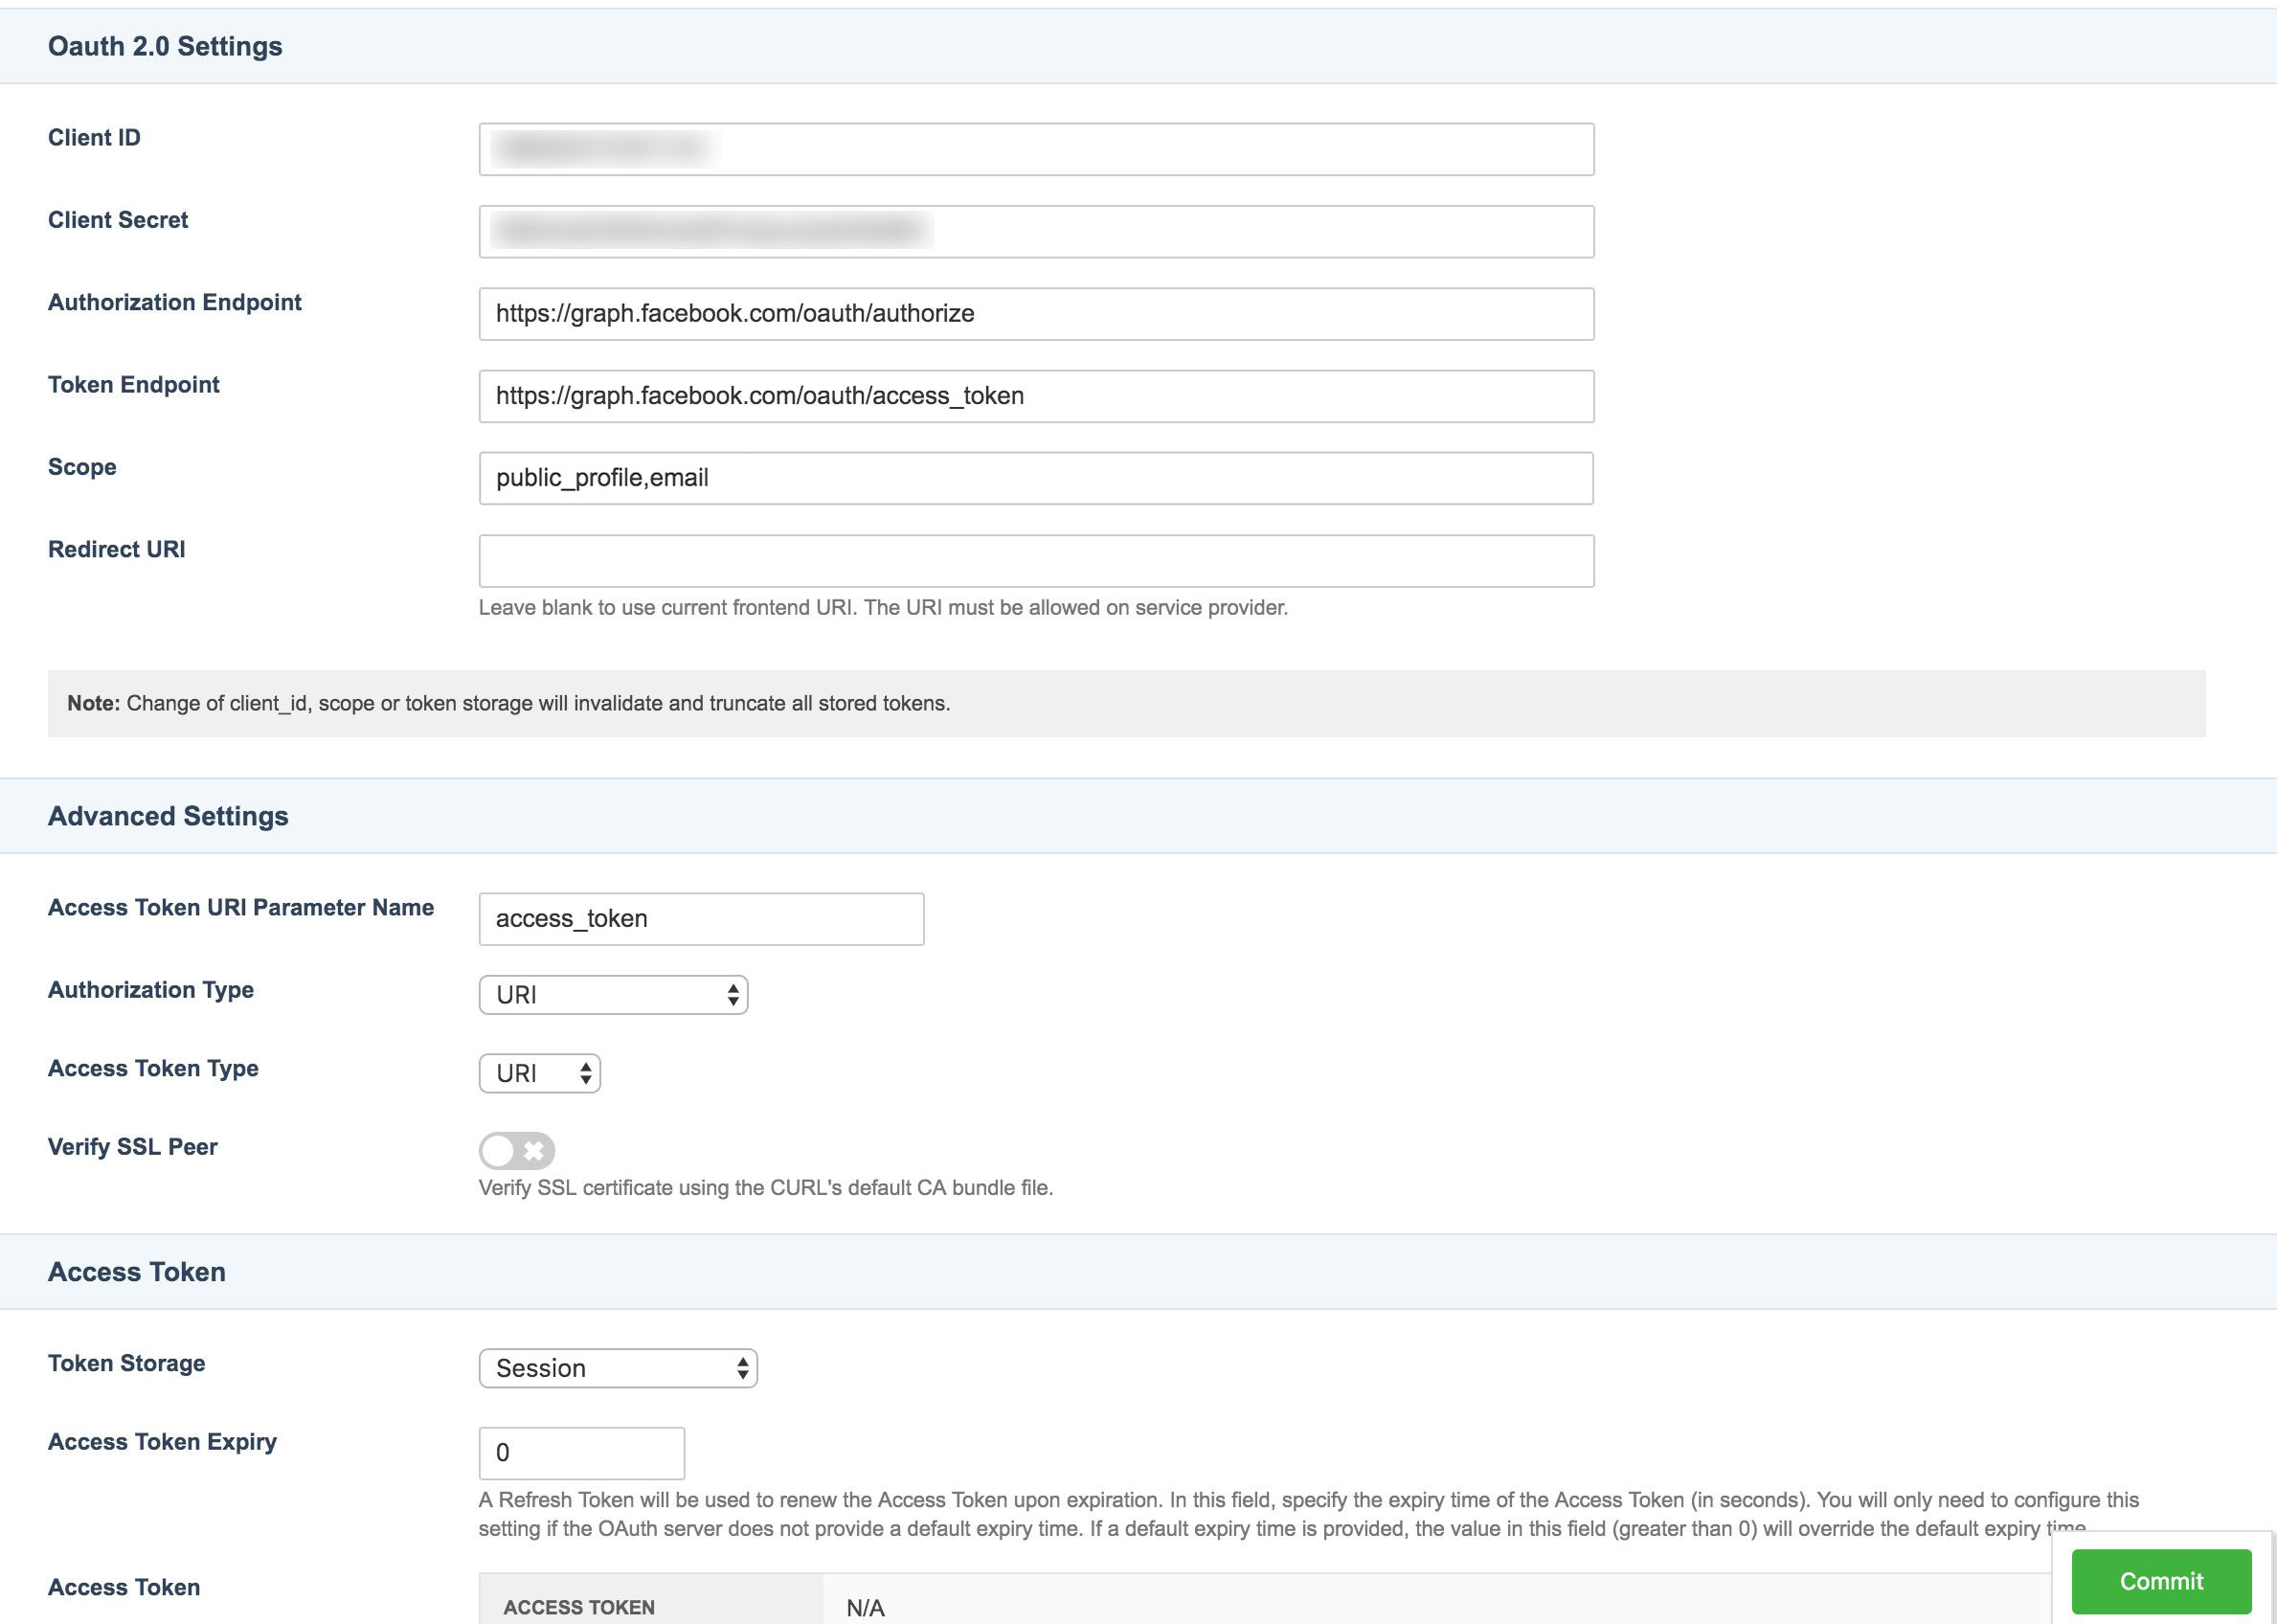
Note that some OAuth providers (like Facebook) use slightly different terminology for OAuth settings i.e. App ID vs. Client ID and App Secret vs. Client Secret, etc. Additionally, OAuth vendors may require a value for Scope which is specific to their API. E.g. for Auth0, you can set the Scope field to openid profile email which just means you want access to user's profile information and email address.
Setup OAuth Account Manager asset
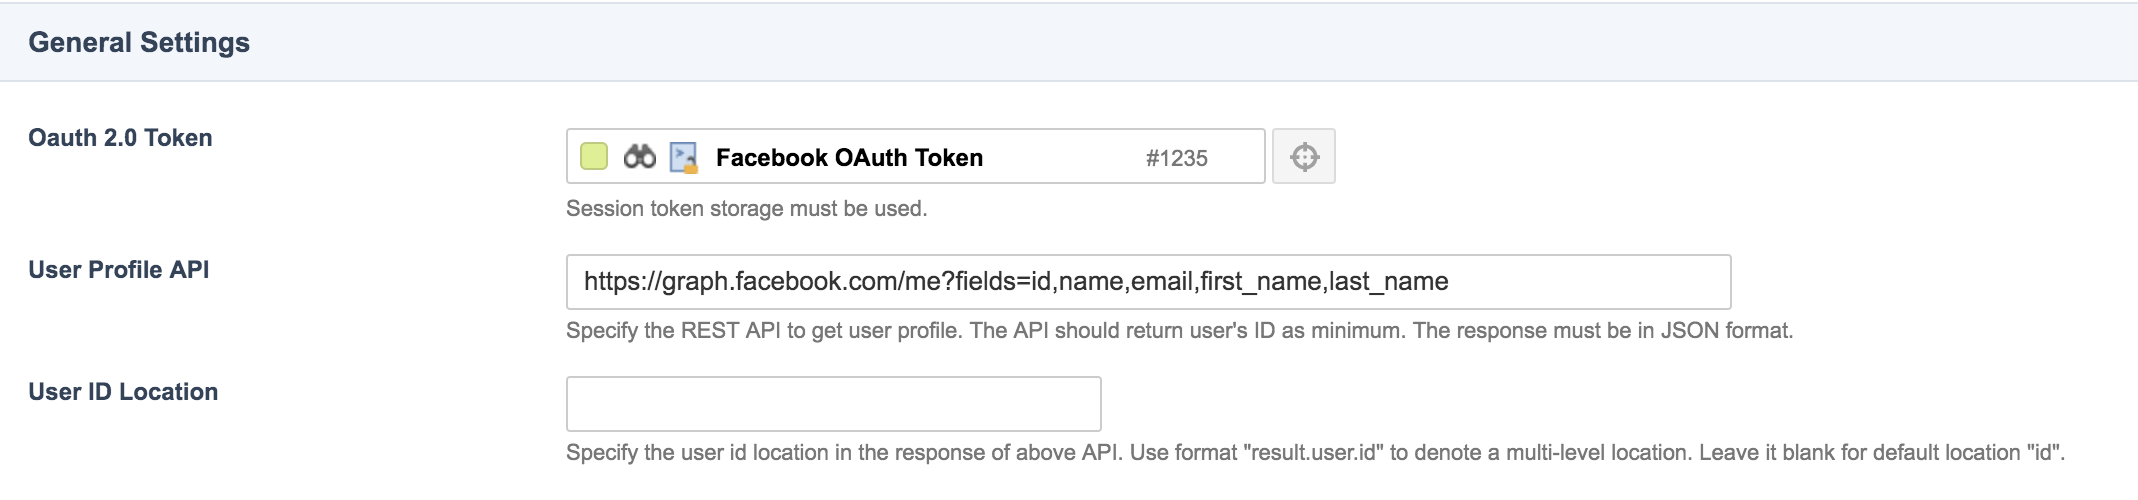
Under General Settings, set:
- Oauth 2.0 Token to the token we created in step 2.2.
- User Profile API:
https://graph.facebook.com/me?fields=id,name,email,first_name,last_name
Under User Creation Settings, set:
- Matrix User to Create: User (we use a simple user in this example)
- (Optional) Metadata Schemas to Apply to the user asset if you want to save any custom attributes against the user. In this case, we have metadata field
customer_login_typewhich is set to facebook so we can keep track the source of social login. - Check the Allow Linking To Existing Users , Automatic Creation and Disallow Password Log In boxes.

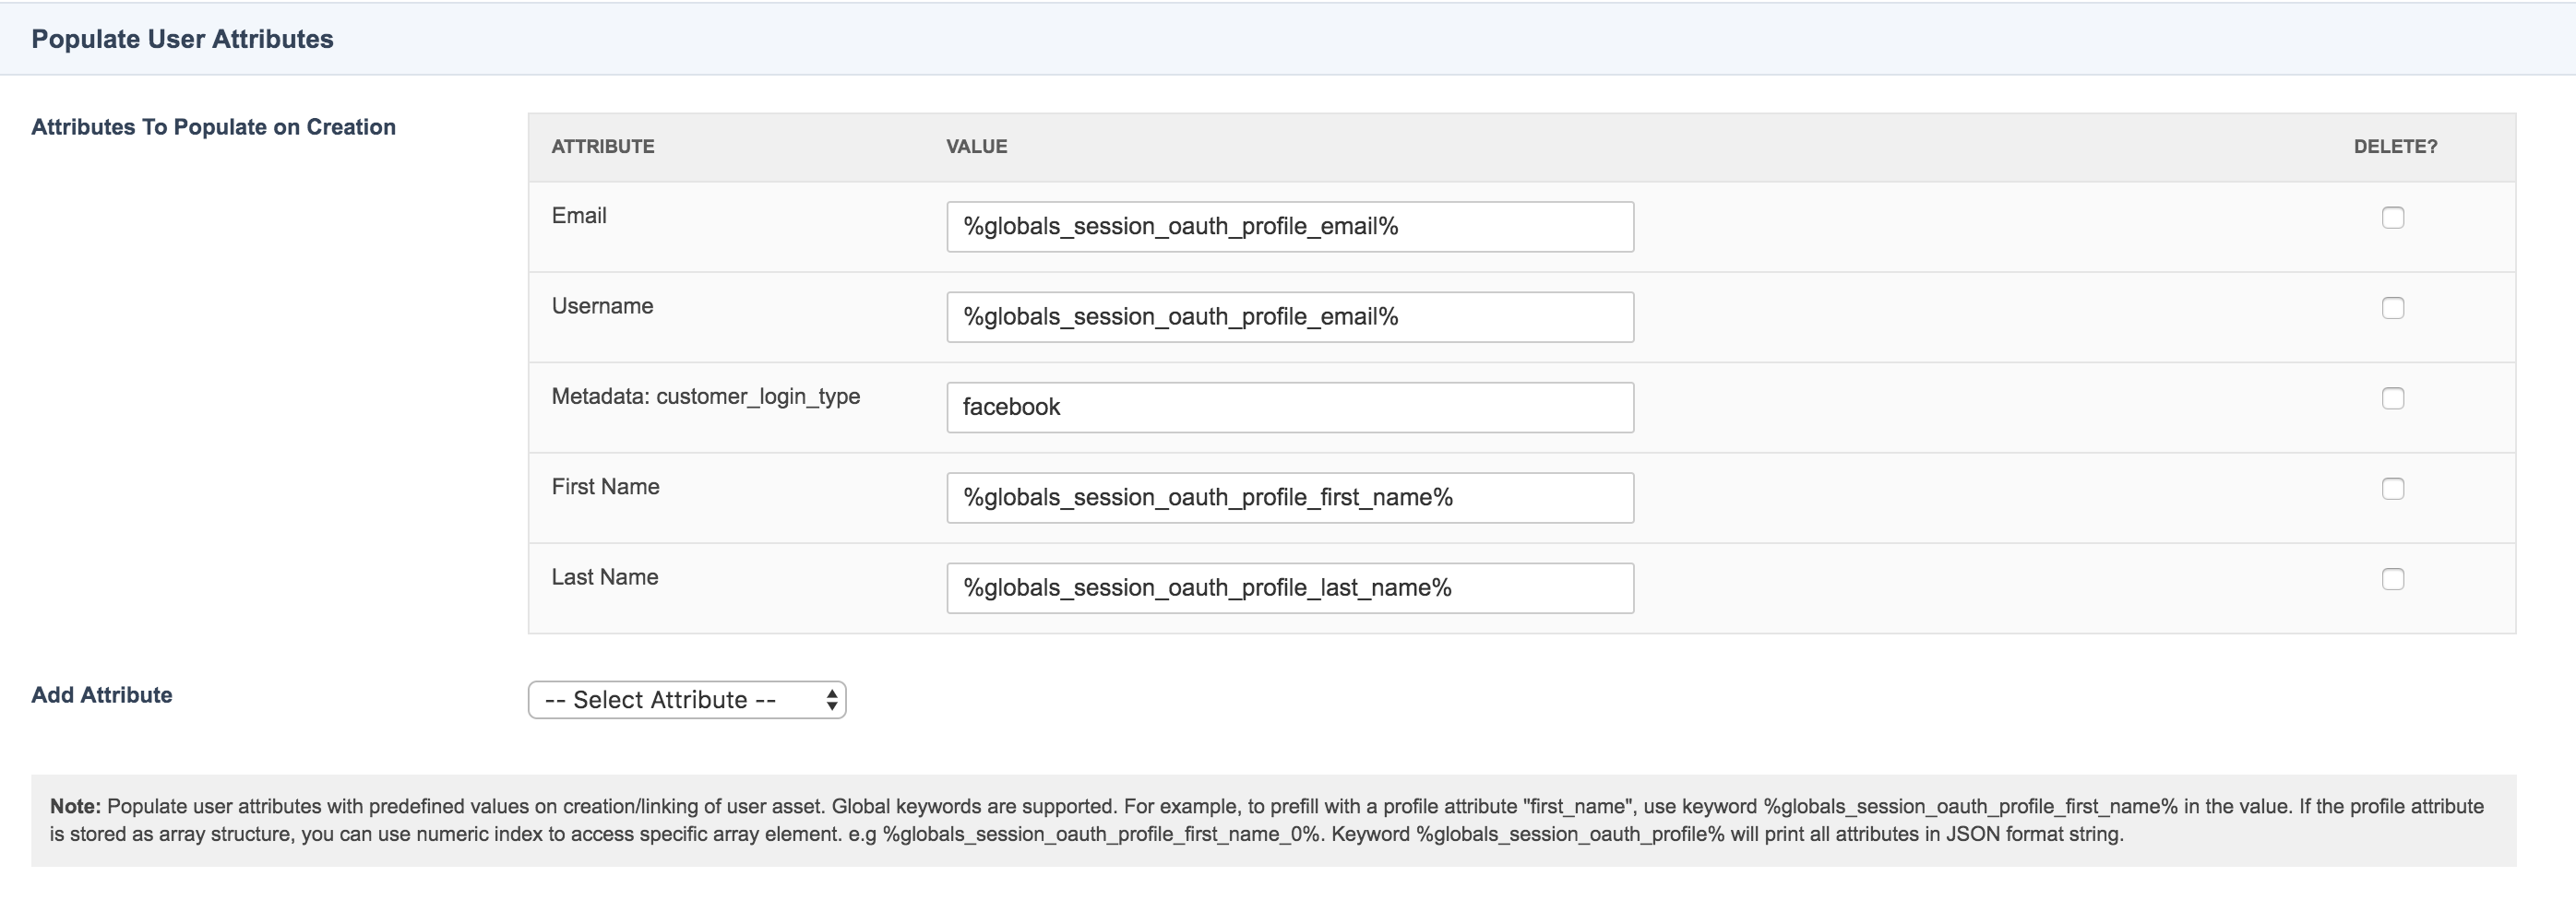
Under Populate User Attributes, add and set the following attributes:
- Email -
%globals_session_oauth_profile_email% - Username -
%globals_session_oauth_profile_email% - Metadata: customer_login_type -
facebook - First Name -
%globals_session_oauth_profile_first_name% - Last Name -
%globals_session_oauth_profile_last_name%
Attributes such as email, first and last name come from the User API Profile URL which we set to https://graph.facebook.com/me?fields=id,name,email,first_name,last_name . If you require more attributes, simply include these attributes in Facebook Graph API URL request and they should be available via the %globals_session_oauth_profile_attributeName% keyword.
Finally, we need JavaScript that shuts down the login pop-up and refreshes the host page once a user has successfully logged-in or shows an error in case of failed login. To achieve this, add the following to the Logged In bodycopy of the OAuth Account Manager asset:
<p><em>Login successful, please wait...</em></p>
<script>
    var windowSource;
    var sourceURL;
    //set the vars depending on the window source type
    if(window.opener){
        windowSource = window.opener;
        sourceURL = window.opener.location.href;
    }else{
        windowSource = window.parent;
        sourceURL = window.parent.location.href;
    }
    //get the current URL and remove the /_login if present
    sourceURL = sourceURL.replace('/_login','');
    //refresh the window opener or window parent and close this one
    windowSource.location.reload();
    window.close();
</script>
Set user create location
Go to the Create Locations screen of the OAuth Account Manager asset. Under Fixed Create Locations, set a location where these users should be create. In this guide, we store these users under a Social Login Users user group asset.

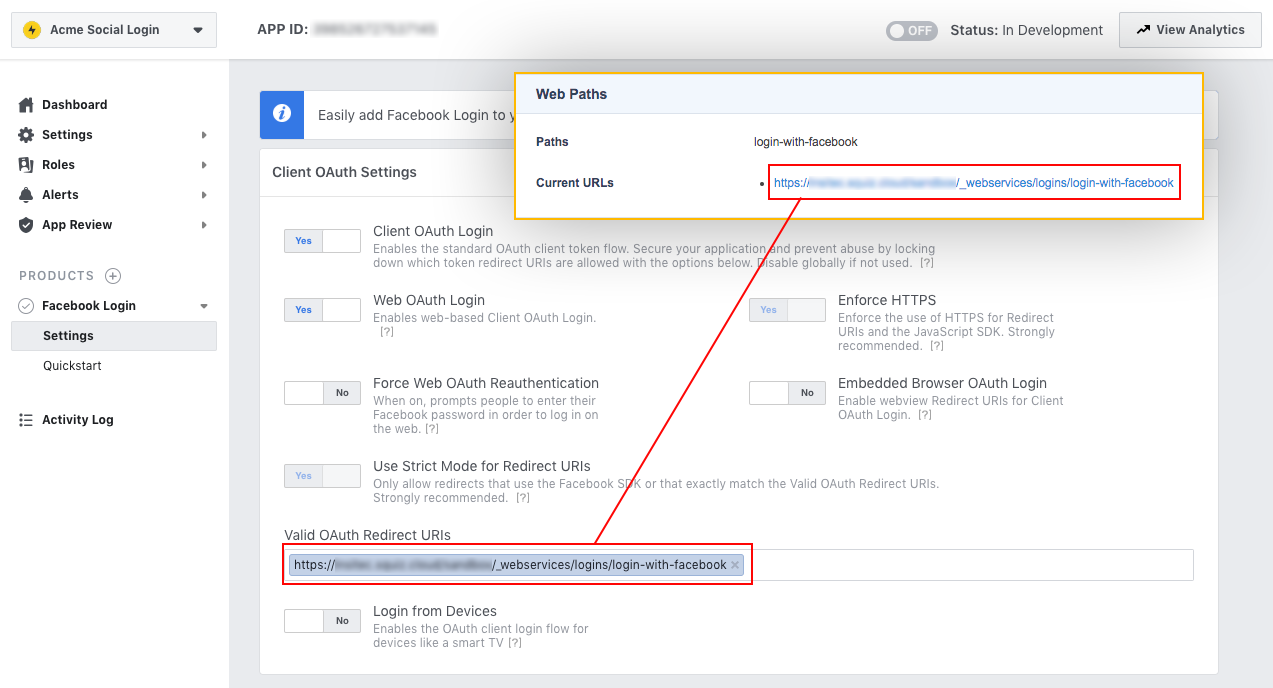
Set valid OAuth redirect URI
Go to the Web Paths screen of OAuth Account Manager and make note of it. It will look something like: https://acme.com.au/_webservices/logins/login-with-facebook.
Return to the Acme Social Login Facebook app settings screen and set it as Valid OAuth Redirect URIs.
Add Facebook login button to your site & test
Put the following code wherever you want the Facebook login button to appear. In this example, I have put it in a paint layout right after the asset contents keyword.
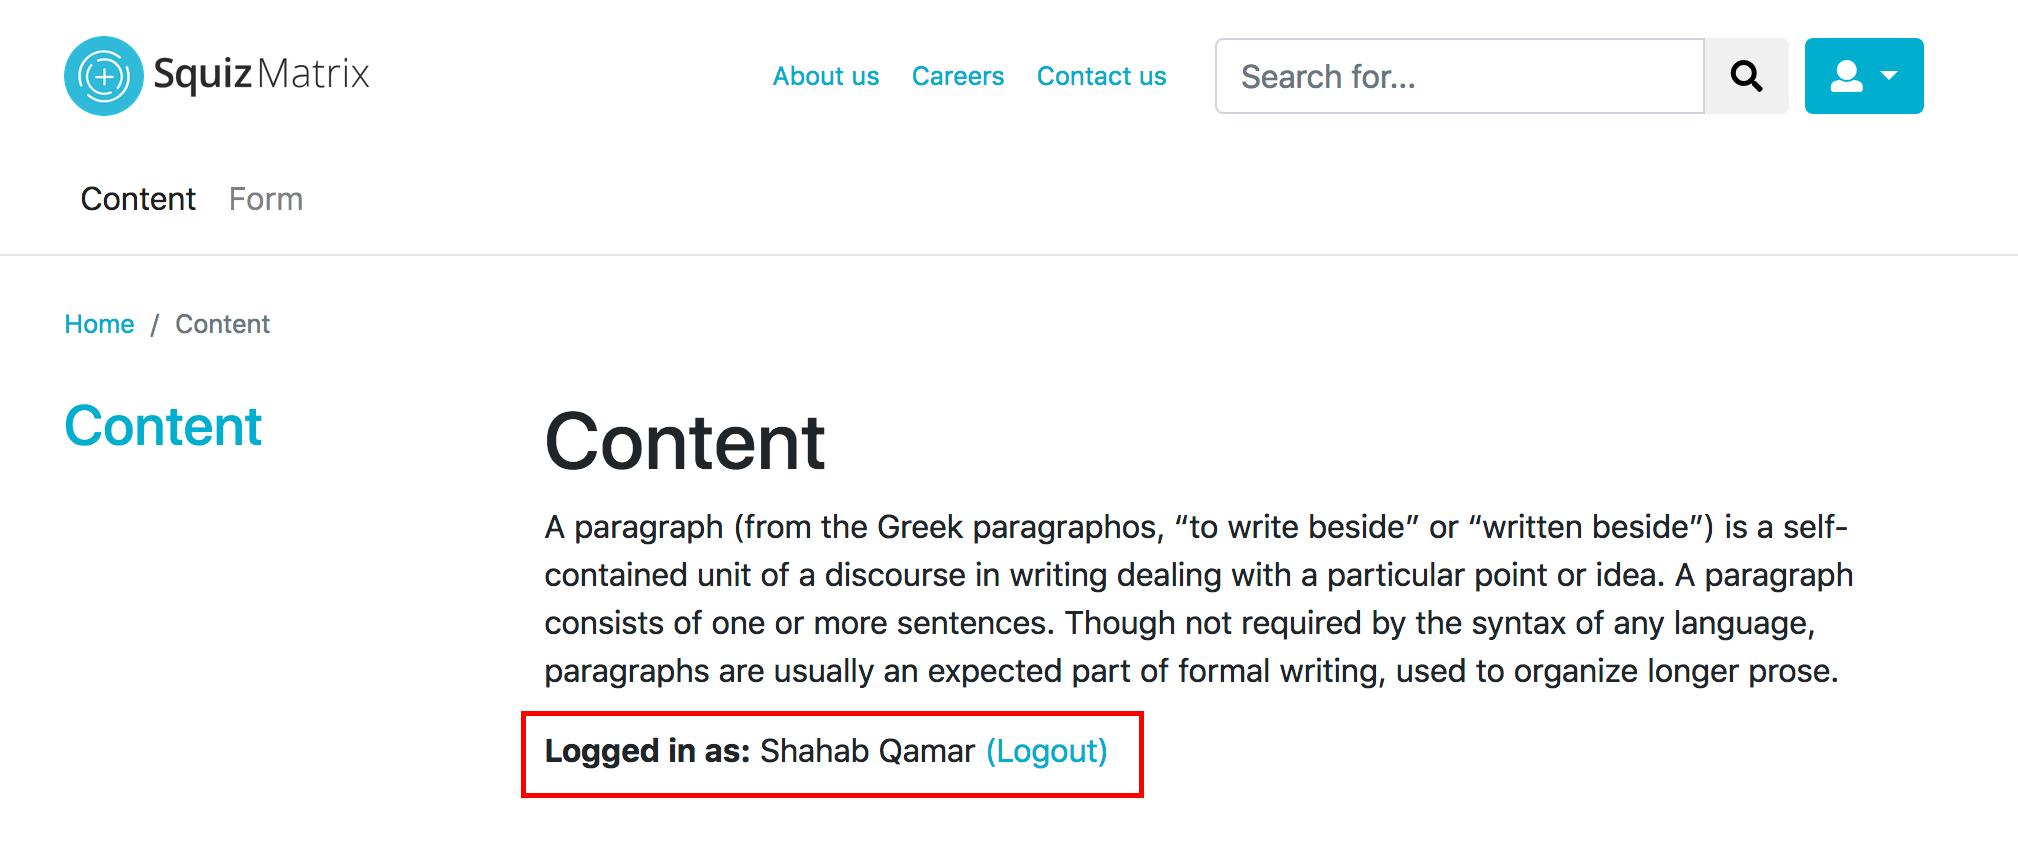
%begin_globals_user_is_logged_in%
   <strong>Logged in as:</strong>
   %globals_user_attribute_first_name% %globals_user_attribute_last_name%
   <a href="?SQ_ACTION=logout">(Logout)</a>
%else_globals%
   <a class="btn btn-primary" href="./?external-uuid=9c1089de-a7d1-42ab-8434-2f87882aec9c" onclick="openWindow('./?external-uuid=9c1089de-a7d1-42ab-8434-2f87882aec9c', 'External Login'); return false;"> Login with Facebook</a>
   <script>
      function openWindow(url, title, w=500, h=600) {
         // Get window reference
         var browserWindow = window.top;
         // Fixes dual-screen position
         var dualScreenLeft = browserWindow.screenLeft != undefined ? browserWindow.screenLeft : screen.left;
         var dualScreenTop = browserWindow.screenTop != undefined ? browserWindow.screenTop : screen.top;

         var width = browserWindow.innerWidth ? browserWindow.innerWidth : document.documentElement.clientWidth ? document.documentElement.clientWidth : screen.width;
         var height = browserWindow.innerHeight ? browserWindow.innerHeight : document.documentElement.clientHeight ? document.documentElement.clientHeight : screen.height;

         var left = ((width / 2) - (w / 2)) + dualScreenLeft;
         var top = ((height / 2) - (h / 2)) + dualScreenTop;
         var newWindow = browserWindow.open(url, title, 'scrollbars=yes, width=' + w + ', height=' + h + ', top=' + top + ', left=' + left);

         // Puts focus on the newWindow
         if (browserWindow.focus) {
               newWindow.focus();
         }
      }
   </script>
%end_globals%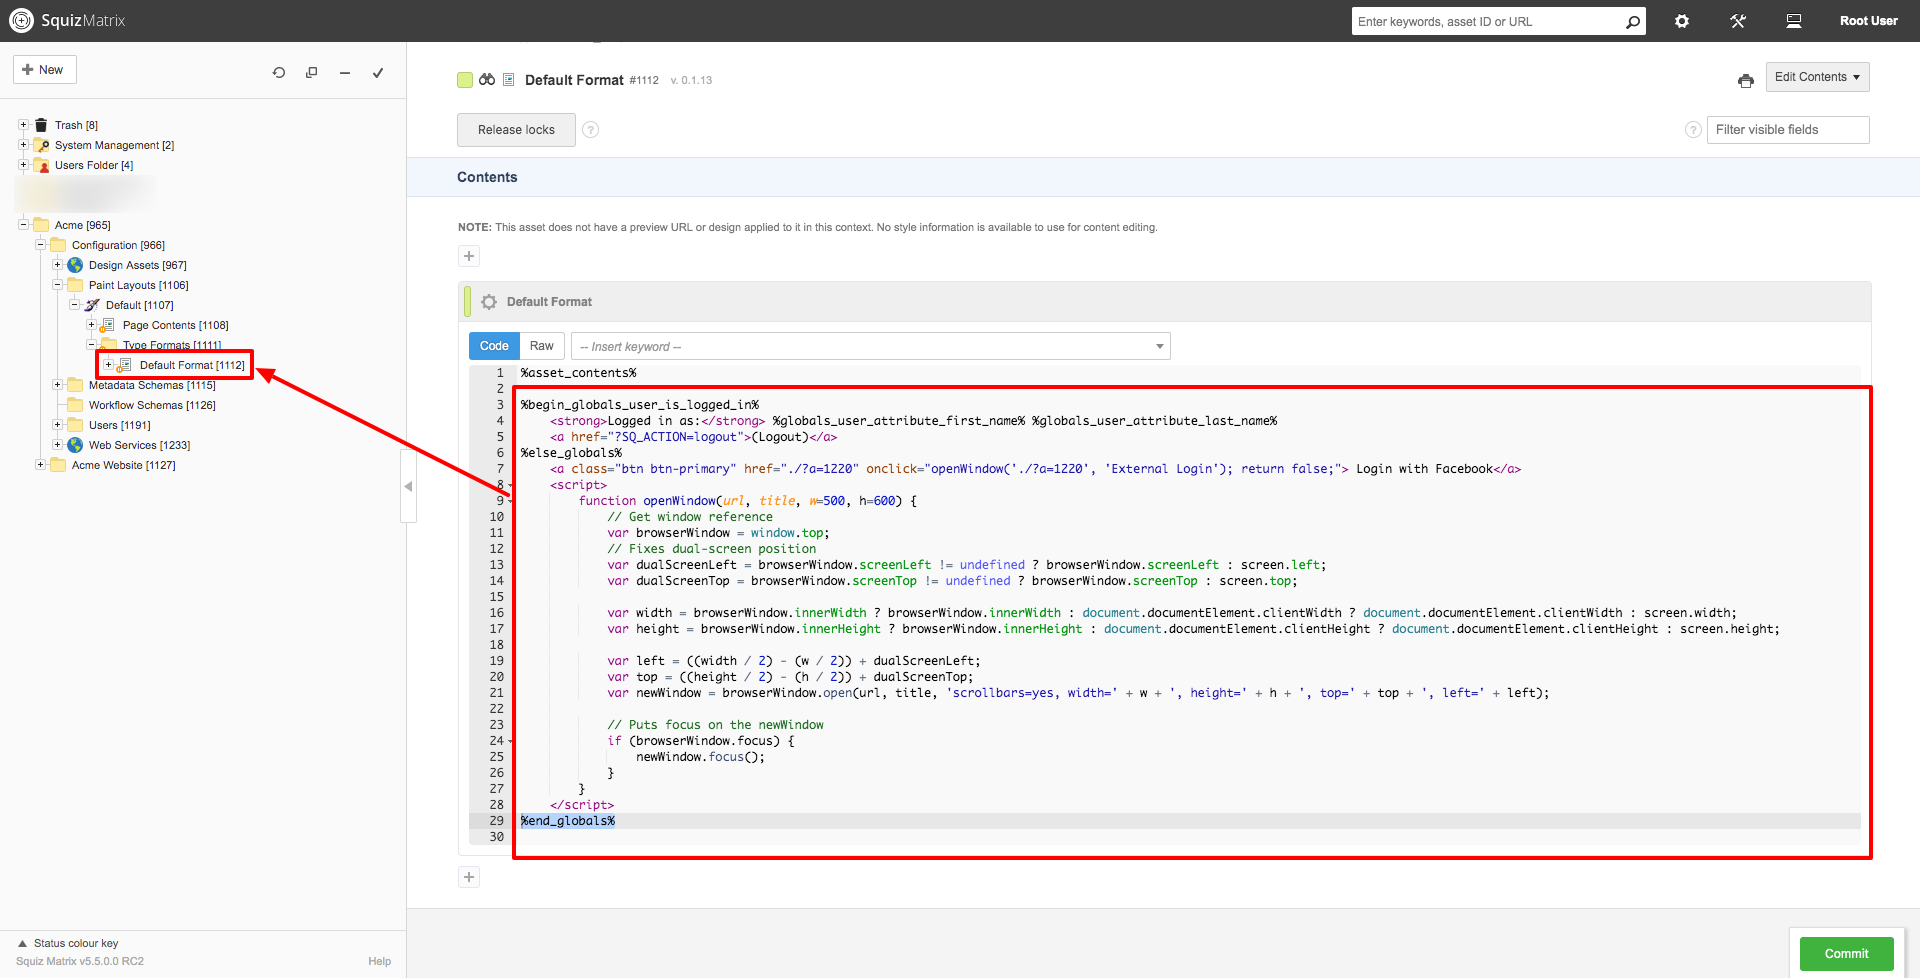
We have a conditional that checks if the user is logged. If yes, we display the user's first and last name. If not logged-in, we display the Facebook login button. Upon clicking this button, a window is launched which loads the asset OAuth Account Manager asset i.e. Login with Facebook.
One the frontend, we can now see the login button. Clicking on the button launches a minimal browser window with Facebook login.
Once a user goes through the login process, the popup window refreshes the host page and then closes itself. The user is now logged-in.
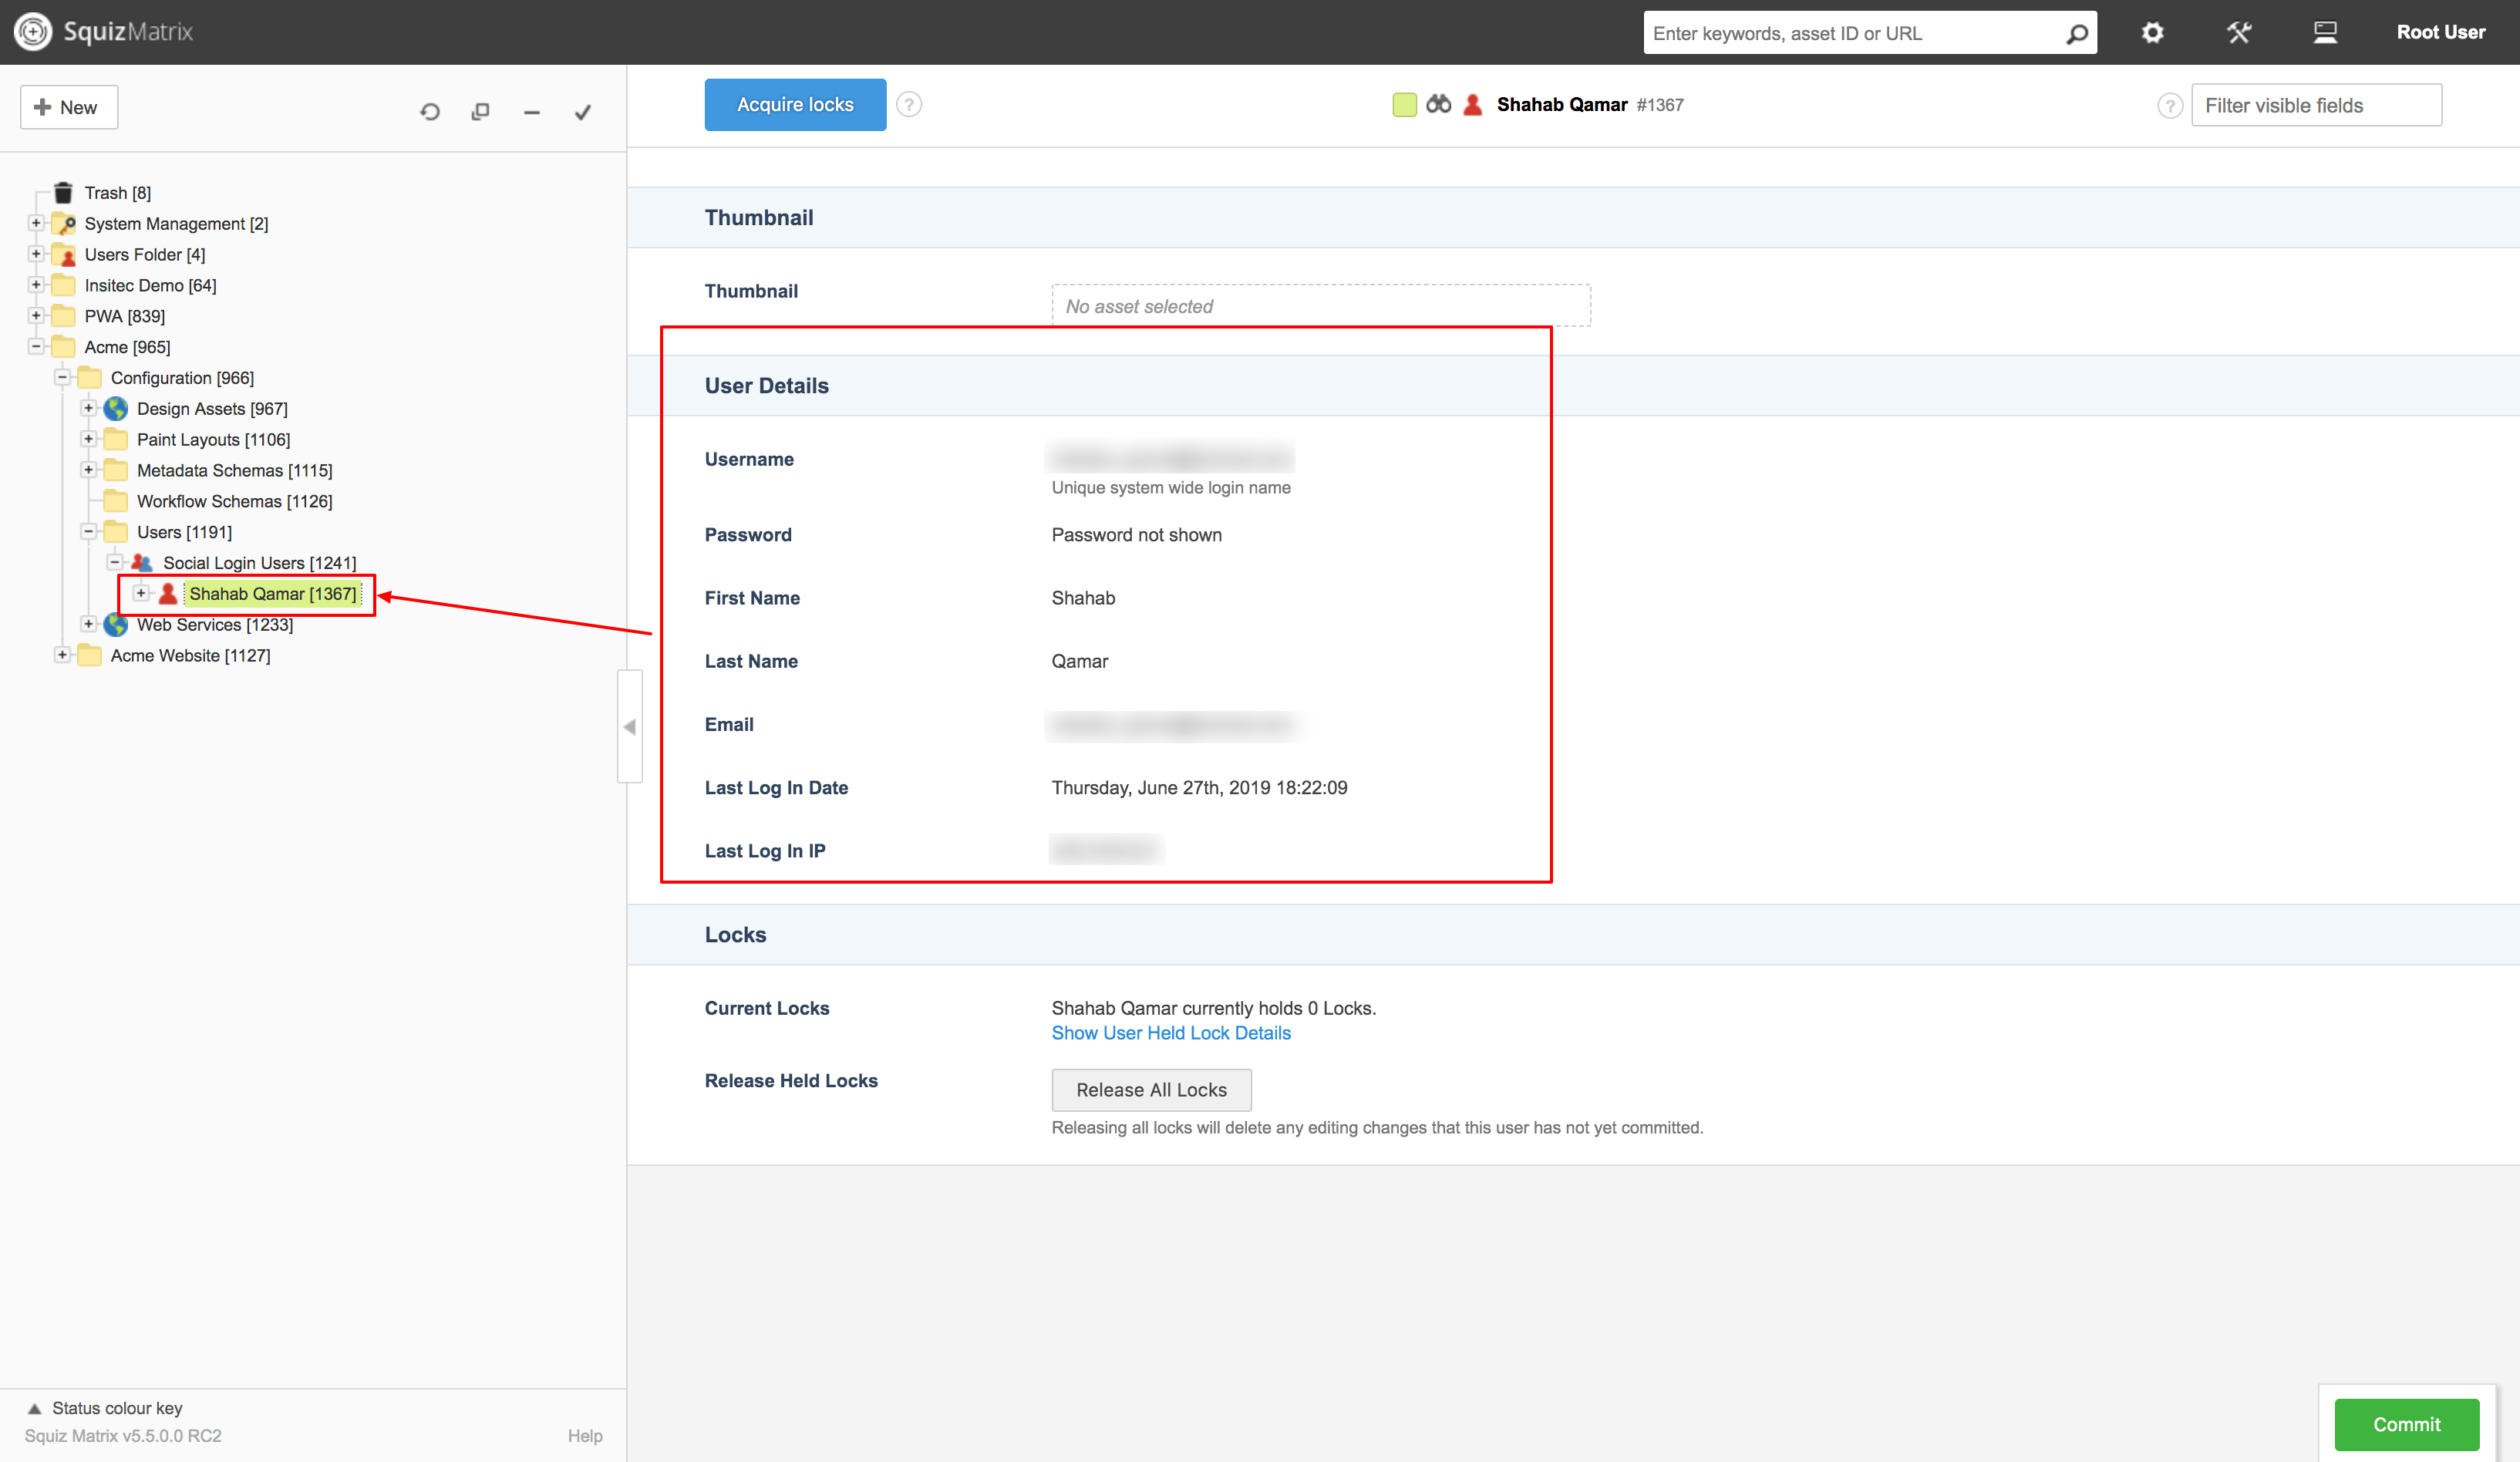
You should expect a new user created in the location specified in step 2.4.
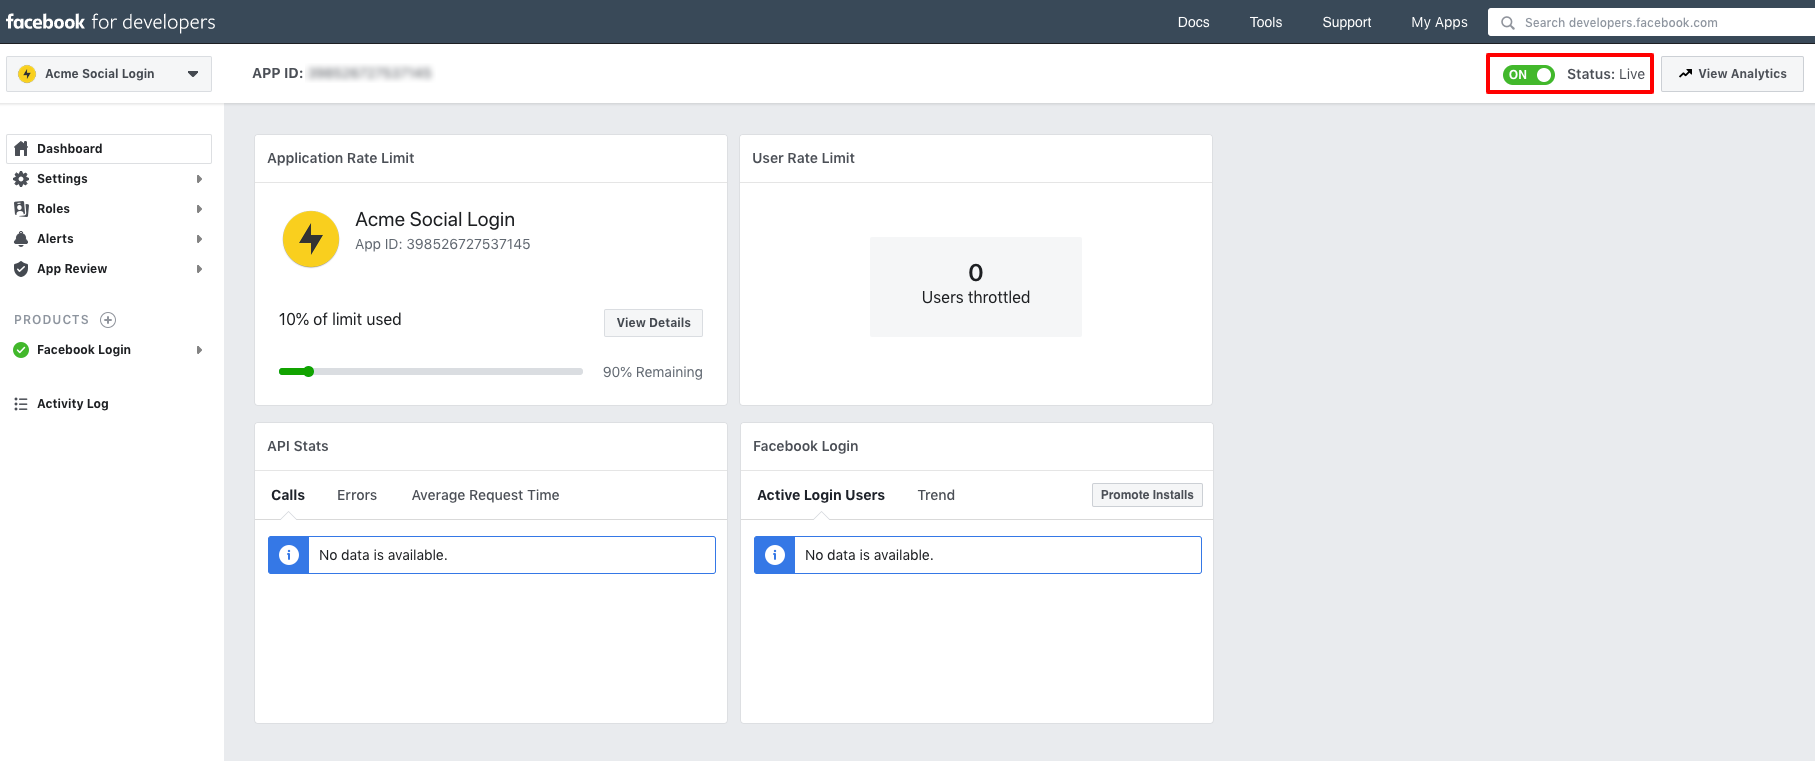
Make the Facebook login app live
When ready, take your Facebook login app live by flicking the status switch.
I don't want/like pop-ups, is there another way?
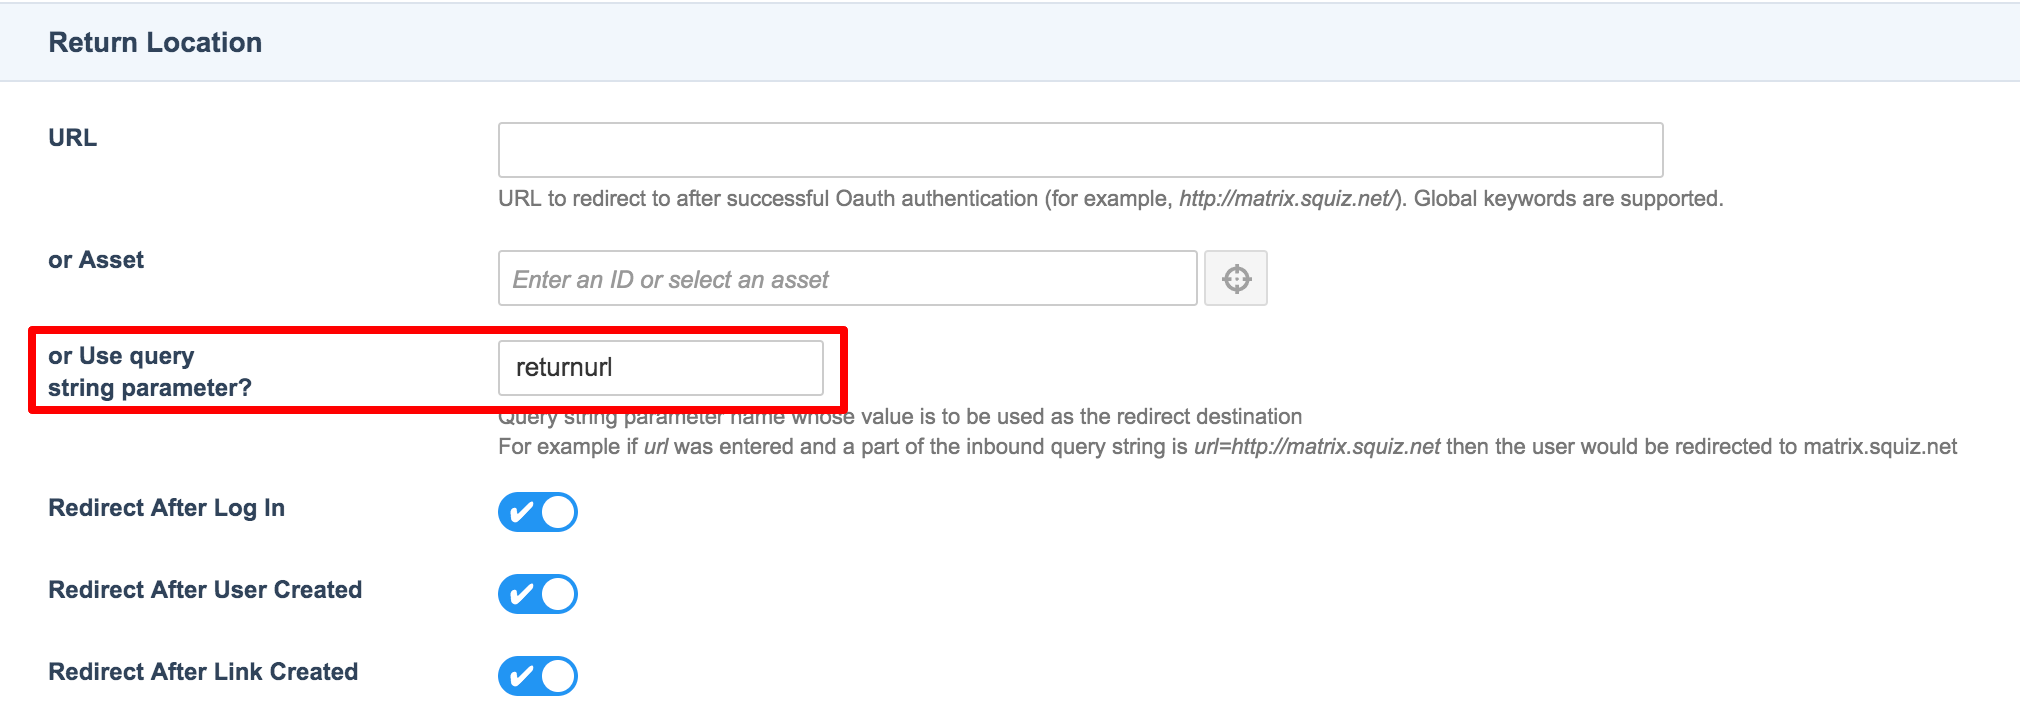
Yes. Lets refactor our Matrix setup to use a login-redirect instead of a popup. To achieve this, go to OAuth Account Manager asset i.e. Login with Facebook Details screen > Return Location and set the value for or Use query string parameter? to returnurl (is it an arbitrary value).
Lets delete the JS we added to the Logged in bodycopy of OAuth Account Manager asset i.e.Login with Facebook as we don't need to refresh the host page anymore.
Now go to the paint layout (or wherever you included the button code) and delete the popup JS code from there as we are ditching the popup. The updated button code should now look like this:
%begin_globals_user_is_logged_in%
   <strong>Logged in as:</strong>
   %globals_user_attribute_first_name% %globals_user_attribute_last_name%
   <a href="?SQ_ACTION=logout">(Logout)</a>
%else_globals%
   <a class="btn btn-primary" href="./?external-uuid=9c1089de-a7d1-42ab-8434-2f87882aec9c?returnurl=%frontend_asset_url%"> Login with Facebook</a>
%end_globals%
In the login href value, we are setting the returnurl query parameter to the current asset URL so we can return to original page after being taken to Facebook login.