OAuth 2 Token
Last Updated: 06 Jan 2017
The OAuth2 Token assets allows you to authenticate and store an OAuth 2.0 access token within Squiz Matrix, which can then be used in conjunction with other assets, such as the OAuth Account Manager, for OAuth integration within the system.
When the OAuth2 Token asset is accessed from the front-end, the system will redirect the user for OAuth 2.0 authentication. Once the user is successfully authenticated, the resulting access token will be stored within this asset.
When the asset is accessed again and this token is still valid, the stored token will be reused. If the token has expired, a new access token will be retrieved by either re-authentication or by using an available refresh token.
The Oauth2 2-legged Token asset works in a similar way, except the authentication is all done on the server side and doesn't require the user to get redirected and authenticate on the front end.
Once your OAuth2 Token asset is created, you can configure its settings on its associated asset screens.
In this chapter we will describe the Details screen, which is different for an OAuth2 Token asset.
Details Screen
OAuth 2.0 Settings
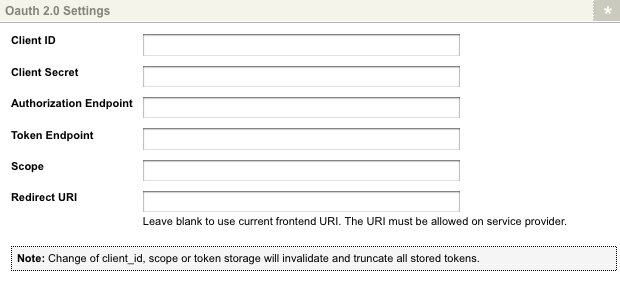
The OAuth 2.0 Settings section of the Details screen allows you to specify the details on the OAuth service provider, as well as configure where users will be redirected after the authorisation process is complete. The OAuth 2.0 Settings section is shown in the figure below.

The OAuth 2.0 Settings section of the Details screen
The fields available are as follows:
- Client ID: enter the client identifier provided to you by the authorisation service provider. This field is compulsory.
- Client Secret: enter the client secret provided to you by the authorisation service provider.
- Authorisation Endpoint: enter the authorisation endpoint URL for the authorisation service provider.
- Token Endpoint: enter the token endpoint URL for the authorisation service provider.
- Scope: enter your authentication scope string. This will determine the user information that can be accessed from the authorisation service provider.
- Redirect URI: enter the URI to redirect to after authorisation. If this field is left blank, the current frontend URI will be used. Please note that the URI must be allowed on the authorisation service provider.
The Oauth2 2-legged Token asset does not require the Authorisation Endpoint and Redirect URI field and are therefore not available on that asset's Details screen.
Advanced Settings
The Advanced Settings section of the Details screen allows you to specify the token and authorisation types of the access token, as well as define its parameter name. The Advanced Settings section is shown in the figure below.

The Advanced Settings section of the Details screen
The following options must be configured before the access token has been created and stored.
The fields available are as follows:
- Access Token URI Parameter Name: specify the parameter name for the access token, as indicated by the authorisation service provider. If you are unsure of the parameter name, use the default value of access_token.
- Authorisation Type: select the authorisation type for the access token, as indicated by the authorisation service provider. The authorisation types available are URI, Authorisation Basic and Form. If you are unsure of the authorisation type, use the default selection of URI.
- Access Token Type: select the access token type, as indicated by the authorisation service provider. The token types available are URI, Bearer and Oauth. If you are unsure of the authorisation type, use the default selection of URI.
Access Token
The Access Token section of the Details screen allows you to modify the way tokens are stored on the OAuth2 Token asset, as well as displaying the details of any access token that is currently being stored. The Access Token section is shown in the figure below.

The Access Token section of the Details screen
The following options must be configured before the access token has been created and stored.
In the Token Storage field, specify how the token should be stored. The following options are available:
- Session: store the access token in the session of the current user. This will mean that once the user logs out of the system, or the browser is closed, the token will be lost. By default, the access token will be stored using this option.
- Global Permanent: store the access token globally for all users as a permanent attribute. Please note that this storage option will require the user to have Write access to be able to refresh and store the access token.
- Per User Permanent: store the access token for the individual user permanently in the database.
The details of the OAuth2 token will be displayed in the Access Token field, including the token string, the date of expiry and whether or not a refresh token is available.
