CMIS Bridge
Last Updated: 17 Dec 2015
The CMIS Bridge is a connection bridge allowing you to retrieve files from a CMIS enabled SharePoint repository. These files will be imported into Squiz Matrix as system assets (such as Images, Text Files, etc.) under the CMIS Bridge. These assets can be edited, linked and moved around the system just like any other asset.
The CMIS Bridge currently only supports connections to Microsoft SharePoint 2010 document repositories with Basic Authentication enabled.
Bookmarks to the headings on this page:

The CMIS Bridge
Once created, you can configure the settings of the CMIS Bridge on its associated asset screens. These screens are often the same or similar to those for a Standard Page and are described in the Asset Screens manual. In this chapter, we will describe the Details screen, which is different for a CMIS Bridge.
Details Screen
The Details screen of a CMIS Bridge allows you to configure the asset. For more information about the Status, Future Status, Thumbnail and Details sections of this screen, refer to the Details chapter in the Asset Screens manual.
Connection Setup
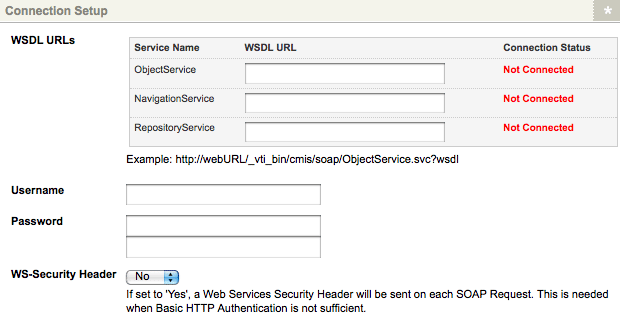
The Connection Setup section allows you to configure the connection to the CMIS compatible SharePoint repository. The Connection Setup section is shown in the figure below.

The Connection Setup section of the Details screen
The following fields are available:
- WSDL URLs: enter the WSDL URLs of the services of the CMIS server. The following WSDL URLs must be configured:
- ObjectService: enter the WSDL URL of the Object Service of the CMIS server. This service controls the functionality of individual objects on the repository, for example, uploading document objects to Squiz Matrix.
- NavigationService: enter the WSDL URL of the Navigation Service of the CMIS server. This service navigates the object hierarchy of the repository, displaying its documents and folders.
- RepositoryService: enter the WSDL URL of the Repository Service of the CMIS server. This service controls the functionality of the repository, such as creating the connection to the repository.
Tip: To connect to SharePoint subsite document libraries, include the subsite path in the "WebURL" component of the WSDL URLs.
e.g. http://www.example.com/site1/_vti_bin/cmis/soap/ObjectService.svc?wsdl - Username: enter the username to use to connect to the SharePoint server.
- Password: enter the password to use to connect to the SharePoint server. This password must be entered twice for validation purposes.
- WS-Security Header: select whether or not a Web Services Security Header will be sent on SOAP requests to the repository. This field may be required if basic HTTP authentication is not sufficient.
Synchronise Options
This section allows you to manage the results of the CMIS Bridge. The Synchronise Options section of the Details screen is shown in the figure below.

The Synchronise Options section of the Details screen
The following fields are available:
- Synchronise Now?: selecting this button and clicking Commit will synchronise Squiz Matrix with the connected CMIS enabled SharePoint repository. This synchronisation process will trash any old files under the CMIS Bridge (and their links), update any existing files that have been modified on the repository and create new files. Please note that updating files under the CMIS Bridge that are Live will place them Under Construction.
Tip: Assets under the CMIS Bridge are updated and created automatically by the Sync CMIS Bridges Scheduled Job, set to run on a nightly basis. You can change the frequency and time this job runs on its Details screen. For more information, refer to the Scheduled Jobs Manager chapter of the System Management manual.
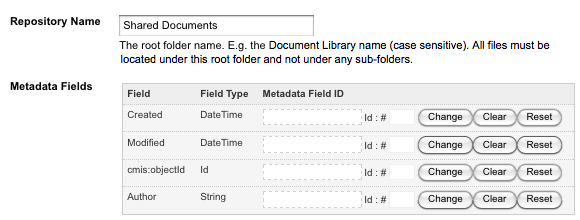
- Repository Name: enter the name of the repository to connect with on the CMIS Bridge. Any files to be imported on the CMIS Bridge should be direct children of this repository (i.e. not under sub-folders). Please note that the Repository Name is case-sensitive.
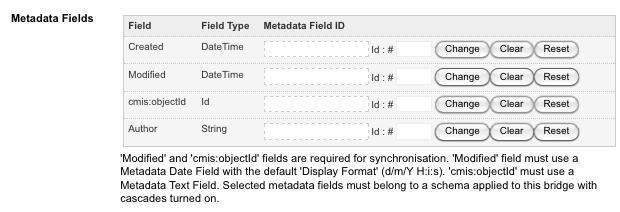
When a valid Repository Name is supplied to a connected CMIS Bridge, the Metadata Field options will appear, as shown in the figure below.

The Metadata Field options
The Metadata Field options allow you to specify metadata fields to map the CMIS properties of returned documents. These metadata fields must belong to a Metadata Schema applied to the CMIS Bridge, with cascading enabled.
The CMIS properties available for metadata mapping will depend on the document repository specified in the Repository Name field. Additional custom fields created for the document library will dynamically appear in this section and made available for metadata mapping.
The following CMIS properties require metadata mapping for synchronisation:
- Modified: select a Metadata Date Field with the default Display Format (d/m/Y H:i:s) to store the last modified date of returned documents.
- cmis:objectid: select a Metadata Text Field to store the CMIS ID of returned documents.
Example: Adding a CMIS Bridge
To create and configure a CMIS Bridge, follow the steps outlined below.
- Create a CMIS Bridge asset.
- On the Details screen, enter the ObjectService, NavigationService and RepositoryService WSDL URLs of the SharePoint server you want to connect to.
- Enter the Username and Password of your SharePoint server.
- In the Repository Name field, enter the name of the document library to bridge to. Please note that this field is case-sensitive.
- Click Commit. The Metadata Fields set up section will be displayed, as shown in the figure below.

The Metadata Field settings for the specified repositoryWe need to specify metadata fields to map the Modified and cmis:objectid properties of returned documents. These are required on the CMIS Bridge before it can be synchronised.
- In the Modified field, select a Metadata DateTime Field of a Metadata Schema applied to the CMIS Bridge. This field will be used to store the last modified date of returned documents.
- In the cmis:objectid field, select a Metadata Text Field of a Metadata Schema applied to the CMIS Bridge. This field will be used to store the CMIS ID of returned documents.
Tip: You can select additional metadata fields to map the remaining property fields of the document repository.
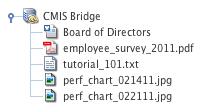
Select the Synchronise Now button and click Commit. The files of the specified repository will be imported into Squiz Matrix as fully functional system assets, as shown in the figure to the right.
A CMIS Bridge asset
Now that the CMIS Bridge has been created and synchronised with a CMIS compatible SharePoint repository, you can use the repository documents within your system.
