
Admin Mode
Last Updated: 29 May 2020
Admin Mode allows you to use all of the functionality available within Squiz Matrix. The functions that are available to a user will depend on the account type of the user.
For example, a Backend User can only perform certain actions, such as edit the content of pages and add new pages to a site. A System Administrator, however, has access to most system functions.
The Admin Mode Interface
You can access Admin Mode by appending _admin to the URL of an asset, like so:
http://www.example.com/site/_admin
The interface is broken up into three major sections:
- The Asset Map on the left side of the screen.
- The editing/properties section on the right side.
- The tool bar at the top.

The tool bar at the top of the screen contains the user's login details, the Quick Search tool and a number of tools that can be used for assistance when using the system.
The options available to users, on the right side of the toolbar, will depend on the level of access the user has been granted. For example, in the example above, the Root User is logged into the system; therefore, all the options are available. A Backend User, however, would only be able to see four of these options.
The Asset Map contains a list of all of the assets in the system. It also has a My Account tab, which allows you to access your Inbox as well as change your account details.
The editing/properties screen contains an info bar, asset navigation history, and displays the editing screens for an asset. The info bar displays information about the asset currently being viewed and allows you to print the screen.
Tool Bar
The tool bar at the top of the screen contains the user's login details, the Quick Search tool and various tools to help you edit your Site.
Log in Details
When you log into Admin Mode, your full name will be displayed on the left side of the tool bar.

If you have not entered your name into your account details, your username will be displayed instead. For more information on how to change your account details, refer to the My Account chapter in this manual.
Quick Search
The Quick Search tool allows you to search for an asset in the system. This tool allows users to search by keyword, asset ID or URL. The Quick Search tool is available on the right side of the tool bar,.

To make a search, enter one or more search terms within the Quick Search field and click the search button. Quick Search will search all standard asset fields (e.g. Page Name, Short Name), as well as the page content and metadata values of each asset in the system.
For keyword searching to work, indexing must be enabled on the Search Manager. For more information on how to do this, refer to the Search Manual.
The results of your search will be displayed in a pop-up.

The number of assets that have been found is listed at the top of the search results. You can navigate through each page of results using the arrows available. Clicking on a result will take you to the Details screen for that particular asset.
If you know the asset ID or URL of the asset you are searching for, entering it into the Quick Search field will take you directly to the Details screen of that asset.
If no results are found on either a keyword, asset ID or URL search, a pop-up will appear, indicating that the search failed.

System Configuration
This button only appears for System Administrators and the Root User. When you click this button, the System Configuration screen will appear in the editing screen. You can use the list in the info bar to navigate to the other screens available in this section.

For more information on the System Configuration section and the screens that are available, refer to the System Configuration manual.
Tools
This button appears for Backend Users, System Administrators and the Root User. Various tools are available from this screen such as Global Search and Replace, Mass Clone and Asset Sorting.
For more information on the Tools that are available in the system, refer to the Tools manual.
HIPO Herder
This button appears for Backend Users, System Administrators and the Root User. The HIPO Herder allows you to view the HIPO jobs that are currently running or are stalled within the system.
For more information on the HIPO Herder, refer to the HIPO Herder chapter in this manual.
System Maintenance
This button appears for System Administrators and the Root User. Various reports are available from this screen such as the Most User Asset Types Report and the Total Assets Report.
For more information on the reports that are available, refer to the Reports manual.
Asset Types

This screen displays a family tree of all the asset types that are available in Squiz Matrix. For example, the Asset is the parent of the Bodycopy asset. At the same time, the Bodycopy asset is the parent of the Simple Edit Layout,Multiple Page Page, and Paint Layout Bodycopy assets.
This family tree is useful when selecting asset types on listing assets such as an Asset Listing or Search Page. For example, when creating a list of all the files on your site, you can select the File asset type and use the inherit option. This option means that the listing asset will also list the child types of the File asset type. From the Asset Types tree, you can see that these children include all the file assets, such as MS Word Documents, Text Files and Images.
For more information about the Asset Listing and the What's New page, refer to the Asset Listing manual.
Login As
This button appears for System Administrators and the Root User. Clicking this button allows you to log in as another user's account. This can be useful when providing technical support for your users.
For more information on the Login As function, refer to the Users and Permissions manual.
Logout
This button will log you out of Squiz Matrix. Click this button when you have finished working within the system and want to close your logged in session.
Editing Screen
The editing screen appears on the right hand side of Admin Mode. This is the area where all of the editing of an asset happens.
Info Bar
The info bar is broken up into three sections. These include the asset information section, the asset menu, and the print button.

Asset Information
The asset information section lists the information related to the current asset being viewed in the editing screen. The first section displays the type of asset you are currently viewing. In the example above, the user is currently viewing a Standard Page asset.
The second section displays the name of the asset, its asset ID and its version number. To find the asset in the Asset Map, click on the  icon. For further information about the asset, hover your mouse over the
  icon which will show the More Info pop-up:

The final section displays the editing screen you are currently viewing for the asset.
Asset Menu

This asset menu lists all the screens that are available for the asset that you are currently viewing. This menu is the same menu that appears when you right click on the name of the asset. It allows you to navigate to other screens without having to use the Asset Map.
For example, if you are on the Details screen of an asset and you want to edit its content, you can select Edit Contents from this list instead of using the Asset Map.
For more information on how to access this menu in the Asset Map, refer to the Using the Asset Map chapter in this manual.
Print Button
The Print button will simply open up your browser's print function and allow you to print the current screen you are viewing.
Asset Navigation History
The Navigation History at the top of the editing screen shows the last five assets you viewed in the editing screen.

You can click on any of the assets in this list to navigate to that asset in the editing screen.
Once you select an asset in this list, the list reverts to the assets that were listed when you were working on that asset previously.
For example, if you had previously navigated to the following assets:
Page1 → Page2 → Page3 → Page4 → Page5 → Page6 → Page7 → Page8 → Page9 → Page10
The list will display the following five assets:
Page1 → Page2 → Page3 → Page4 → Page5 → Page6 → Page7 → Page8 → Page9 → Page10
If you then selected Page6, the list would then display the following five assets:
Page1 → Page2 → Page3 → Page4 → Page5 → Page6 → Page7 → Page8 →Page9 → Page10
Acquire Locks and Release Locks
At the top of the editing section, a button called Acquire Locks will appear.

Before you can edit the contents of an asset, you need to acquire its locks. This will stop other people from editing the asset at the same time as you. If you do not have permission to edit this asset or someone else is currently editing the asset, then the Acquire Locks button will not appear on the screen, as shown below:

To acquire the locks for the screen and all of its editing fields, click on the Acquire Locks button.
The keyboard shortcut for Acquire Locks is Alt + A in Windows or Ctrl + A on a Mac.
The fields on the screen will now be editable and the Acquire Locks button will change into Release Locks.

You will continue to have the lock on the asset while you are editing its content. When you are no longer editing the asset, by default, the lock will expire after 10 minutes. This means that you will no longer have the lock on an asset and someone else will be able to make changes to it.
You can also choose to manually release the lock by clicking the Release Locks button. This is useful if you know somebody else is waiting to edit the asset.
The keyboard shortcut for Release Locks is Alt + R in Windows or Ctrl + R on a Mac.
At times, both the Acquire Locks and Release Locks buttons will be shown.

This means that you have some of the locks on the asset but you need further locks to edit this screen. You will still need to click on the Acquire Locks button before you edit the screen.
Lock Refreshing
When locks are held on a screen, they will automatically be refreshed as long as you are active on that screen.
If you are inactive on a screen for a certain period of time, the locks will automatically be released and you will see a message saying that the locks have been lost.
You can try and re-acquire the locks from this point, but only if the asset hasn't been updated by someone else in the meantime or the locks acquired by another user.
If you are on the Details screen of an asset and you have the locks, the locks can automatically be released for you if there is a scheduled job that runs in the background that changes the asset's status (the Set Future Status Scheduled Job). This means that the asset has been updated in the background and you need to refresh the screen in order to make further edits.
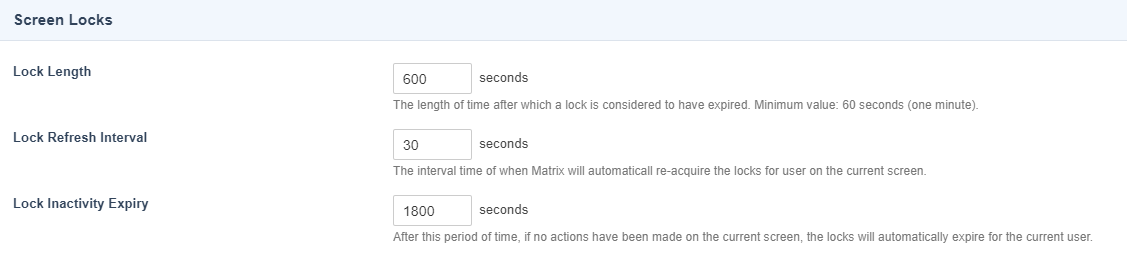
The various time lengths of how long locks are held and refreshed, can set via the System Configuration screen by a system admin user.
Show Lock Details
When you click this link, a list of the currently held locks will be displayed. This list details the lock type, the user who holds the lock and when the lock expires.

If you do not have access to edit the asset, an access denied message will be displayed instead.

Stealing Locks
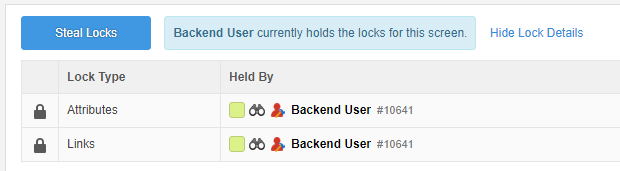
If you are loged in as a System Administrator or Root User, you have the ability to Steal locks from other Backend Users.
For example, if a Backend user has the locks on the Details screen of an asset and you view that screen, you will be presented with a button to Steal the user's locks.
If you then click on the Steal Locks button, a pop-up window will appear with more information about which assets the other user has locks on. This will warn you as well to make sure you understand that any changes that that user is currently doing to those assets will be lost if the locks are stolen.
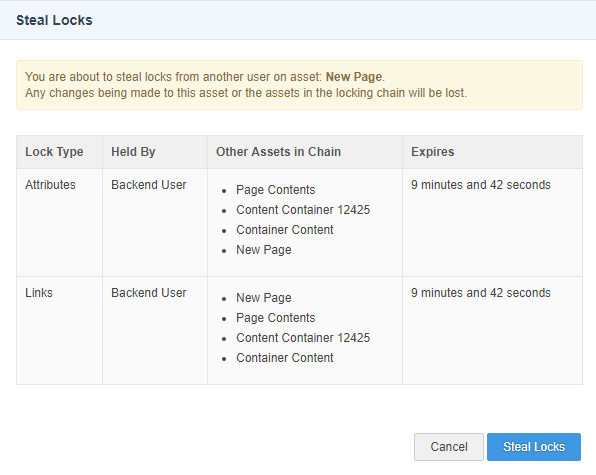
Once you click on the Steal Locks in this pop-up window you will then Acquire those locks and be able to edit the asset.
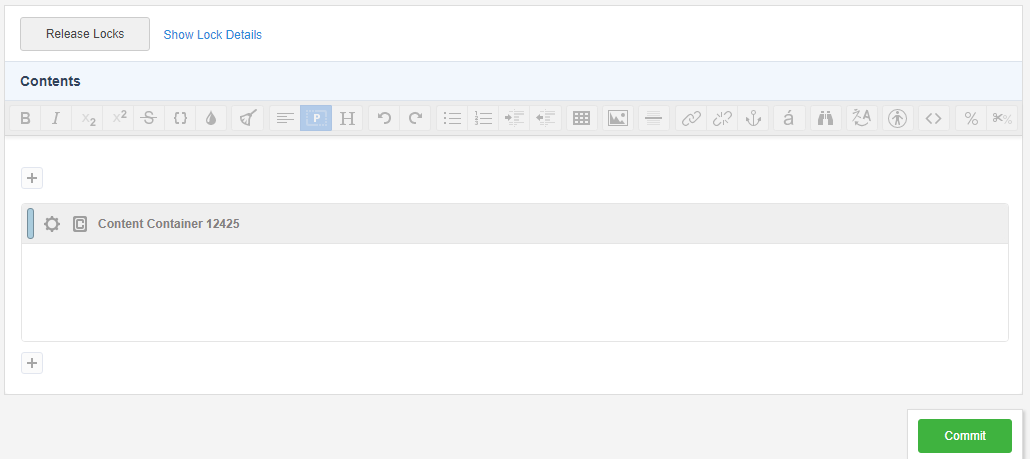
Commit
By default, a Commit button will be displayed in the bottom right corner of the editing section and is visible on the page as you scroll down the screen. This button will only appear once you have the locks on the current screen.
When you are editing an asset, you will need to save your changes by clicking the Commit button. If you leave the screen or perform another task without saving your changes, a warning message will appear.

If you want to save your changes, click the Cancel button, otherwise, click OK to continue and disgard any changes you have made.
The keyboard shortcut for Commit is Alt + S in Internet Explorer on Windows, Alt + Shift + S in Firefox on Windows or Ctrl + S on a Mac.
Asset Finder Field
The asset finder field allows you to select an asset to use from the Asset Map. This asset finder field allows you to select which asset to use for a particular editing field.

To select an asset in this field, click the Change button – the Asset Map on the left hand side of the screen will turn purple.
Right click on the appropriate asset and select Use Me. The Name and Asset ID of this asset will then appear in the field. Alternatively, you can enter the asset ID of the asset you want to use, directly into the second field.
Asset Map and My Account
The Asset Map is located on the left hand side of the screen. It shows a list of all of the available assets in your system.
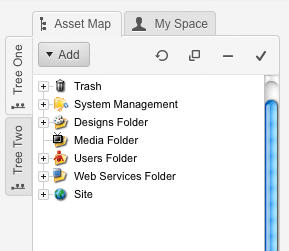
You can also add, move, link, clone and delete assets using the Asset Map.
The Asset Map also contains a My Account tab. This tab allows you to view your Squiz Matrix Inbox and change your account details.
For more information on the Asset Map and My Account, refer to the Using the Asset Map and My Account chapters in this manual.