Numeric Question Type
Last Updated: 17 Dec 2015
![]()
The Numeric question type
The Numeric question type allows the user to enter a numeric value only.
Bookmarks to the headings on this page:
Details Screen
The Details screen allows you to configure the settings of the Numeric question.
Question Options
This section allows you to customise the options for the Numeric question. The Question Options section is shown in the figure below:
The Question Options section
The following fields are available:
-
Title: enter the question title, for example Phone Number. When you change the Title of the question, the asset name will change in the Asset Map, as shown in the figure to the right. This Title will appear on the Custom Form as the name of the question.
The question asset - Note: enter a note to be displayed for the question on the Custom Form. This can be used to provide information to your users about the question and the expected form of the response. For example Please enter your phone number.
- Input Type: specify the input type of the response field. When using a HTML5 compatible browser, the input field will provide specific interfaces to suit the specified the field type. The input types available are:
- Number
- Text
By default, the input type will be set to 'Text'. - Default Value: enter the default value for the question. This will be displayed within the answer field on the form. The user can then override this value.
- Placeholder: enter a placeholder value, i.e. a short hint describing the expected value of the input field. The value entered into this field will be displayed in the input field before the user enters a value.
Internet Explorer users should note that the placeholder attribute is currently only supported in IE10 and above.
- Width: enter the width of the text field to be displayed on the Custom Form. By default, this value is 30.
- Height: enter the number of rows for the question. By default, this value is 1 meaning that the field on the form will be one row. If 2 or more is entered, the text field changes into a multiple line box.
- Maximum Length: enter the maximum number of characters that can be entered by the user. If this value is bigger than the Width, the visible portion of the field scrolls as the user types into the field. By default, this value is 300.
- Tab Index: enter the tab index for the Text question on the Custom Form. This index is used when the user press the Tab key on the keyboard. This is useful when you have laid out each question individually on the Page Contents Bodycopy. If this question is the first question on the Custom Form, but on the Page Contents Bodycopy you have put it last, you can enter the Tab Index so that when the user presses the Tab key, it will be the last question the cursor goes to.
- Extras: enter any additional HTML attributes to be added to the tag used to display the answer field for the question. For example, you may wish to specify a CSS class that defines the formatting of the question text.
- Sticky: select Yes to define the answer to this question as sticky for the remainder of this users session. If this option is set to Yes, the most recent value entered into this question is marked as sticky and will be used to pre-fill other forms with a question of the same name that also have the Sticky flag set to Yes. Any sticky value will override the default value for the question.
Simple Validation Rules
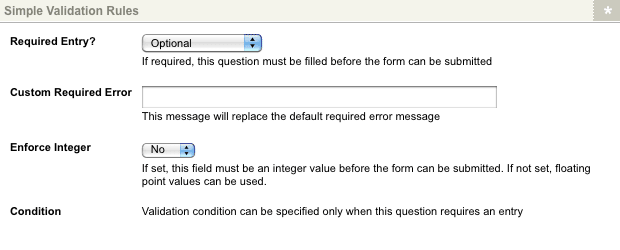
The Simple Validation Rules section of the Details screen is shown in the figure below.

The Simple Validation Rules section
The first part of this section allows you to select whether or not this question is mandatory. For more information on the Required Entry and Custom Required Error fields, refer to the Questions chapter in this manual.
The Enforce Integer field allows you to specify whether or not the value that the user enters needs to be an integer (for example 3) rather than a floating-point value (for example 3.99).
The Condition field allows you to add a condition on the validation rule. For more information, refer to the Questions chapter in this manual.
Complex Validation Rules
The Complex Validation Rules section of the Details screen allows you to add additional validation rules to the select question. For more information on how to add a rule, refer to the Questions chapter in this manual.
The complex validation rules that are available for the select question are as follows:
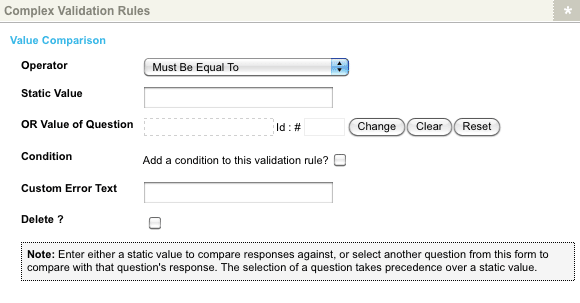
- Value Comparison: this rule allows you to specify that the answer entered must be or must not be equal to the value specified. You can enter either a string value or select a question from the Custom Form for the value to compare to. The fields that are available for this rule
are shown in the figure below.
The fields that can be set up are as follows:
The Value Comparison Complex Validation Rule- Operator: select from Must be equal to, Must NOT be equal to, Must be greater than, Must be less than, Must be greater than or equal to or Must be less than or equal to.
- Static Value: enter the value for the comparison.
- OR Value of Question: select the question from the form that the answer must or must not equal.
- Condition: this field allows you to add a condition on the validation rule. For more information, refer to the Questions chapter in this manual.
- Custom Error Text: enter a customised error message to show on the form if this rule fails. If you do not enter an error message, a default message will appear similar to The response to "Name" must be equal to "a".
- Delete?: to delete this validation rule, click the Delete check box and click Commit.
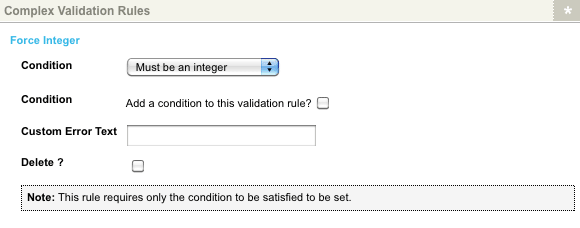
- Force Integer: this rule allows you to specify that the number that is entered must be or must not be an integer. The fields that are available for this rule are shown in the figure below.
The fields that can be set up are as follows:
The Force Integer Complex Validation Rule- Condition: select from Must be an integer or Must not be an integer.
- Condition: this field allows you to add a condition on the validation rule. For more information, refer to the Questions chapter in this manual.
- Custom Error Text: enter a customised error message to show on the form if this rule fails. If you do not enter an error message, a default message will appear similar to The response to question "Phone Number" must be a valid integer value.
- Delete?: to delete this validation rule, click the Delete check box and click Commit.
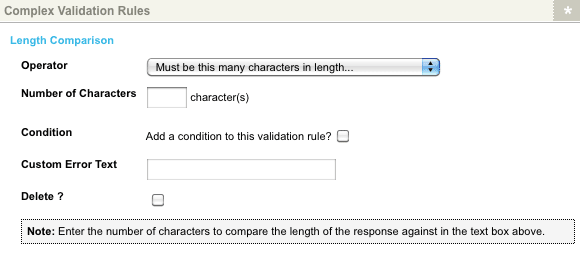
- Length Comparison: this rule allows you to specify that the length of the answer entered must be a certain number of characters. For example, if this question is for a mobile phone number it must be at least 10 characters long. The fields that are available for this rule are shown in
the figure below.
The fields that can be set up are as follows:
The Length Comparison Complex Validation Rules- Operator: select from Must be this many characters in length, Must not be this many characters in length, Length must be greater than this many characters, Length must be less than this many characters, Length must be at least this many characters, or Length must be no more than this many characters.
- Number of characters: enter the number of characters the value must or must be.
- Condition: this field allows you to add a condition on the validation rule. For more information, refer to the Questions chapter in this manual.
- Custom Error Text: enter a customised error message to show on the form if this rule fails. If you do not enter an error message, a default message will appear similar to The length of the response to "Phone Number" must be 4 character(s).
- Delete?: to delete this validation rule, click the Delete check box and click Commit.
