Select Question Type
Last Updated: 17 Dec 2015

The Select question type
The Select question type allows a user to select a value from a drop down list.
Bookmarks to the headings on this page:
Details Screen
The Details screen allows you to configure the settings of the Select question.
Question Options
This section allows you to customise the options for the Select question. The Question Options section is shown in the figure below:
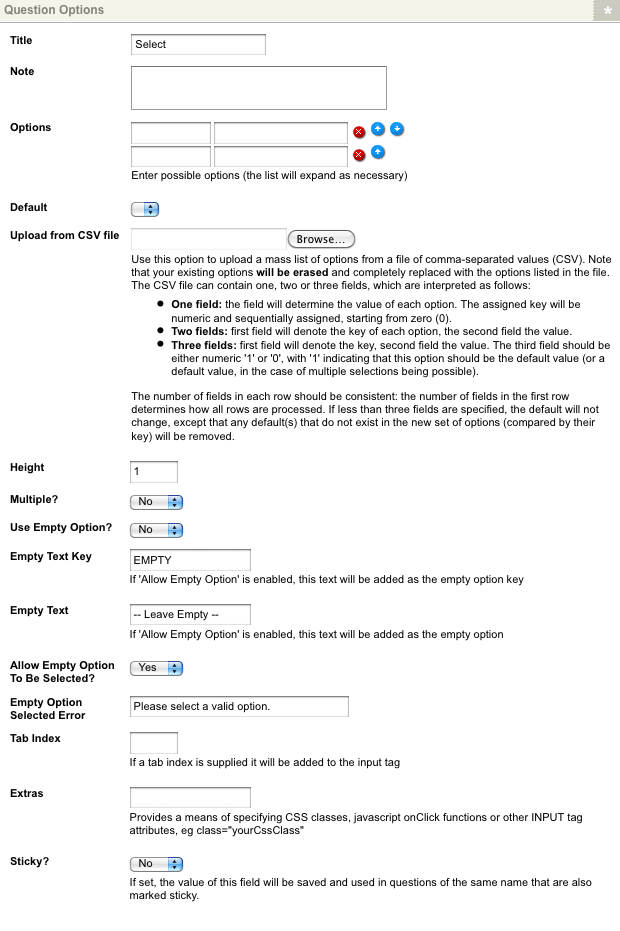
The Question Options section
The following fields are available:
-
Title: enter the question title, for example State. When you change the Title of the question, the asset name will change in the Asset Map, as shown in the figure to the right. This Title will appear on the Custom Form as the name of the question.
The question asset - Note: enter a note to be displayed for the question on the Custom Form. This can be used to provide information to your users about the question and the expected form of the response. For example Please select a state from the list.
-
Options: this section shows the values that have been added to the list and allows you to add new ones, delete existing ones or re-order the list. To add a new value to the list, click within a blank box, enter the value and click Commit. For example, enter NSW, QLD, ACT, VIC, TAS, NT, SA and WA and click Commit. You can enter as many options as you want at the same time and there is no limit to the number of options you can add to the list.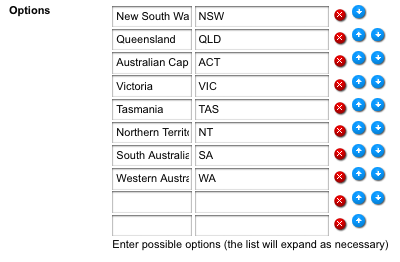
The Options fieldTo delete an option from the list, click the
 icon to the right of the text box. To re-order the list click on the up and down arrows and click Commit. If you do not click Commit the new
order will not be saved.
 - Default: select a default value for the list on the Custom Form. You will only be able to select a default value once you have specified the options for the list and clicked Commit. This value will be selected within the answer field on the form. The user can then override this value.
- Upload from CSV file: select a comma-separated values (CSV) file from your computer to automatically input the options for the select questions. This is useful for batch uploading a number of options or if you are importing an existing Select Form question's options. The CSV file can have up to three fields, with the first determining the key of each option, the second determining the value of each option and the third indicating if the option is the default value (1 for yes, 0 for no). An uploaded CSV file will overwrite any current options already inputted.
-
Height: enter the height for the list. This height determines the number of rows that are visible at a time. For example, if 3 were entered for the Height, 3 rows will be visible on the Custom Form, as shown in the figure to the right.
The Height option -
Multiple: specify whether or not to allow users to select multiple values from the list. If you select Yes, a box will appear on the Custom Form where the user can hold down the Shift key or Ctrl key to select multiple values. If you select No, the user can only select one value from the list.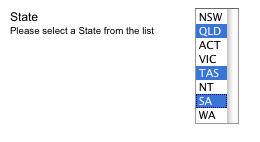
The Multiple option -
Use Empty Option?: specify whether or not to display an empty option on the list. If you select Yes, by default -- Leave Empty -- will appear in the list. You can change this in the Empty Text field below.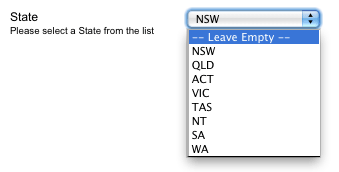
The Allow Empty option - Empty Text Key: enter the key for the empty option in the list. By default, this will be EMPTY. This option will only be applied if Use Empty Option is set to Yes.
- Empty Text: enter the text to show for the empty option in the list. By default, this option will say -- Leave Empty --. This option will only be applied if Use Empty Option is set to Yes.
- Allow Empty Option to be Selected?: specify whether or not users can submit the empty option selection on this question. If this field is disabled, users will be forced to select a valid answer. This option will only be applied if Use Empty Option is set to Yes.
- Empty Option Selected Error: enter the error text to be displayed when the Allow Empty Option to be Selected? field is disabled and the user attempts to submit their form, having selected the empty option on this question. By default, this will read Please select a valid option. This setting will only be applied if the Allow Empty Option to be Selected? field is disabled.
- Tab Index: enter the tab index for the Select question on the Custom Form. This index is used when the user press the Tab key on the keyboard. This is useful when you have laid out each question individually on the Page Contents Bodycopy. If this question is the first question on the Custom Form, but on the Page Contents Bodycopy you have put it last, you can enter the Tab Index so that when the user presses the Tab key, it will be the last question the cursor goes to.
- Extras: enter any additional HTML attributes to be added to the tag used to display the answer field for the question. For example, you may wish to specify a CSS class that defines the formatting of the question text.
- Sticky: select Yes to define the answer to this question as sticky for the remainder of this users session. If this option is set to Yes, the most recent value entered into this question is marked as sticky and will be used to pre-fill other forms with a question of the same name that also have the Sticky flag set to Yes. Any sticky value will override the default value for the question.
Complex Validation Rules
The Complex Validation Rules section of the Details screen allows you to add additional validation rules to the select question. For more information on how to add a rule, refer to the Questions chapter in this manual.
The complex validation rules that are available for the select question include the Regular Expression, Value Comparison, Numeric Value, Text Found In, Text Contains, Length Comparison, Valid Email, Value Begins With and Value Ends With rules. These rules are similar to the complex validation rules that are available for the Text question type. For more information on these rules, refer to the Text Question Type chapter in this manual.
The complex validation rules unique on the select question are as follows:
- Selection Limit: this rule allows you to validate how many options the user must select from the list. For example, if you want the user to select two options from the list, select Must select more than this many options in the Operator field and enter 2 into the Number of Options.
When the user fills out the Custom Form, if they have not selected two options they will receive an error message. The fields that are available for this rule are shown in the figure below.
The fields that can be set up are as follows: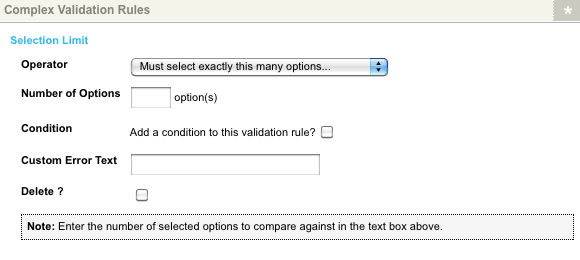
The Selection Limit Complex Validation Rule- Operator: you can select from Must select exactly this many options, Must not select exactly this many options, Must select more than this many options, Must select less than this many options, Must select at least this many options, or Must select no more than this many options.
- Number of Options: enter the number of options that must either be selected or not selected for the rule.
- Condition: this field allows you to add a condition on the validation rule. For more information, refer to the Questions chapter in this manual.
- Custom Error Text: enter a customised error message to show on the form if this rule fails. If you do not enter an error message, a default message will appear similar to You have selected 1 option(s) at question "State" - you must select more than 2.
- Delete?: to delete this validation rule, click the Delete box and click Commit.
