Using an Ecommerce Form Page
Last Updated: 12 Aug 2016
The following example will create an e-commerce system using an Ecommerce Form Page. The e-commerce system will contain an Asset Listing of fruit that is for sale and a SecurePay Direct Post Payment Gateway to allow users to pay for their purchases. The items in this store will be created as Standard Page assets and tax and location-based delivery fees will be charged on each item.
Bookmarks to the headings on this page:
- Setting Up the Ecommerce Form Page
- Setting Up the Form Questions
- Adding the E-Commerce Items
- Setting Up the E-Commerce Items
- Creating the Item Asset Listing
- Configuring the Tax Rate and Asset Purchase Source Strings
- Setting Up a Payment Gateway
- Creating an E-commerce Rule
- Configuring the Recipient Email
- Display Formatting of the Ecommerce Form Page
- Defining the Layout of the Ecommerce Form Page
- How Does this E-Commerce System Work for a Public User
- Final Steps
Tip: Remember that you must Commit any asset changes that you make.
Setting Up the Ecommerce Form Page
- Add an Ecommerce Form Page under your Site in the Asset Map, titled Order Form.
- Right click on the Ecommerce Form Contents asset in the Asset Map and select the Form Contents screen. The fields on this screen are similar to those on the Form Contents screen of a Custom Form.
- Create a new Section under the e-commerce form, called Delivery Details. A Section asset will appear in the Asset Map.
- Add six questions to the Delivery Details section: two text type questions, a select type question, two numeric type questions and an email Address type question.
These questions will appear on the Details screen of the Delivery Details section, as shown in the figure below.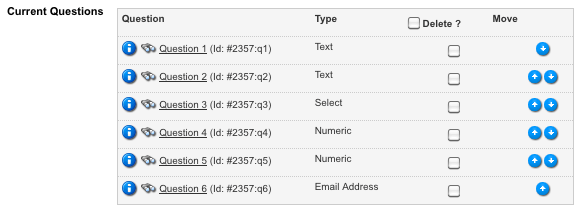
Questions on the Ecommerce Form Page
Setting Up the Form Questions
Name Question
To set up the Name question:
- Right click on the Question 1 (text type) asset under the Delivery Details section in the Asset Map and select the Details screen.
- In the Title field, enter Name.
- In the Required Entry field, select Required. This will mean that users will be required to answer this question on the form.
- Click Commit. The name of the asset in the Asset Map will change to Name.
Address Question
To set up the Address question:
- Right click on the Question 2 (text type) asset under the Delivery Details section in the Asset Map and select the Details screen.
- In the Title field, enter Address.
- In the Height field, enter 3. This will display a multi-line text field on the form for this question.
- Click Commit. The name of the asset in the Asset Map will change to Address.
State/Territory Question
To set up the State/Territory question:
- Right click on the Question 3 (select type) asset under the Delivery Details section in the Asset Map and select the Details screen.
- In the Title field, enter State/Territory.
- In the Options field, enter the following options into the fields provided: QLD, NSW, ACT, VIC, TAS, NT, SA and WA.
- In the Allow Empty Option field, select No. This will mean that users will be required to select a state or territory.
- Click Commit. The name of the asset in the Asset Map will change to State/Territory.
Postcode Question
To set up the Postcode question:
- Right click on the Question 4 (numeric type) asset under the Delivery Details section in the Asset Map and select the Details screen.
- In the Title field, enter Postcode.
- In the Width field, enter 4. This will mean that the question field will be four characters wide.
- In the Maximum Length field, enter 4. This will mean that users will only be able to enter up to four characters in this field.
- In the Required Entry field, select Required. This will mean that users will be required to answer this question on the form.
- Click Commit. The name of the asset in the Asset Map will change to Postcode.
Contact Number Question
To set up the Contact Number question:
- Right click on the Question 5 (numeric type) asset under the Delivery Details section in the Asset Map and select the Details screen.
- In the Title field, enter Contact Number.
- In the Width field, enter 10. This will mean that the question field will be ten characters wide.
- In the Maximum Length field, enter 10. This will mean that users will only be able to enter up to ten characters in this field.
- In the Required Entry field, select Required. This will mean that users will be required to answer this question on the form.
- Click Commit. The name of the asset in the Asset Map will change to Contact Number.
Email Question
To set up the Email question:
- Right click on the Question 6 (email address type) asset under the Delivery Details section in the Asset Map and select the Details screen.
- In the Title field, enter Email.
- In the Required Entry field, select Required. This will mean that users will be required to answer this question on the form.
- Click Commit. The name of the asset in the Asset Map will change to Email.
Adding the E-Commerce Items
- Create a Folder under your Site, titled Items.
- Underneath this folder, add five Standard Page assets titled Apple, Orange, Peach, Pear and Watermelon.
Once you have done this, the five assets will appear in the Items Folder in the Asset Map, as shown in the figure to the right. These assets will act as the items on our e-commerce store.
To set up these items, a Metadata Schema must be applied to the Items Folder with the price and taxation information. - Create a Metadata Schema under your Site, titled Item Information.
- Add a section to the Metadata Schema and two Text fields titled Price and Taxability.
- Apply the Metadata Schema to the Items Folder and its children.
Setting Up the E-Commerce Items
Apple Item
To set up the Apple item:
- Right click on the Apple item asset under the Items Folder in the Asset Map and select the Metadata screen.
- In the Price metadata field, enter 1.75.
- In the Taxability metadata field, enter YES.
Orange Item
To set up the Orange item:
- Right click on the Orange item asset under the Items Folder in the Asset Map and select the Metadata screen.
- In the Price metadata field, enter 1.49.
- In the Taxability metadata field, enter YES.
Peach Item
To set up the Peach item:
- Right click on the Peach item asset under the Items Folder in the Asset Map and select the Metadata screen.
- In the Price metadata field, enter 2.65.
- In the Taxability metadata field, enter YES.
Pear Item
To set up the Pear item:
- Right click on the Pear item asset under the Items Folder in the Asset Map and select the Metadata screen.
- In the Price metadata field, enter 2.35.
- In the Taxability metadata field, enter YES.
Watermelon Item
To set up the Watermelon item:
- Right click on the Watermelon item asset under the Items Folder in the Asset Map and select the Metadata screen.
- In the Price metadata field, enter 2.99.
- In the Taxability metadata field, enter YES.
Creating the Item Asset Listing
To list items on a Site, allowing users to browse and purchase items, an Asset Listing Page needs to be added.
To do this:
- Create an Asset Listing Page under your Site, titled Buy Our Fruit.
- On the Details screen, select Standard Page in the Asset Types to List field.
- In the Root Node field, select the Items Folder.
The items will now be listed on the Buy Our Fruit page, as shown in the figure below.
The item assets on the Asset Listing - The listed items now need to be able to be added to the Ecommerce Form Page.
Right click on the Asset Listing Page's Default Format Bodycopy in the Asset Map and select the Edit Contents screen. - The content shown in the figure below is entered into the WYSIWYG Editor.
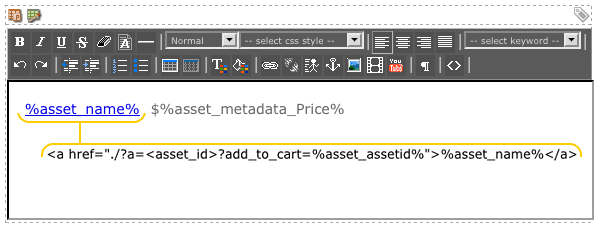 The WYSIWYG Editor on the Default Format Bodycopy
Tip: You will need to replace <asset_id> with the Asset ID of your Ecommerce Form Page. This allows the item asset to link to the e-commerce form.
Configuring the Tax Rate and Asset Purchase Source Strings
Now that the items have been listed and linked to the Ecommerce Form Page, the e-commerce form needs to be able to source the price and tax information and a tax rate needs to be added for the taxable items.
To do this:
- Right click on the Ecommerce Form Contents asset in the Asset Map and select the Details screen.
- In the Tax Name field, enter GST.
- In the Tax Rate (%) field, enter 10.
- In the Price Source field, enter %asset_metadata_Price%. This will tell the e-commerce form to find the price of the item from its Price metadata.
- In the Taxable field, enter %asset_metadata_Taxability%. This will tell the e-commerce form if the items are taxable or not by their Taxability metadata. As we have entered YES in the Taxability metadata field for all our items, they will be taxable.
Adding and Setting Up a Payment Gateway
A payment gateway needs to be added to allow users to pay for their orders.
To do this:
- Add a SecurePay Direct Post Payment Gateway under your Site, titled Payment.
- On the Details screen, in the SecurePay Account Details section enter the following generic test account details: Merchant ID: ABC001, Transaction Password: abc123.
- Also on the Details screen, in the Test Mode section, make sure Enable Test Mode is set to Yes. This will allow the payment gateway to be used for testing purposes.
Tip: To create a fully functional SecurePay Direct Post Payment Gateway you need to acquire a Merchant ID from your bank and complete a Merchant Application at the Direct Post Payments Gateway website. For more information, refer to the SecurePay Direct Post Payment Gateway chapter in the manual.
- The payment gateway needs to now be linked to the Ecommerce Form Page. To do this:
i) Right click on the Ecommerce Form Contents asset in the Asset Map and select the Details screen.
ii) In the Linked Gateway field, select the Payment payment gateway.
The e-commerce form is now linked to the payment gateway.
Creating an E-commerce Rule
To add delivery fees determined by the state or territory the products are being shipped to, an E- commerce rule needs to be applied to the State/Territory question.
To do this:
- Right click on the Ecommerce Form Page and select the Ecommerce Rules screen.
The State/Territory, Postcode and Contact Number questions will be listed on this screen, as they are either Numerical questions or questions with predetermined answers. - To create a rule for the State/Territory question, select the corresponding tick-box under the Ecom Enabled? column and click Commit.
New fields will appear in the Options column, as shown in the figure below.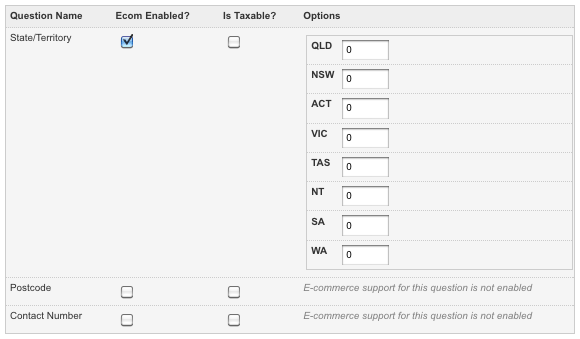
Creating an E-commerce Rule - Edit the Options fields of the State/Territory question as follows: NSW and ACT, 4.49; QLD and VIC, 6.55; TAS, NT and SA, 7.25; and WA, 8.99.
Delivery fees will now be charged depending on the answer of the State/Territory question. For example, if the fruit is being shipped within New South Wales, a delivery fee of $4.49 will be charged, while if it is being shipped to Western Australia the delivery fee will be more expensive, at $8.99.
Configuring the Recipient Email
In order to receive the details of the order, a Recipient Email must be sent to the site administrator.
To do this:
- Right click on the Ecommerce Form Contents asset in the Asset Map and select the Email Options screen.
- Navigate to the Recipient Email Format section of the screen.
- In the To field, enter the email address of the site administrator, for example, admin@squiz.com.au.
- In the From field, enter %response_<form_id>_q1% (%response_<form_id>_q6%) (where
<form_id> is the asset ID of the Delivery Details section.) This will display the user’s response
to the Name and Email questions. - In the Subject field, enter Order #%form_submission_id%. This will display the order ID.
- In the Body field, enter the keyword replacements %form_info% and %form_summary_html%, as
shown in the figure below.
This will display the order and form details including the items ordered, total cost and delivery information.
The Body section of the Recipient Email - You may also wish to configure the Receipt email to send an email to the e-commerce user.
Display Formatting of the Ecommerce Form Page
To configure the item listing on the form page of the Ecommerce Form Page asset, an Asset List Format needs to be created.
To do this:
- Right click on the Ecommerce Form Contents asset in the Asset Map and select the Display Formatting screen.
- In the Asset List Format field, enter the %item_format% keyword replacement, as shown in the figure below.
The %item_listing% keyword can now be used on the Form Bodycopy.
The Asset List Format field on the Display Formatting screen
Defining the Layout of the Ecommerce Form Page
Form Bodycopy
As there is no default layout for the form page, the Form Bodycopy must be configured to create a layout for the page.
To do this:
- Right click on the e-commerce form's Form Bodycopy in the Asset Map and select the Edit Contents screen.
- The content shown in the figure below is entered into the WYSIWYG Editor.
The e-commerce form questions, form errors, reset and submit buttons have been added to the page. The page has been given a heading and a list of the ordered items has also been added.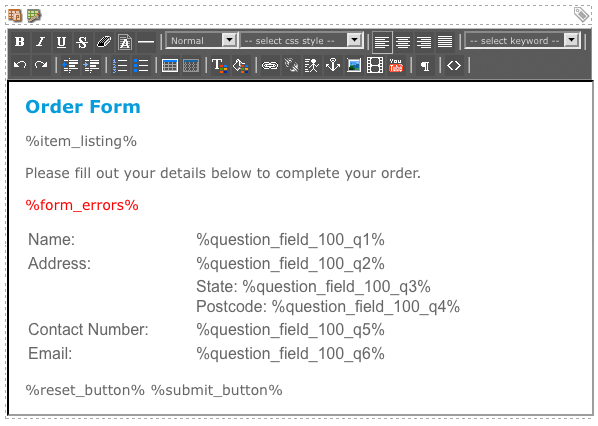
The WYSIWYG Editor on the Form Bodycopy
The new layout of the form page is shown in the figure below.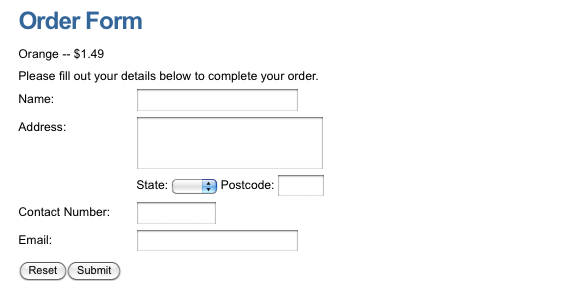
The new layout of the form page
Confirmation Bodycopy
When a user completes the e-commerce form, a confirmation page is shown for them to confirm their information and order details. As there is no default layout for the confirmation page, the Confirmation Bodycopy must be configured to create a layout for the page.
To do this:
- Right click on the e-commerce form's Confirmation Bodycopy in the Asset Map and select the Edit Contents screen.
- The content shown in the figure below is entered into the WYSIWYG Editor.
The list of ordered items, total price, included tax and form responses have been added to the page. The page has been given a heading and the confirm and cancel buttons have also been added.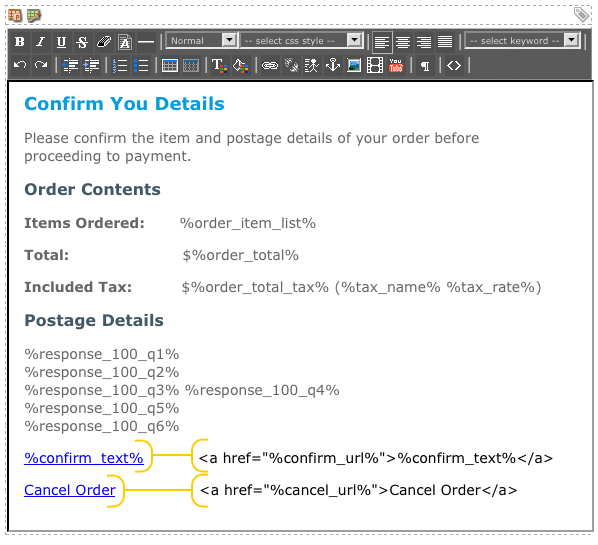
The WYSIWYG Editor on the Confirmation Bodycopy
The new layout of the confirmation page is shown in the figure below.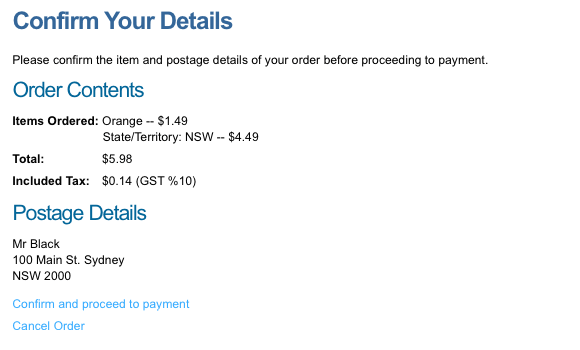
The new layout for the confirmation page
Receipt Bodycopy
Once a user has paid for their order, a receipt page is shown for them with information on the order and their payment. As there is no default layout for the receipt page, the Receipt Bodycopy must be configured to create a layout for the page.
To do this:
- Right click on the e-commerce form's Receipt Bodycopy in the Asset Map and select the Edit Contents screen.
- The content shown in the figure below is entered into the WYSIWYG Editor.
A thank you message and form summary has been added to the page.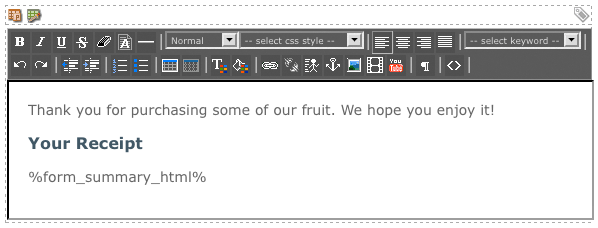
The WYSIWYG Editor on the Receipt Bodycopy
The new layout of the receipt page is shown in the figure below.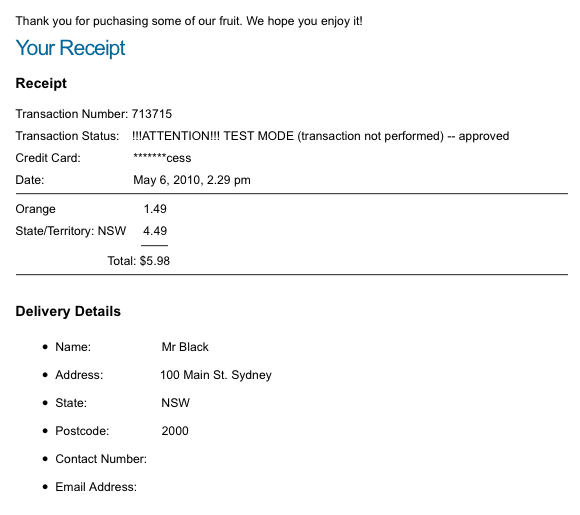
The new layout of the receipt page
How Does this E-Commerce System Work for a Public User?
Now that the E-commerce system has been set up, it is made available on the site so users can purchase the items available in the store. The checkout process that the user will go through is as follows:
- The user will browse the Buy Our Fruit page, as shown in the figure below, and determine the item they want to purchase. In this example, the user has decided to buy an Apple.

The Buy Our Fruit page - When the user clicks on the Apple item, they will be taken to the Ecommerce Form Page where they will fill out their contact details, as shown in the figure below. Once they have completed the form, they will click Submit.
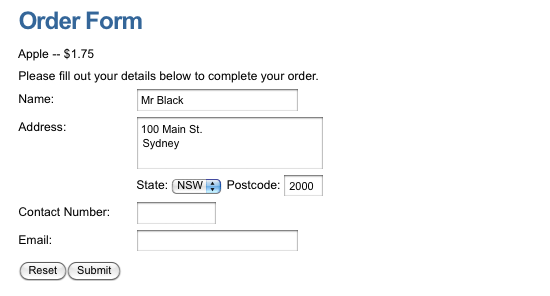
The Ecommerce Form Page of the e-commerce system - The user is taken to the Confirmation Page where they can overlook the details of their order before proceeding to the payment process. The Confirmation Page for this order is shown in the figure below.
As you can see, a delivery fee of $4.49 has been applied to the order, determined by the user’s response to the State/Territory question. The page also informs the user that the price of the Apple includes $0.16 GST. The postage details completed in the previous step are also listed on this page. When the user is satisfied these details are correct, they will click Confirm and proceed to payment.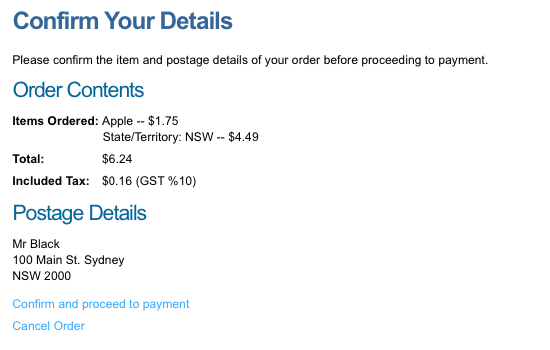
The Confirmation Page of the e-commerce system - When the user has confirmed their order details, they will be taken to the SecurePay eSec Payment Gateway, as shown in the figure below. The payment gateway will list the payment that is to be processed and allow the user to select a Valid or Invalid Card Number. Our payment gateway is currently in Test Mode meaning that no payments will be issued. When creating your own, operational e-commerce system, you will need to turn Enable Test Mode to Off on the SecurePay Direct Post Payment Gateway Details screen. For more information, refer to the SecurePay Direct Post Payment Gateway chapter in this manual.
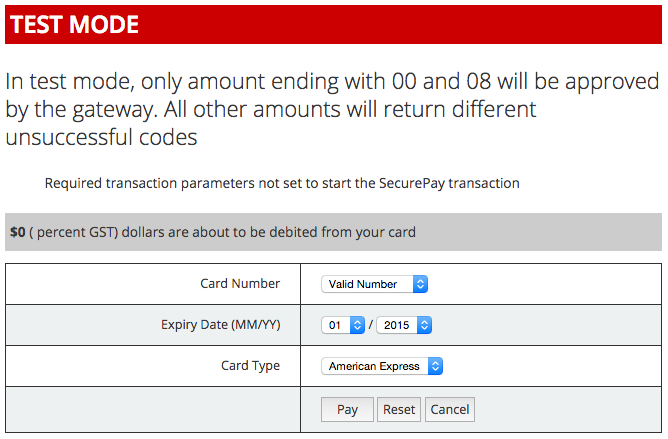
eSec SecurePay Payment Gateway in Test Mode - When the user completes the payment form and clicks Pay, the payment will process. When the payment has been processed and approved, the user will be taken to the Receipt Page, as shown in the figure below. A thank you message and order and delivery details are displayed on this page.
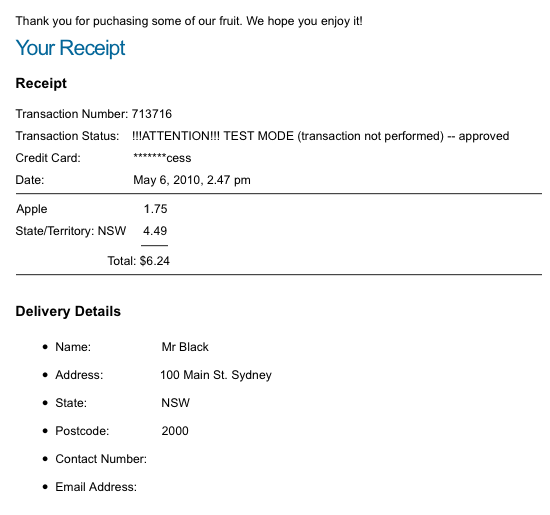
Receipt page of the Ecommerce Form Page
An Order asset will appear in the Asset Map with the information the user has entered into the form, as shown in the figures to the right and below. An email will also be sent to the administrator of the site with the order and delivery details.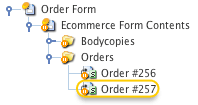
Order asset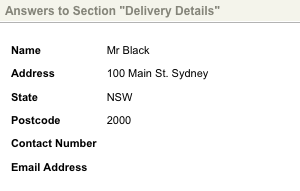
Form details in the Order asset
Final Steps
The e-commerce system is now set up with a fully functioning Ecommerce Form Page. Before making it Live to the public you should check the following things:
- The e-commerce system functions correctly and allows you to choose an item from the item Asset List, complete the e-commerce form and pay for the purchases.
- The layout of each page is correct.
- The delivery fees are calculated and displayed correctly.
- The SecurePay eSec Payment Gateway works correctly. Please note that if you are applying
this example to your own e-commerce store you will need to change the payment gateway to
Live. For more information, refer to the SecurePay Direct Post Payment Gateway chapter. - An Order asset is created and an email is sent to the administrator with the order details.
Once you have checked these things and you are happy with the way the e-commerce system works, change the Status of all the assets in the Site to Live and grant Public Read Permission.
