
How To Use an Asset Builder To Create & Edit Assets
Intermediate
10 Apr 2017 For version 5.3.0.0
This guide will take you through an example of how to create an Asset Builder, with customised layouts, that can both create new assets and also allow users to edit any assets that they have created or have write access to. We will also use a Metadata Schema to add some additional custom fields.
Our example for this tutorial will follow the creation of an events manager that is only meant for logged in users. Users will be able to create new events and then edit any existing ones they have created previously.
This tutorial assumes you have a basic understanding of the Asset Builder and Simple Edit Layout functionality in Squiz Matrix.
Configuring the Asset Builder
We'll start by creating the main components for this functionality, the Asset Builder and the Metadata Schema. These assets will be used for both the creation and the editing functionality.
- Create a new Asset Builder asset in a location that is accessible via a URL on the front-end. Let's call it, Events Manager.
- Create a new Metadata Schema (ideally in a place where your other Metadata Schemas are located in) and name it Events Schema. We'll configure this asset in the next section.
- Go to the Details screen of the Events Manager. Find the Asset Creation Settings section and configure the following fields:
- Asset Types to Create and Edit: Choose Single Calendar Event.
- Metadata Schemas to Apply: Select the Events Schema we just created. This will make this Metadata Schema get applied to a Single Calendar Event asset when it gets created by the Asset Builder.
You could leave this step out and instead apply the Metadata Schema to the create location parent of the Asset Builder, as that would also make the schema get applied to the created events. However, configuring it here will allow us to expose Metadata Fields on the creation layout because the Asset Builder will then be aware of the available fields that it can use when creating the events.
- This section should now look similar to this:

- Save the screen at this point.
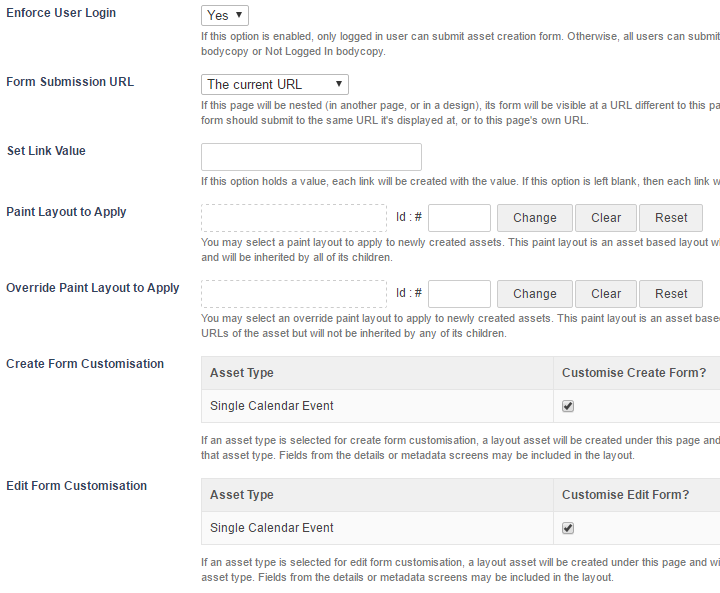
- Now find the Advanced Settings section and configure the following fields:
- Enforce User Login: Set this to Yes. We only want logged in users to create and edit events.
- Create Form Customisation: Because we save the screen to indicate that we are creating Single Calendar Events, we should now have an option here for enabling the customisation of the creation form for this asset type. Tick this checkbox.
- Edit Form Customisation: Same thing here, but for the editing form. Tick this checkbox.
- This section should now look like this:
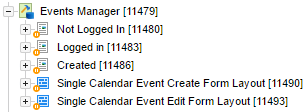
- Save the screen again. If you expand the children of the Asset Builder in the Asset Map, you should now see a Simple Edit Layout for the Create Form and one for the Edit Form layout.
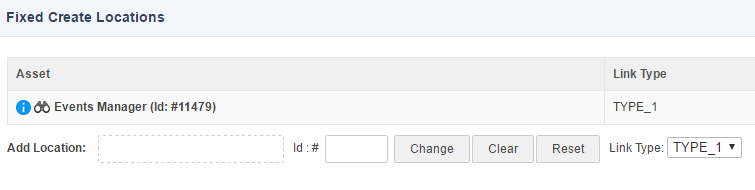
- The last thing we need to do is to set a location for the events to be created in. Go to the Create Locations screen.
- In the Fixed Create Locations section, select an asset to use as the parent for all events that get created. Usually you would probably set this under your Events or Calendar page, but for this tutorial we'll just set it to the asset ID of our Asset Builder using a Type 1 link type.
We'll configure the Simple Edit Layouts later and we'll leave the Asset Builder as is for now.
Next, we'll set up the Metadata Schema.
Configuring the Metadata Schema
In this section, we'll configure the Metadata Schema that we created previously.
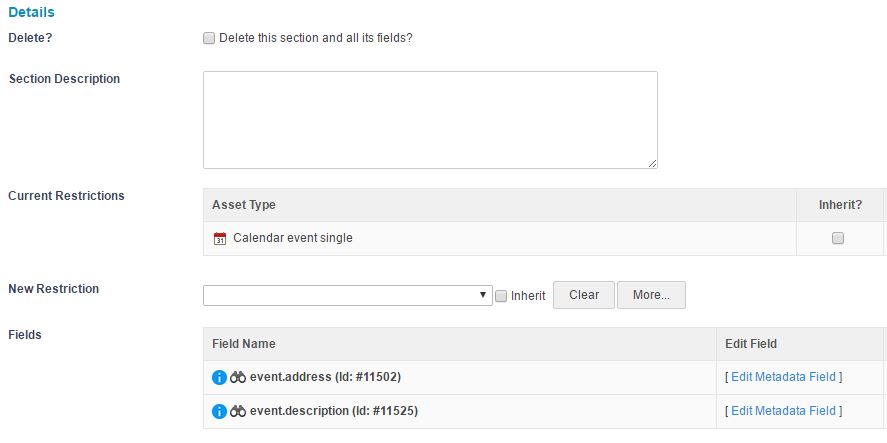
- Go to the Details screen of the Events Schema and create a new Metadata Section called Details.
- In this section, create two Text metadata fields:
- event.address: This will be used for the location address for the event.
- event.description: This will be used as a substitute for the Description field on the event's Details screen, because we'll just want users to enter simple text in a textarea and not allow any rich HTML using a WYSIWYG editor.
Feel free to add more metadata fields here if you want. For the purposes of this tutorial, we'll keep it simple though to just show you the concept of how to add custom fields to the Asset Builder layouts.
- It's always a good idea and best practice to restrict your Metadata Sections, so add a restriction the Details section for Single Calendar Events.
Hopefully, your configuration now looks something like this:
- Finally, we'll just format fields slightly. Click on the Edit Metadata Field link of the event.address field to go to the Details screen of this new metadata field.
- In the Friendly Name field, enter Address.
- Addresses are usually long, so lets set the Width to 60.
- Then go to the Details screen of the event.description field.
- Give it a Friendly Name of Description.
- We also want this field to be a textarea, set the Multi Line option in the Options section to Yes.
- Let's make this field wide as well, set the Width to 60.
That's our Metadata Schema done. Now we can start configuring the layouts of the different screens.
Configuring the Logged In Bodycopy
Because we're only letting logged in people access this Asset Builder, we can disregard the Not Logged In Bodycopy and go straight to the Logged In Bodycopy layout.
To make sure non-logged in users don't see this Bodycopy at all, make sure the Events Manager has Denied Public Read Permission on it. That way, users will first need to log in to see the Asset Builder and therefore will always see the Logged In Bodycopy and never the Not Logged In Bodycopy.
- Go to the Edit Contents screen of the Logged In Bodycopy.
- This Bodycopy will be used for both the creation form and the editing form, so we can put in keywords that power both forms into the same layout. We can also just use one Content Container for this, so if there are two created by default, you can delete the second one.
Set the Content Container to Raw HTML and add the following code:<!-- Create Layout --> <div style="color: red;">%create_error%</div> <div>%create_invite%</div> <div>%create_form%</div> <!-- Edit Layout --> <div style="color: red;">%edit_lock_error%</div> <div style="color: red;">%edit_error%</div> <div style="color: green;">%edit_success%</div> <div>%edit_invite%</div> <div>%edit_form%</div>
As of version 5.4.1.0 of Squiz Matrix, this is the default code for the Logged In Bodycopy for the Asset Builder.
Let's have a closer look at what these keywords are used for (if you are familiar with these keywords, you can skip this part).
%create_error%: This will print an error message if there are any issues with creating the asset. For example, if the user tried to create a new event without entering a name.%create_invite%: This can be used to print an intro message to the user with instructions on how to use the form to create the asset. The benefit of using a keyword for this instead of hardcoding a message, is that it will only print if the user is creating an asset, not when they are editing it.%create_form%: This will be replaced with the content of the Create Form Simple Edit Layout that we will customise later.%edit_lock_error%: This will print an error message if the user tries to edit an event that another user already has the locks on.%edit_error%: This will print all other edit form errors. For example, if there is an issue saving the changes of the event the user is editing.%edit_success%: This will print a message telling the user that the save of an edit was successful.%edit_invite%: An intro message for the editing layout. Again, the benefit here is that it will only print in the editing form.%edit_form%: This will be replaced with the content of the Edit Form Simple Edit Layout.
The content of the message keywords can be customised on the Messages screen of the Asset Builder.
Let's now configure the Created Bodycopy.
Configuring the Created Bodycopy
This layout will be used after the user has successfully created a new event. We'll want to display a message to the user that the event was successfully created and give them some options for what to do next.
- Go to the Edit Contents screen of the Created Bodycopy.
- Set the Content Container to Raw HTML and add the following code:
<p style="color: green;">Asset created.</p>
<ul>
    <li><a href="%created_asset_url%">View it</a></li>
    <li><a href="%asset_url%?edit=%created_assetid%">Edit it</a></li>
    <li><a href="%asset_url%">Create another event</a></li>
</ul>
Let's look at the keywords used for the various options.
%created_asset_url%: This will print the URL of the event asset that just got created. This will only work if the create location for the asset already has a URL applied that can be accessed on the front-end.%asset_url%?edit=%created_assetid%: This will print the URL to the current front-end asset (which in our case will be the URL of the Asset Builder) and a query string with asset ID of the event that was created. By passing the?edit=query, it will activate the%edit_X%keywords in the Logged In Bodycopy we created earlier, and thus load the Edit Form Simple Edit Layout.%asset_url%: This will just print a URL back to the original state of the Asset Builder, the create screen.
Configuring the Create Form Layout
Now it's time to customise the layout for the creation form that users will use to create new event assets.
- Go to the Edit Contents screen of the Single Calendar Event Create Form Layout.
- Set the Content Container to Raw HTML.
- In the website design of our example, we're using the Bootstrap framework, so the code we are using below is tailored to those CSS styles and classes. Feel free to customise the HTML layout to suit your own site's design needs.
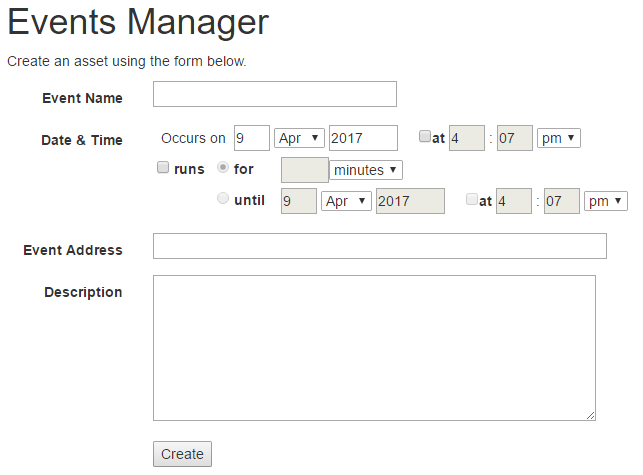
Enter the following code for the create layout:<div class="form-horizontal"> <div class="form-group"> <label for="%details-F_id%" class="col-sm-2 control-label">Event Name</label> <div class="col-sm-10"> %details-F_name% </div> </div> <div class="form-group"> <label for="%details-F_id%" class="col-sm-2 control-label">Date & Time</label> <div class="col-sm-10"> %details-F_start_end% </div> </div> <div class="form-group"> <label for="%details-F_id%" class="col-sm-2 control-label">Event Address</label> <div class="col-sm-10"> %metadata-F_11502% </div> </div> <div class="form-group"> <label for="%metadata-id_F_11525%" class="col-sm-2 control-label">Description</label> <div class="col-sm-10"> %metadata-F_11525% </div> </div> <div class="form-group"> <div class="col-sm-offset-2 col-sm-10"> %commit_button_clean^replace:Save:Create% </div> </div> </div>We won't go into detail about the keywords used in here, as they should be straight forward if you are familiar with Simple Edit Layout keywords. The one thing worth mentioning here though is that we've used a keyword modifier on the Commit button so that the button text becomes "Create" instead of "Save".
You can use keyword modifiers on the other keywords as well to do things like add classes and attributes to the input fields. For example, if I want a text field to have a different class, I could use
%details-F_name^replace:sq-form-field:form-control%. More examples of this are available in the next section.
That's our creation layout done. Preview the Events Manager in a new window now and you should hopefully see something like this:
Let's move on to the editing layout.
Configuring the Edit Form Layout
The editing layout can usually be very similar to the creation layout. In our example however, we'll customise our editing layout a bit more to show you how you can use certain keyword modifiers to change the styles of the various fields. We'll also add one extra field, the Status selector.
- Go to the Edit Contents screen of the Single Calendar Event Edit Form Layout.
- Set the Content Container to Raw HTML.
- The following code uses the same structure as the creation layout, but with several keyword modifiers to change the look and feel.
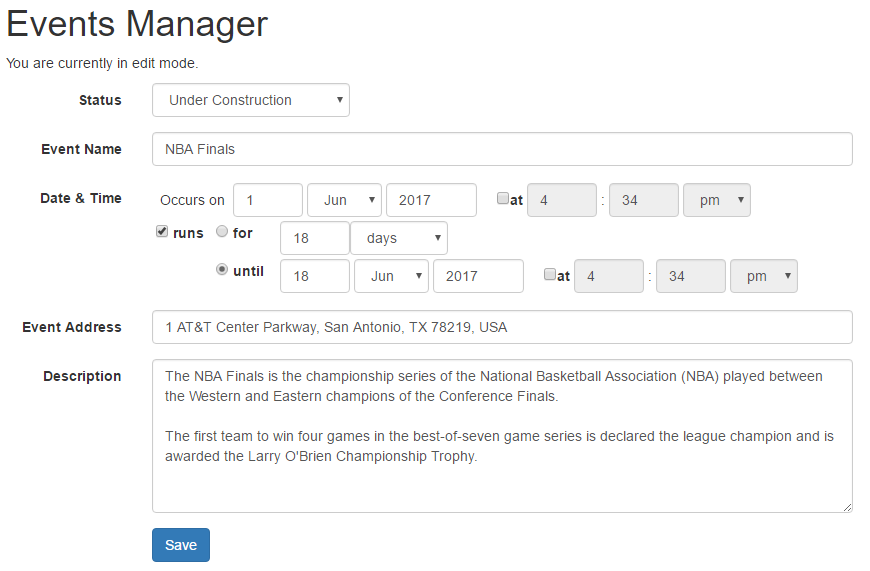
This is the code we'll use for our editing layout:<div class="form-horizontal"> <div class="form-group field_status-selection"> <label for="calendar_event_single_%asset_assetid%_change_status" class="col-sm-2 control-label">Status</label> <div class="col-sm-10"> %details-F_status_change^replace:selected">:selected">{asset_status_description} ^replace:"sq-form-field":"form-control" style="display\: inline; width\: auto;" ^replace:\r\n|\n|\r:^replace:select>.*:select>% </div> </div> <div class="form-group"> <label for="%details-id_F_name%" class="col-sm-2 control-label">Event Name</label> <div class="col-sm-10"> %details-F_name^replace:sq-form-field:form-control% </div> </div> <div class="form-group"> <label class="col-sm-2 control-label">Date & Time</label> <div class="col-sm-10"> %details-F_start_end^replace:5ex:auto ^replace:"sq-form-field" style=":"form-control" style="display\: inline; ^replace:"sq-form-field" type="text":"form-control" type="text" style="display\: inline; width\: auto" ^replace:"sq-form-field" id:"form-control" style="display\: inline; width\: auto" id ^replace:select class="sq-form-field":select class="form-control" style="display\: inline; width\: auto"% </div> </div> <div class="form-group"> <label for="%metadata-id_F_11502%" class="col-sm-2 control-label">Event Address</label> <div class="col-sm-10"> %metadata-F_11502^replace:sq-form-field:form-control% </div> </div> <div class="form-group"> <label for="%metadata-id_F_11525%" class="col-sm-2 control-label">Description</label> <div class="col-sm-10"> %metadata-F_11525^replace:sq-form-field:form-control% </div> </div> <div class="form-group"> <div class="col-sm-offset-2 col-sm-10"> %commit_button_clean^replace:sq-form-field:btn btn-primary^replace:Save% </div> </div> </div>As you can see, there are a lot of keyword modification going on here. Based on your situation, it sometimes might be easier and better to customise this layout using custom CSS and JS instead.
If we now create an asset using the Events Manager on the front-end and then click on the Edit it link, as configured in our Created Bodycopy, we should now see a similar (but prettier) layout:
There you have it. We've created an Asset Builder that can be used to let users create and edit their event assets.
You could now extend this even further by using an Asset Listing to list all assets the logged in user has write access to, with each asset listed having a link to edit it in the Events Manager.
You can download the assets used in this tutorial below and import them into your own Matrix system using the Import Assets from XML Tool.