
How To Use Edge Side Include Tags With Squiz Edge
Intermediate
11 Dec 2017 For version 5.4.0.0
This tutorial will take you through a basic example of how you can use Matrix to take advantage of the ESI capabilities in Squiz Edge (or any other caching layer that supports them) to display cached conditional content within your site.
The example we'll use is to print different "aside" content in the design, based on what section of the site the user is viewing a page from.
In order to start using ESI functionality in Squiz Edge, you need to make sure that ESI processing is enabled for your site on the Squiz Edge network configuration by a system administrator.
What is Squiz Edge?
Squiz Edge is a globally distributed content delivery and caching network created by Squiz. It was born out of industry wide issues where website owners need to:
- Deliver a fast web experience to end users, no matter where they are located
- Provide dynamic &/or personalised content to globally distributed users
We won't go into the details around the Squiz Edge network in this article, but it is recommended that you have a basic understanding of what it is and specifically of how ESI tags work, which you can find plenty of info about on the web:
- https://en.wikipedia.org/wiki/Edge_Side_Includes
- https://www.w3.org/TR/esi-lang
- https://github.com/pintsized/ledge/#edge-side-includes
- Squiz Edge Video
- https://www.squiz.net/technology/cloud
To find out if your site is using Squiz Edge, you can simply inspect the response headers of one your pages and see if they contain the via header with squizedge.net in it, for example:
via: 1.1 squizedge.net
In fact, matrix.squiz.net is running behind Squiz Edge!
Setting up the design
The site design we'll be using in the example is based on the sample Project Template that you can download from the Templates area of the Matrix Community site.
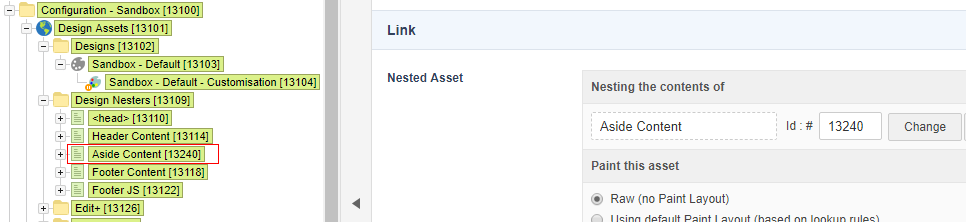
The first thing we'll do, is to nest in a Standard Page to sit under the left-column menu for our aside content to live.
- Start by creating a new Standard Page somewhere under the Nested Content folder. Name it something appropriately, like "Aside Content".
- Make the page Live and set the Content Type to Raw HTML.
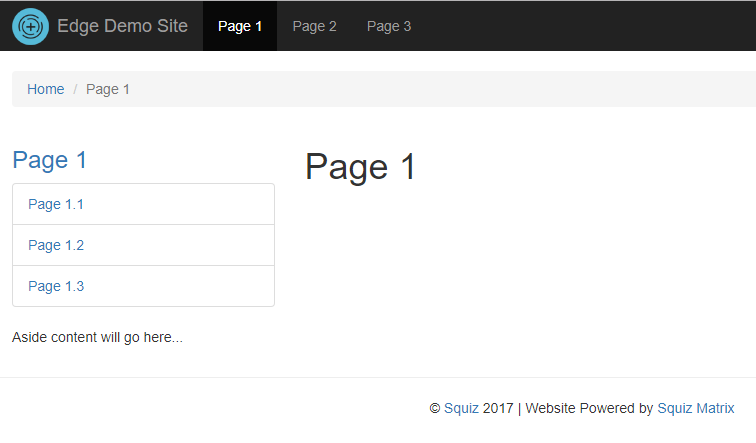
- For now, we'll just add some placeholder content:
<p>Aside content will go here...</p>
- Next, edit the Parse File of the main Design and find the closing
</div><!--.sub-nav-wrapper-->tag. - Just after this div, add a new Nest Content Design Area, which is where we'll nest our page in. Let's call it, "aside_content".
<mysource_area id_name="aside_content" design_area="nest_content"/>

- After saving the Parse File, go to the Customisation screen, customise the aside_content Design Area, and choose our Aside Content page as the asset to nest in.
If we now preview one of the pages within the site, we should now see the sample "Aside content will go here..." text located just after the left-col menu:
Creating the content
Next, we'll create some content for us to include in the aside area. This will be based on the section of the site a page is being viewed in, so we'll also change the names of our first level pages in our template site to be a bit more interesting.
- Change the name and the web path for each of the 3 top level pages of the site to the following:
- Services -
/services - About -
/about - News -
/news
The web path here is important, as that's the value we'll be checking against to figure out what section of the site the user is in.
- Services -
- Next, we'll create the actual HTML page that we'll be linking in to our ESI tag. There is a folder in the Project Template structure called "ESI", so lets create a Standard Page in there called "Promo Content (ESI)".
It's important that wherever you create this page, that is has a browseable URL that you can use to view the page on the frontend with.
- Make the page Live and set the Content Type to Raw HTML.
- This content area will hold all the possible content that can appear as our "promo content". We'll be using the choose | when | otherwise technique to conditionally display the content. We'll just add some content for the Services area to start with, which we'll do if the URL of the frontend page resides within the
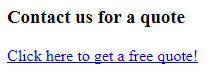
/servicessection of the site. To do that, we'll add the following code snippet into the Raw HTML area:<!--@@ /services content @@--> <esi:choose> <esi:when test="$(ESI_ARGS{section}) == 'services'"> <div class="panel panel-default"> <div class="panel-heading"> <h3 class="panel-title">Contact us for a quote</h3> </div> <div class="panel-body"> <p><a href="#">Click here to get a free quote!</a></p> </div> </div> </esi:when> </esi:choose>The test we are using is to check if the$(ESI_ARGS{section})ESI variable is equal to "services". If it is, we'll print some additional HTML into the content area. - If we now Save the content and preview the Promo Content (ESI) page, we should see no content at all, simply because our test would be evaluating as false. To see our conditional content, we need to pass an ESI based query string to the URL of the page, like this:
https://example.com/esi/promo-content-esi?SQ_ASSET_CONTENTS_RAW&esi_section=services
Note that we are also passing the ?SQ_ASSET_CONTENTS_RAW query parameter in order to view the page without any Designs or Paint Layouts applied as we just want to print the contents of the Standard Page, nothing else. Previewing the page with that URL query string should give us something like this:
We now have our content ready to be Edge Side Included into our design.
Including the content into the design
We'll now update our Aside Content page that is currently printing our placeholder content of "Aside content will go here..." and replace it with our ESI content.
- Go to the contents screen of the Aside Content page and replace the content there with the following ESI tag:
<!-- ESI Start - Promo Content -->
<esi:include src="./?a=1234?SQ_ASSET_CONTENTS_RAW&esi_section=services"/>
<!-- ESI End - Promo Content -->
Make sure to replace the./?a=1234part with the correct asset ID of your Promo Content (ESI) page asset. - If we preview any page of our site now, we should see our promo content being included in the left column:
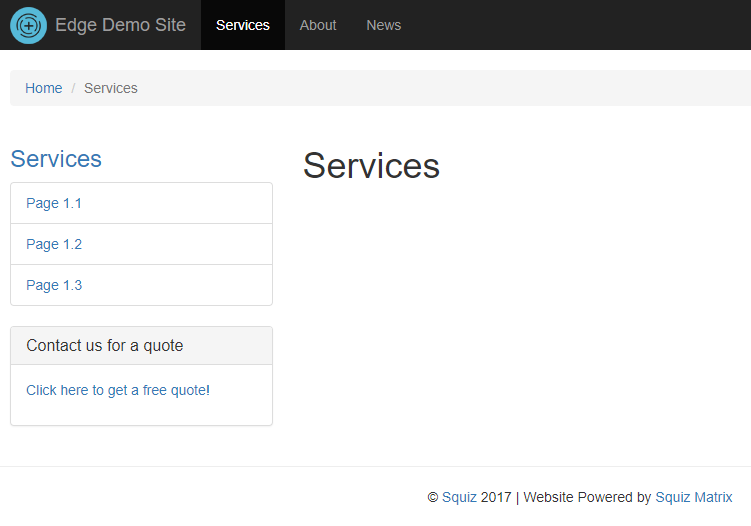
However, the content is being included on all pages because we've hard-coded theesi_section=servicespart of the ESI URL. We'll need to make this dynamic. - We only want the Services promo content to be included on our pages that live in
/servicessection of the site. To do that, we need to make theesi_sectionvariable dynamic using a keyword. The value we want to use is the first level page's web path and to extract that value we can use the following keyword:%frontend_asset_linking_lineage^index:1^as_asset:asset_web_path%
If the %asset_linking_lineage% keyword is not available in your version of Matrix, there are other keyword combinations that you can try to use to get this value, for example %frontend_asset_url_path^explode:/^index:1%.
- Let's update our ESI tag using this keyword as the
esi_sectionquery parameter value.
<!-- ESI Start - Promo Content -->
<esi:include src="./?a=1234?SQ_ASSET_CONTENTS_RAW&esi_section=%frontend_asset_linking_lineage^index:1^as_asset:asset_web_path%"/>
<!-- ESI End - Promo Content -->
If we now preview the various pages of our site, we should only see the Services promo content appearing for pages that live under the /services URL path and nowhere else.
Adding more conditional content
So far we've only added some content for the Services section of the site. However, we can add other content for the other areas using the same technique.
You can simply just add more <esi:choose> tags into the Promo Content (ESI) page content, one for each section:
<!--@@  /services content  @@-->
<esi:choose>
    <esi:when test="$(ESI_ARGS{section}) == 'services'">
       Services promo content here...
   </esi:when>
</esi:choose>

<!--@@  /about content  @@-->
<esi:choose>
    <esi:when test="$(ESI_ARGS{section}) == 'about'">
       About promo content here...
   </esi:when>
</esi:choose>

<!--@@  /news content  @@-->
<esi:choose>
    <esi:when test="$(ESI_ARGS{section}) == 'news'">
       News promo content here...
   </esi:when>
</esi:choose>
You might also want to have content that should appear for multiple sections, in which case, you can use the OR operator within the test= attribute:
<!--@@  /about and /news content  @@-->
<esi:choose>
    <esi:when test="($(ESI_ARGS{section}) == 'about') | ($(ESI_ARGS{section}) == 'news')">
       About and News promo content here...
   </esi:when>
</esi:choose>
That's it! You've now got conditional content being included in your design using the power of ESI tags.
You can keep using this implementation example to further explore the possibilities of ESI tags using other test conditions such as the $(HTTP_COOKIE{ cookie }) and $(HTTP_ACCEPT_LANGUAGE{ language }) variables.
Make sure to get in touch with Squiz for more information on Squiz Edge and how you can use it to optimise the performance and functionality of your Squiz Matrix site.