What's New
Last Updated: 02 Feb 2018
page_whats_new|asset|5.4.5.0
The What's New page is used to show a list of assets that have been created, updated or published between either a specified date range or rolling time period. For example, you can enter a date range (for example, between the 1st January 2010 and 17th January 2010) to show all asset results from between the specified dates. You can also appoint a time period, such as the current day or week or a period relative to the current date (3 days in the past) to create a "rolling" What's New page.
Bookmarks to the headings on this page:
The What's New page is an extension on the Asset Listing page. All of the functionality that is available on the Asset Listing page is also available on the What's New page. This chapter will only cover the additional features of the What's New page.
Once your What's New page is created, you can configure its settings on its associated asset screens. The majority of these screens are the same or similar to those for a Standard Page and an Asset Listing Page and are described in either this manual or the Asset Screens manual. In this chapter we will describe the Details and Date Ranges screens, which are different for a What's New page.
Details Screen
The Details screen allows you to configure various settings including what types of asset to list, where to find the assets to list and the date range to use. The Details screen of the What's New page is similar to the Details screen for an Asset Listing page with the only difference being the Date Range Settings section, which is outlined in the section below. For more information on any other sections and fields, refer to the Details Screen chapter in this manual.
Date Range Settings
This section allows you to set the date range and time periods to use for the What's New page.
The fields that are available in this section are as follows.
- Date Field: select which date to use for the What's New page. The options that are available are as follows:
- Created Date: this is the date that the asset was created.
- Last Updated Date: this is the last time the Commit button was pressed on the asset.
- Last Published Date: this is the last time the Status of the asset was changed to Live.
- Range Type: select whether to use a specified or set date range for the What's New page. The options that are available are as follows:
- Specified Range: this option allows you to specify a date range for the What's New page using the Date Range From and Date Range To fields. By default, this option is selected in the Range Type field.
- Today: this option will set the What's New page to display results for the current day. If this option is set, any information entered into the Date Range From and Date Range To fields will be ignored.
- This Week: this option will set the What's New page to display results for the current week (starting on Monday). If this option is set, any information entered into the Date Range From and Date Range To fields will be ignored.
- This Month: this option will set the What's New page to display results for the current month. If this option is set, any information entered into the Date Range From and Date Range To fields will be ignored.
- This Year: this option will set the What's New page to display results for the current year. If this option is set, any information entered into the Date Range From and Date Range To fields will be ignored.
- Date Range From: this field allows you to enter the starting date of the Date Range. To enter the Date Range starting date, select the type of Date Period to enter. The fields available will vary depending on the Date Period type selected. The following options are available:
- Fixed date and time: this option allows you to enter a fixed starting date and time for the Date Range.
Use the fields available to enter the starting date for the Date Range, for example, 1 Apr 2010 1:30:00 will set the start date to the 1st of April 2010 at 1:30 am. A calendar is available to assist you when selecting the date. - Period relative to the current date and time: this option allows you to set the starting date of the Date Range as a time period relative to the current date and time.
Use the fields available to enter the starting date for the Date Range. You can select any number of minutes, hours, days, weeks, months or years in the past or future. For example, 10 hours in the future will set the start date to ten hours from the current time. - Period relative to a fixed time on the current date: this option allows you to set the start date of the Date Range to a fixed time on a time period relative to the current date.
Use the fields available to enter the starting date for the Date Range. You can specify a time on any selected number of days, weeks, months or years before or after the current day. For example, 2 days before the current day at 17:00:00 will set the start date to2 days ago from today, at 5:00 pm.
- Fixed date and time: this option allows you to enter a fixed starting date and time for the Date Range.
- Date Range To: this field allows you to enter the ending date of the Date Range. To enter the Date Range ending date, select the type of Date Period to enter. The fields available will vary depending on the Date Period type selected. The following options are available:
- Fixed date and time: this option allows you to enter a fixed ending date and time for the Date Range.
Use the fields available to enter the ending date for the Date Range, for example, 17 Apr 2010 18:00:00 will set the end date to the 17th of April 2010 at 6:00 pm.calendar is available to assist you when selecting the date. - Period relative to the current date and time: this option allows you to set the ending date of the Date Range as a time period relative to the current date and time.
Use the fields available to enter the ending date for the Date Range. You can select any number of minutes, hours, days, weeks, months or years in the past or future. For example, 15 days in the past will set the end date to fifteen days ago from today. - Period relative to a fixed time on the current date: this option allows you to set the ending date of the Date Range to a fixed time on a time period relative to the current date.
Use the fields available to enter the ending date for the Date Range. You can specify a time on any selected number of days, weeks, months or years before or after the current day. For example, 1 week after the current day at 12:00:00 will set the end date to 1 week from today, at midday.
- Fixed date and time: this option allows you to enter a fixed ending date and time for the Date Range.
Date Ranges Screen
The Date Ranges screen allows you to set up a list of date ranges. The user can then select which date range they want to view on the What's New page. For example, you can create a list where the user can select to view the assets that were created in today, this week, this month or this year.
Adding a New Date Range to the List
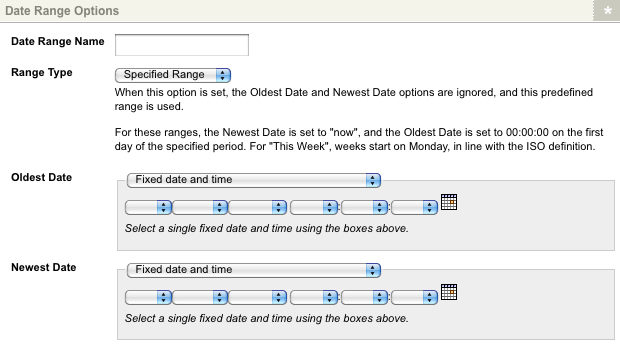
By default, no date ranges will be added to the list, as shown in the figure below. To add a new date range, click the Add New Range box and click Commit. Additional fields will appear in the Date Range Options section, as shown in the figure below.

The Date Range Options section
Set up the following fields for the new date range.
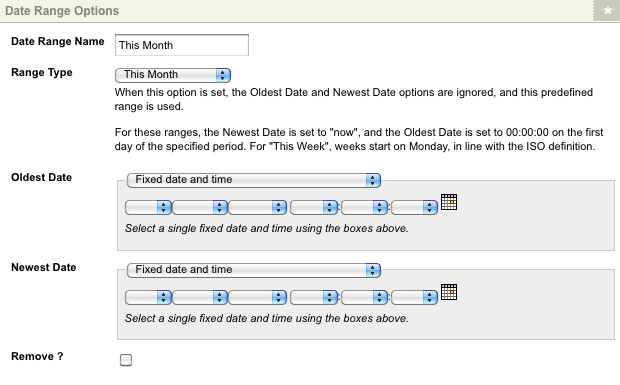
- Date Range Name: enter a name for the new date range, for example This Month. This will appear in the list to the user.
- Range Type: select whether to use a specified or set date range. The options available in this field are similar to those in the Range Type field on the Details screen. For more information, refer to the Details screen section of this chapter.
- Oldest Date: this field allows you to enter the starting date of the date range. The options available in this field are similar to those in the Date Range From field on the Details screen. For more information, refer to the Details screen section of this chapter.
- Newest Date: this field allows you to enter the ending date of the date range. The options available in this field are similar to those in the Date Range To field on the Details screen. For more information, refer to the Details screen section of this chapter.
Once you have filled out these fields, click Commit. The date range will be added to the Customise Range list in the Current Date Ranges section, as shown in the figure below.

The Current Date Ranges section
You can add as many dates ranges as you want to the list.
Editing a Date Range in the List
To edit a date range that you have added to the list, select it from the Customise Range list in the Current Date Ranges section of the screen. The fields for that date range will appear in the Date Range Options section, as shown in the figure below.

The Date Range Options section
Edit the date range using the fields provided and click Commit.
Deleting a Date Range from the List
To delete a date range that you have added to the list, select it from the Customise Range list in the Current Date Ranges section of the screen. The fields for that date range will appear in the Date Range Options section. Click the Remove box within this section and click Commit. The date range will be removed from the list.
Showing the Date Range List on the What's New Page
To show the date range list on the What's New page, right click on the Page Contents Bodycopy in the Asset Map and select Edit Contents. In the WYSIWYG Editor, add either of the following keyword replacements:
- Date Range List: this will show the list of date ranges in the drop down list. When a user selects a value from the list, the What's New page will be updated to show the assets for that date range.
- Date Range List Linked: this will show each date range as a hyperlink. When a user clicks on the hyperlink, the What's New page will be updated to show the assets for that date range.
Example of Setting Up a What's New Page
To understand how to set up a What's New page, consider the following example.
We want to create a What's New page for our Site called Latest Pages. It should show the pages that have been published in the last 5 days. To set up this What's New page, follow the steps outlined below.
- Create a What's New page called Latest Pages under your Site.
- Right click on the What's New page in the Asset Map and select Details. Change the following fields on this screen:
- Date Field: select Last Published Date.
- Range Type: select Specified Range.
- Date Range From: select Period Relative to the Current Date and Time and enter 5 days in the past.
- Date Range To: select Period Relative to the Current Date and Time and enter 0 days in the past.
- Asset Types to List: select Pages and click inherit.
- Root Nodes: select the Site.
- Click Commit.
- Right click on the Page Contents Bodycopy in the Asset Map and select Edit Contents.
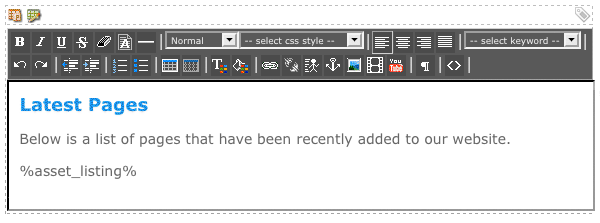
- Format what to show for the page. An example of what you can do is shown in the figure below.

The WYSIWYG Editor on the Page Contents Bodycopy - Right click on the Default Format Bodycopy in the Asset Map and select Edit Contents.
- Format what to show for each asset in the list. An example of what you can do is shown in the figure below.

The WYSIWYG Editor on the Default Format BodycopyWhen you preview the Latest Pages page, the assets that have been published will appear, as shown in the figure below.

A preview of the What's New page
